There are many scenarios in which downloading all WordPress media files becomes required.
It could be when you create a brand new website and you want to keep those valuable files in place. Or you simply want to create a backup for media files during WordPress migration. You can also regularly export a full media library archive in case you’re about to install a new plugin or update WordPress core and you don’t want strange conflicts.
What to look for when downloading WordPress media?
Downloading the WordPress media library helps keep your media files safe when testing new updates or staging new developments.
While it is possible to go through each image, download it one by one, and then sort them out, that manual work is not enjoyable at all. It is even very time-consuming when you have thousands of media files. You would want something fast, simple, and neat.
This article is going to show you 4 straightforward ways to download the entire library of your WordPress media files. It works perfectly for FileBird document library as well.
With a few clicks and a full copy of your WordPress media library will be ready on your computer or cloud storage services with minimum effort.
Now let’s hop on the first method.
1. Use FileBird plugin
FileBird is a media library organizer plugin that has frequent new features from time to time. And Download media folder is one of them!
This plugin is super useful for media-heavy websites like cuisine blogs, fashion showcases, photographer websites, or designer portfolios.
How to download your entire WordPress media library?
FileBird comes with a user-friendly interface that allows you to drag and drop to organize all media files. After you categorize them the way you want, you can easily use the right-click to access its smart context menu.
From the menu dropdown, click Download to download the entire selected folder.
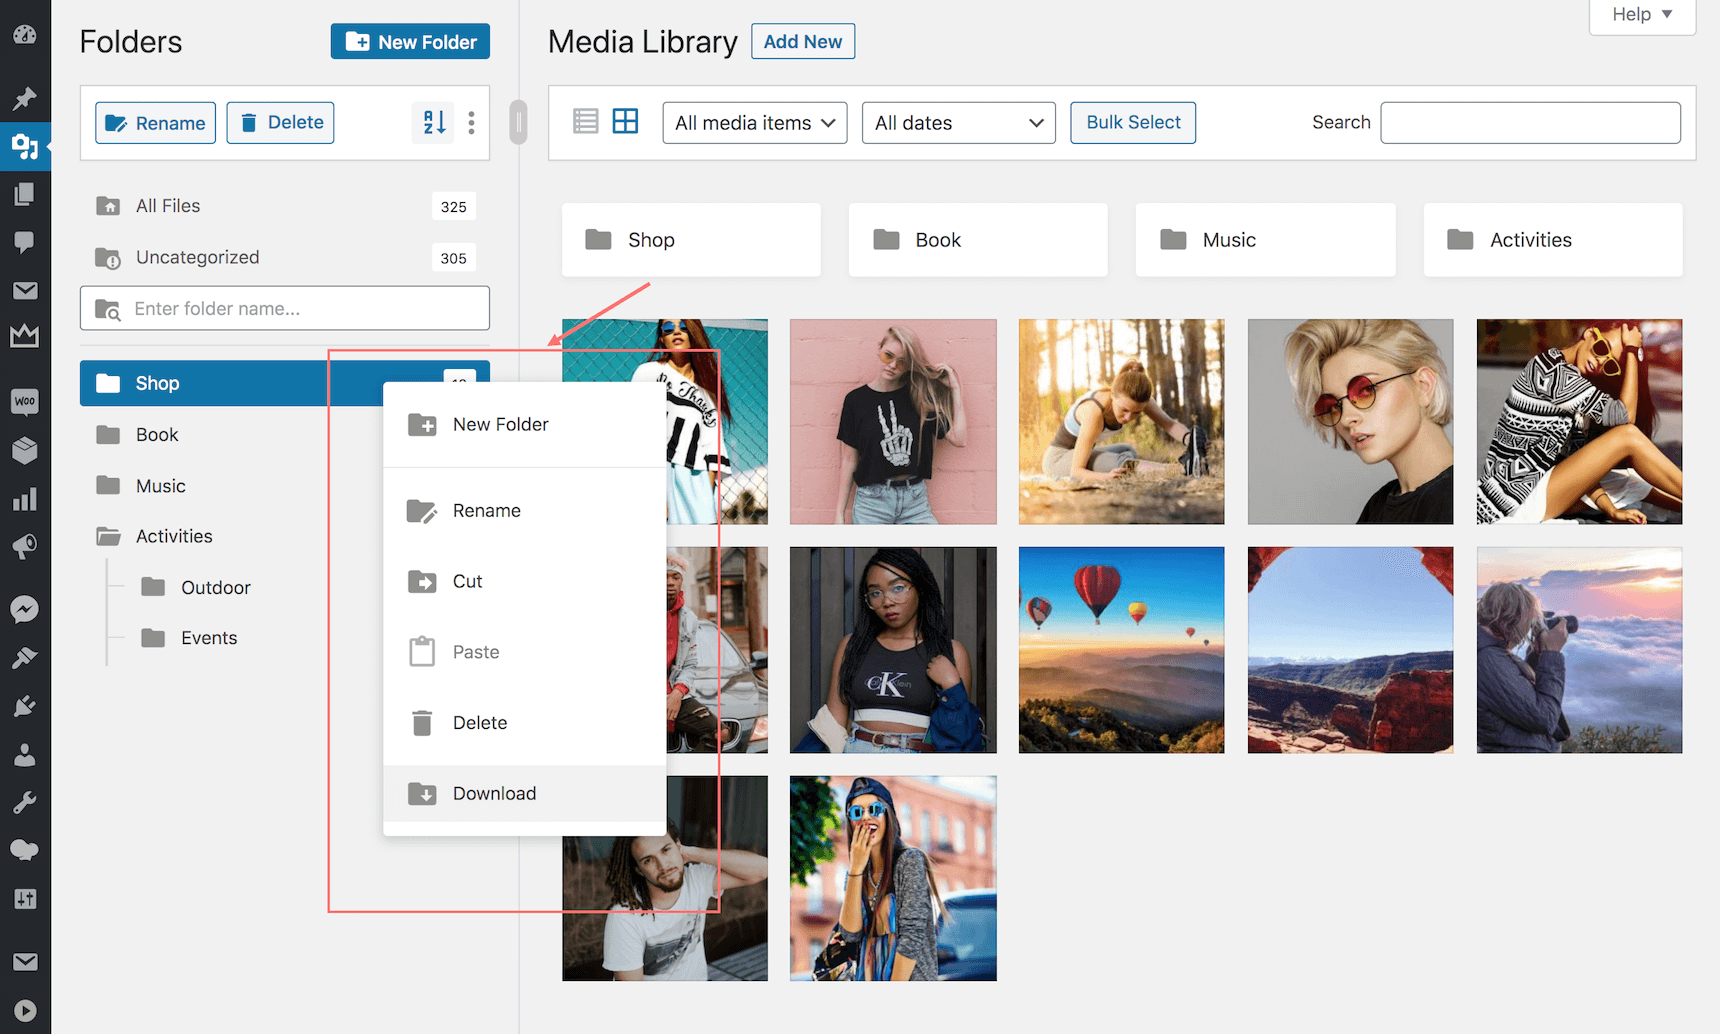
This action will save your media folder in a ZIP file, keeping the same folder structure of the main folders and nested folders. With this method, you can scientifically keep the media data backup in the organized order — thus very easy to check back and sort them out.
Pros:
The exported ZIP file contains the original files only. By excluding the WordPress auto-generated image sizes, you will have the main files and the structure of media folders to save on your hard disk or cloud drive services.
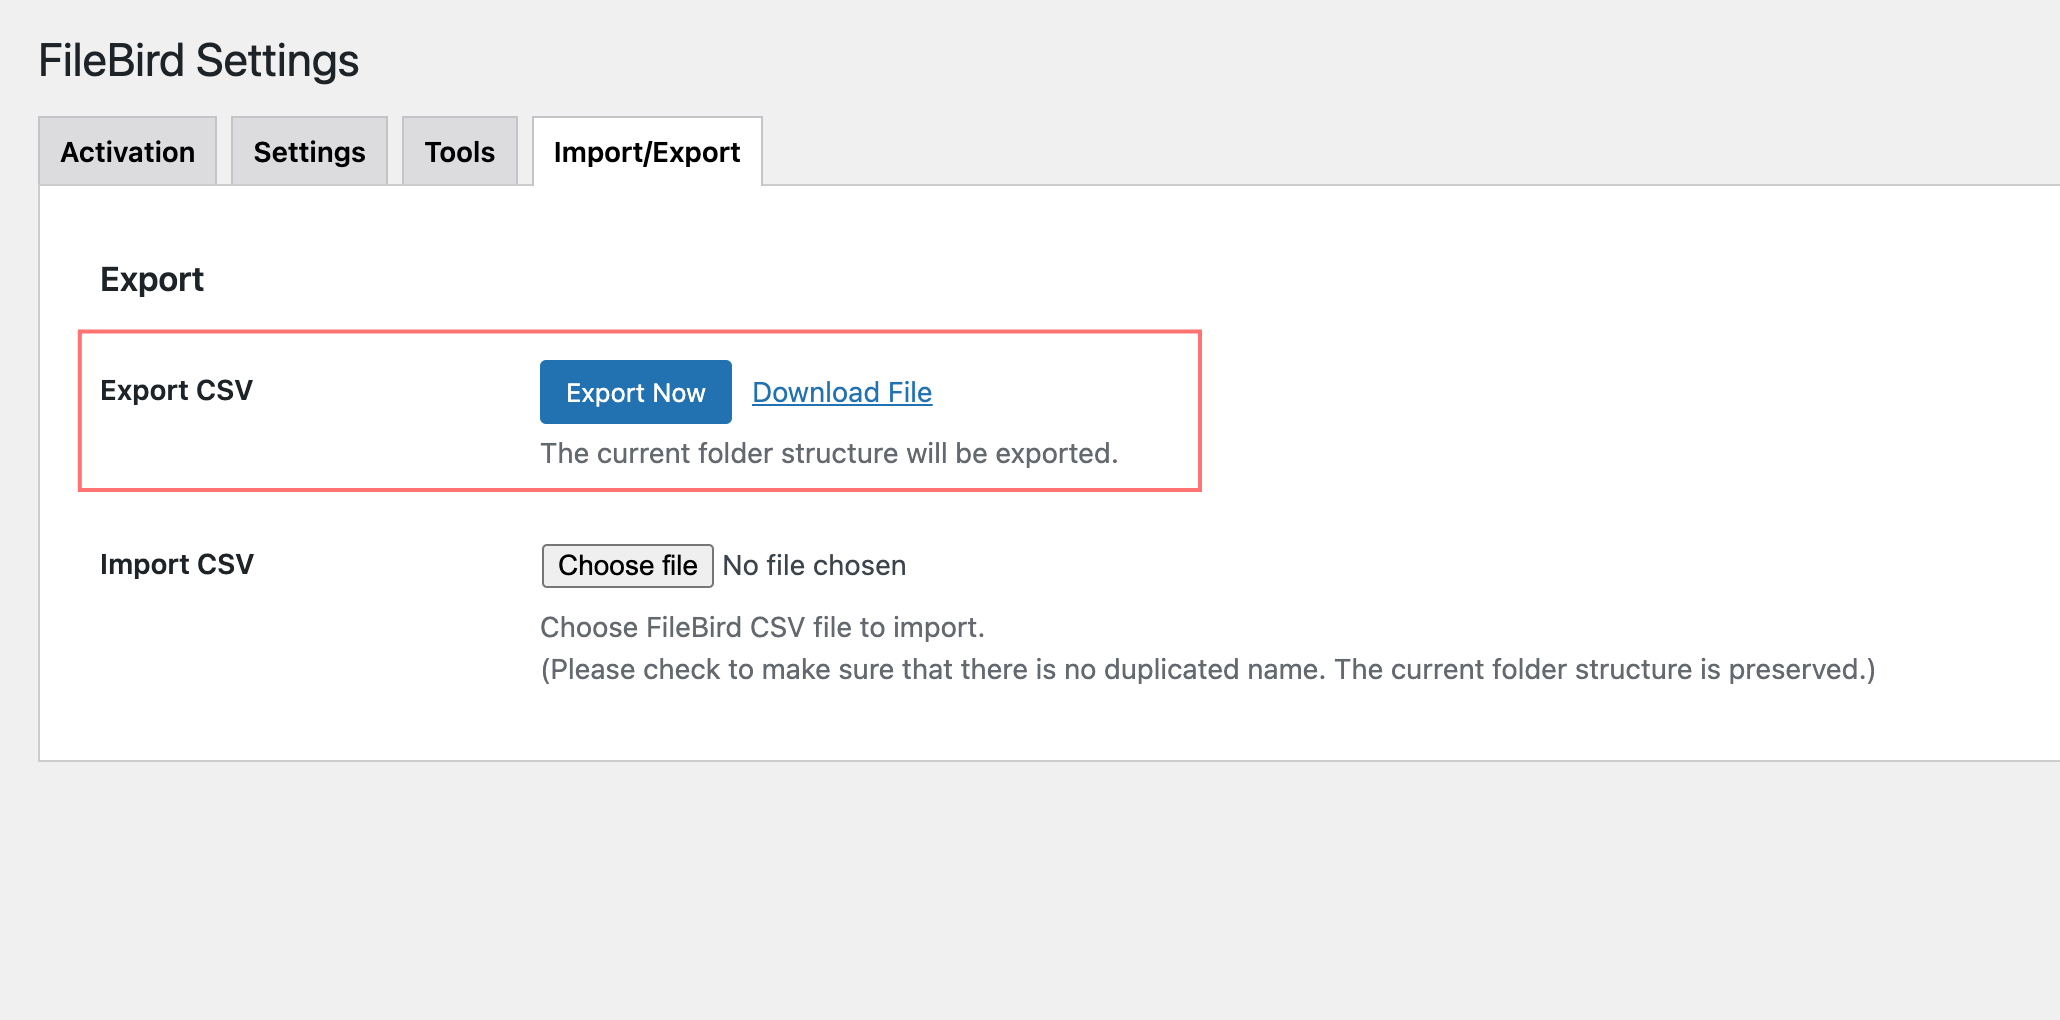
How to export WordPress media library folders?
CSV export/import is an exclusive feature of FileBird Pro to allow you to keep a backup of your folder organization. Imagine that you’ve done the hard work of categorizing thousands of files into folders in your development environment, and now you want to migrate them to your live website.
In order to export your WordPress media library structure, go to FileBird Settings > click Export and then Download File. This will be saved as a CSV file to your computer.
After that, just go to your live website, import the CSV file, and you’re good to go. You will be able to restore the folder organization on your main website in just a few clicks.
Additionally, with FileBird, users can import categories and folders directly from other plugins on their site, making it easy to switch over.
FileBird organizes more than just media files; it also handles folders for custom post types, including posts, pages, templates, and landing pages.

This feature is available in FileBird – WordPress Media Library Folders (Pro Version).
Learn more about the comparison FileBird Free vs Pro.
Now let’s head over to other download/export options for your WordPress media library.
2. Filester File Manager Pro plugin
Filester is actually a handy yet versatile file manager for all of your WordPress server files. The free version already offers all the professional features you need to manage WP configuration.
In this section, I’m going to show you only a tiny built-in feature to help you see how it works in exporting the WordPress media library.
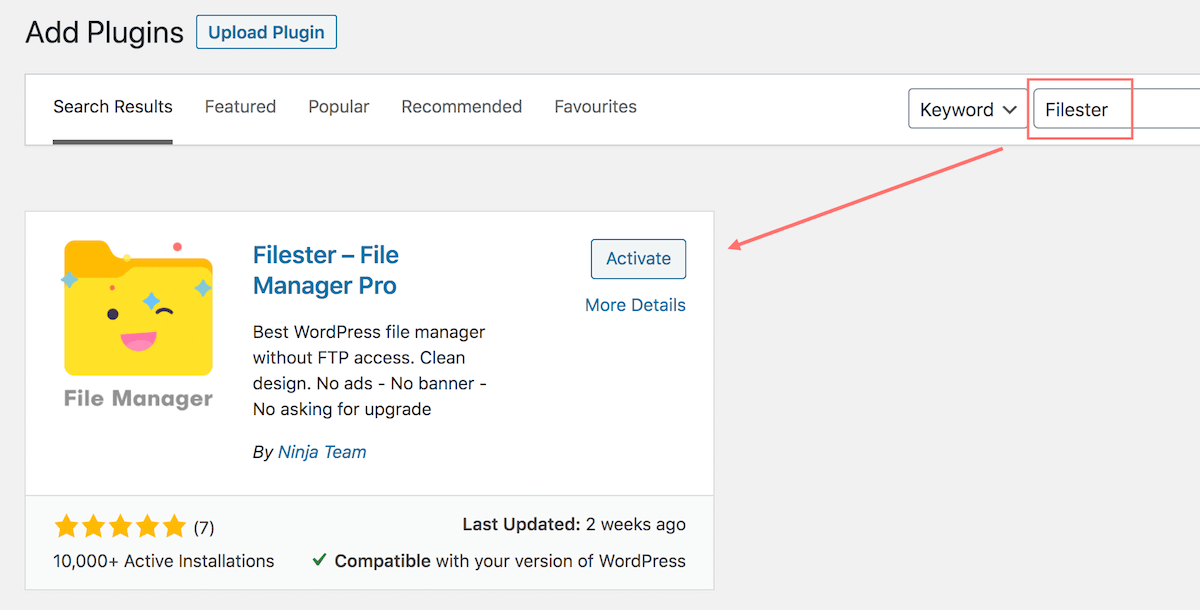
To start off, you need to go to your WordPress admin dashboard and install Filester – File Manager Pro.
This can be done easily by running a search of Filester > Activate the plugin.
After activation, the Filester plugin creates a new menu item File Manager on the left sidebar. And you can click on it to view all the files that compose your current WordPress website.
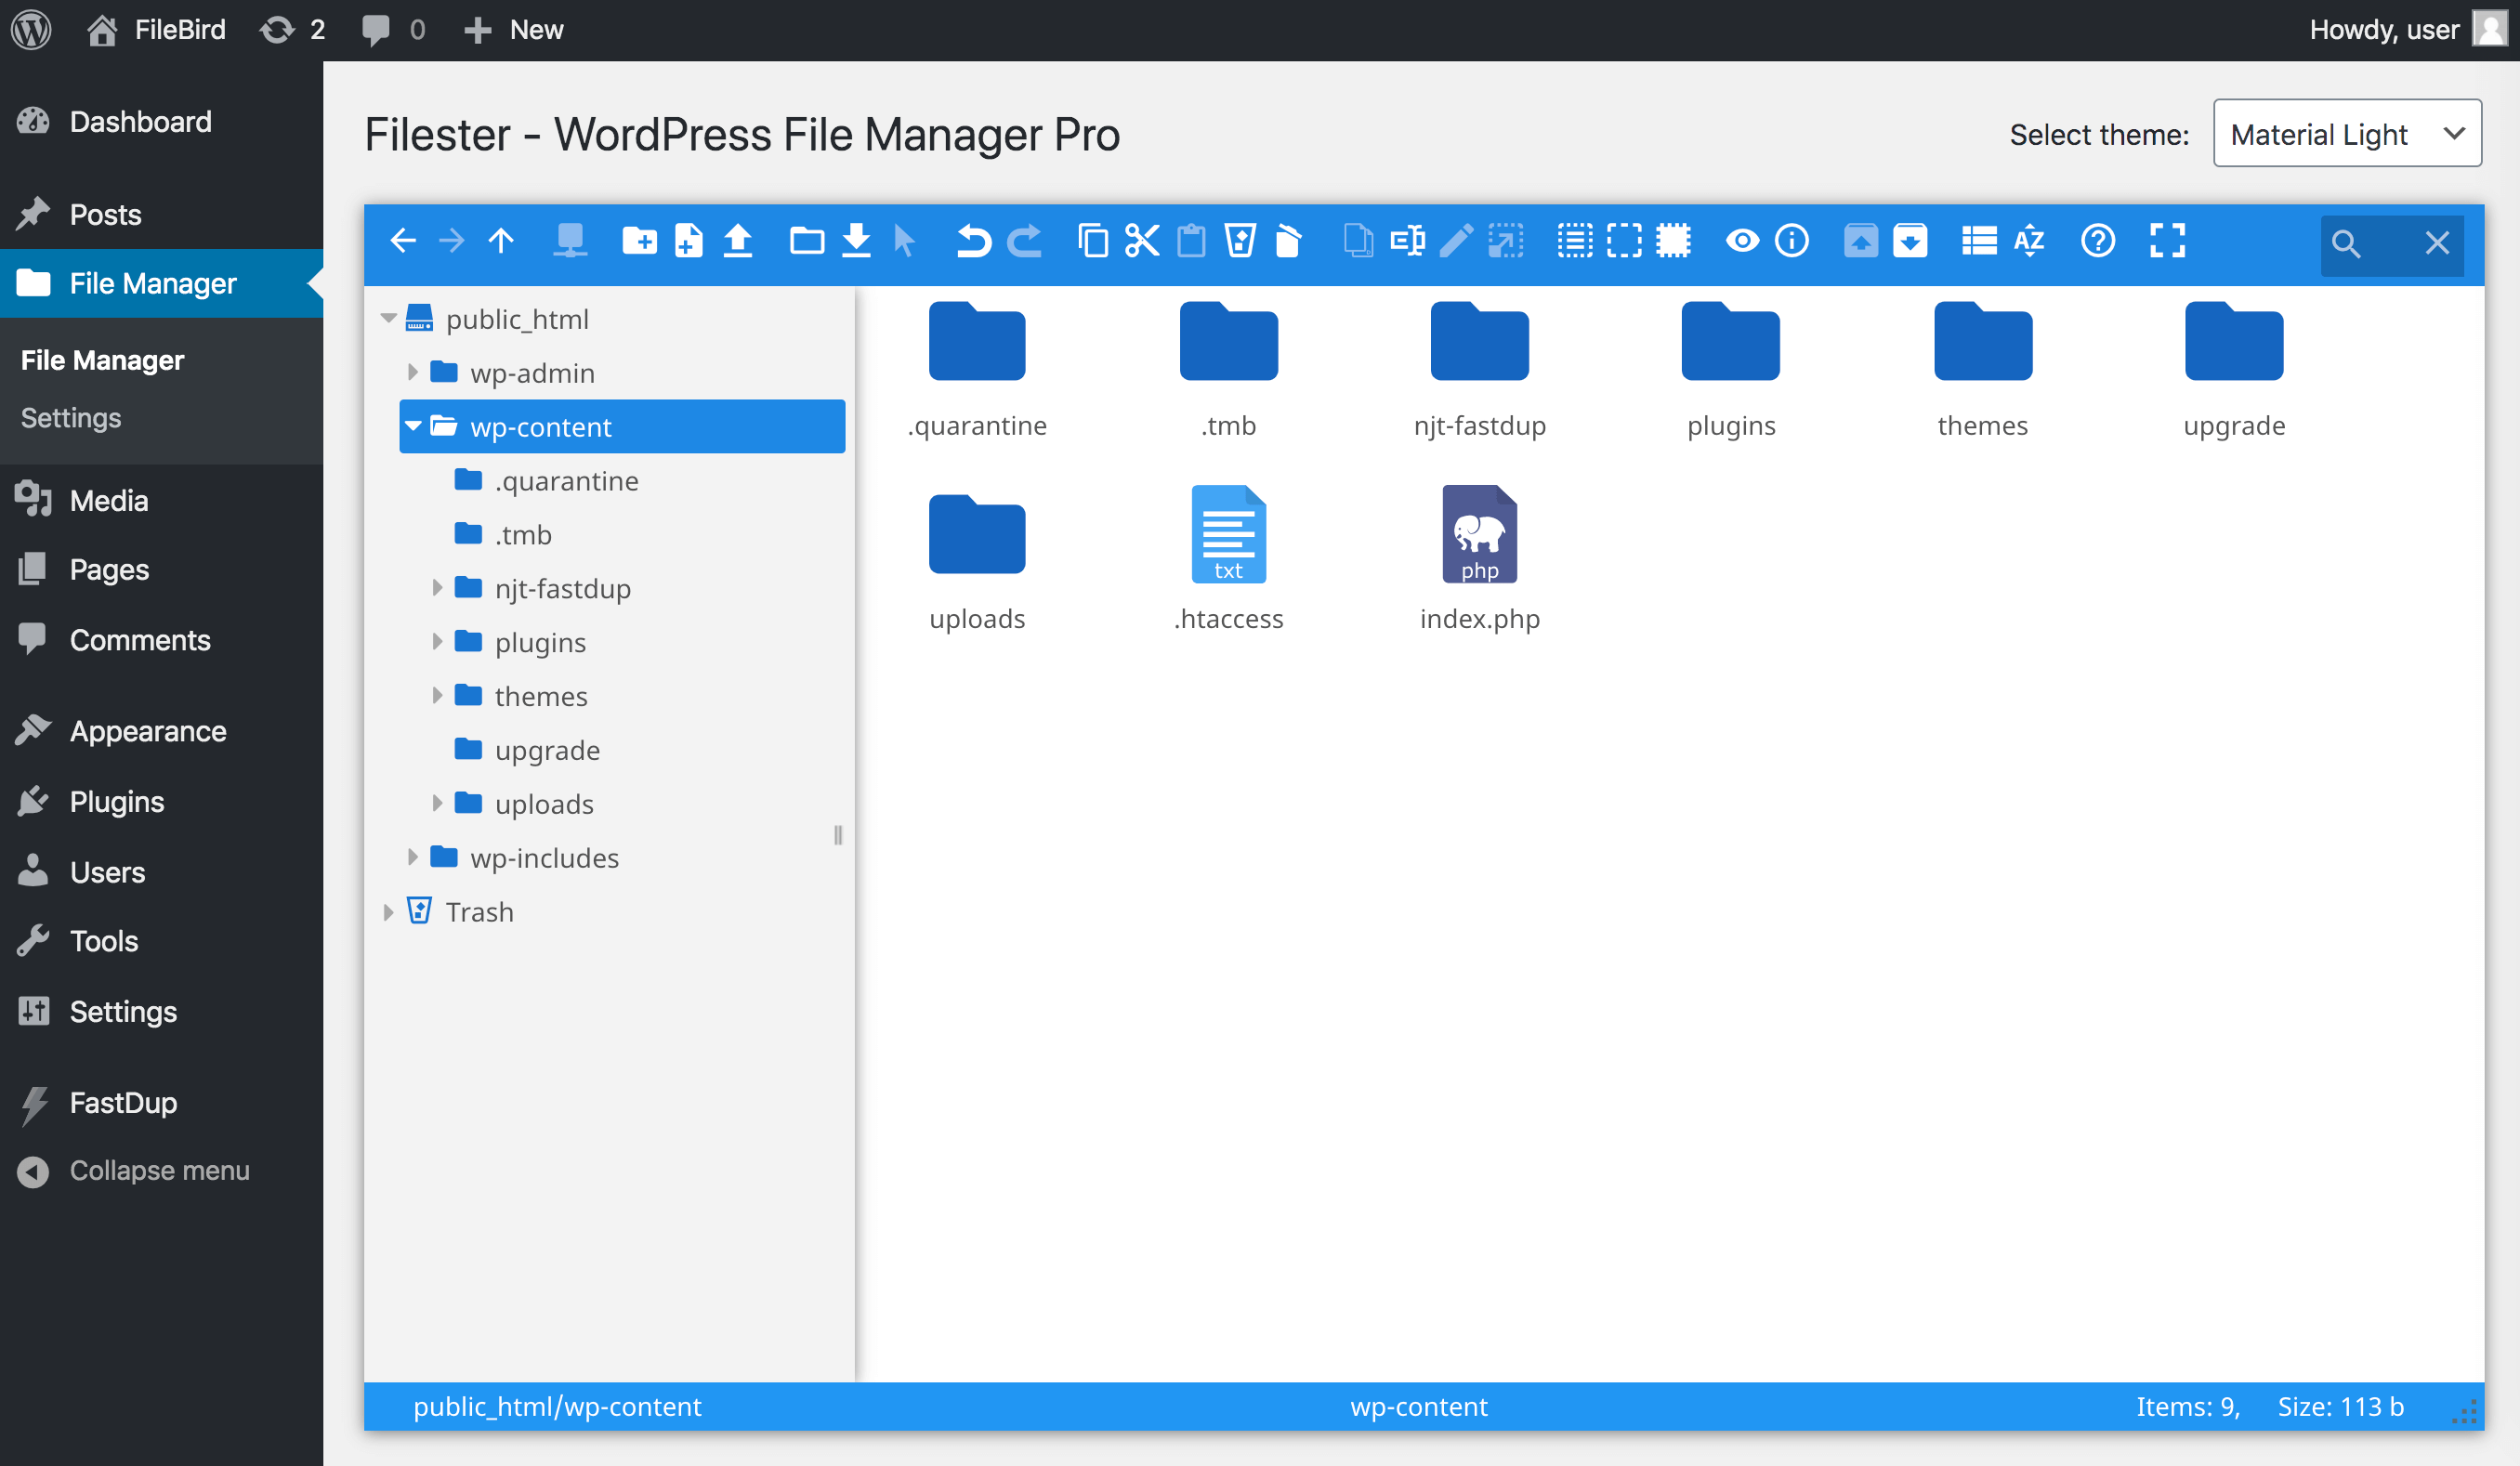
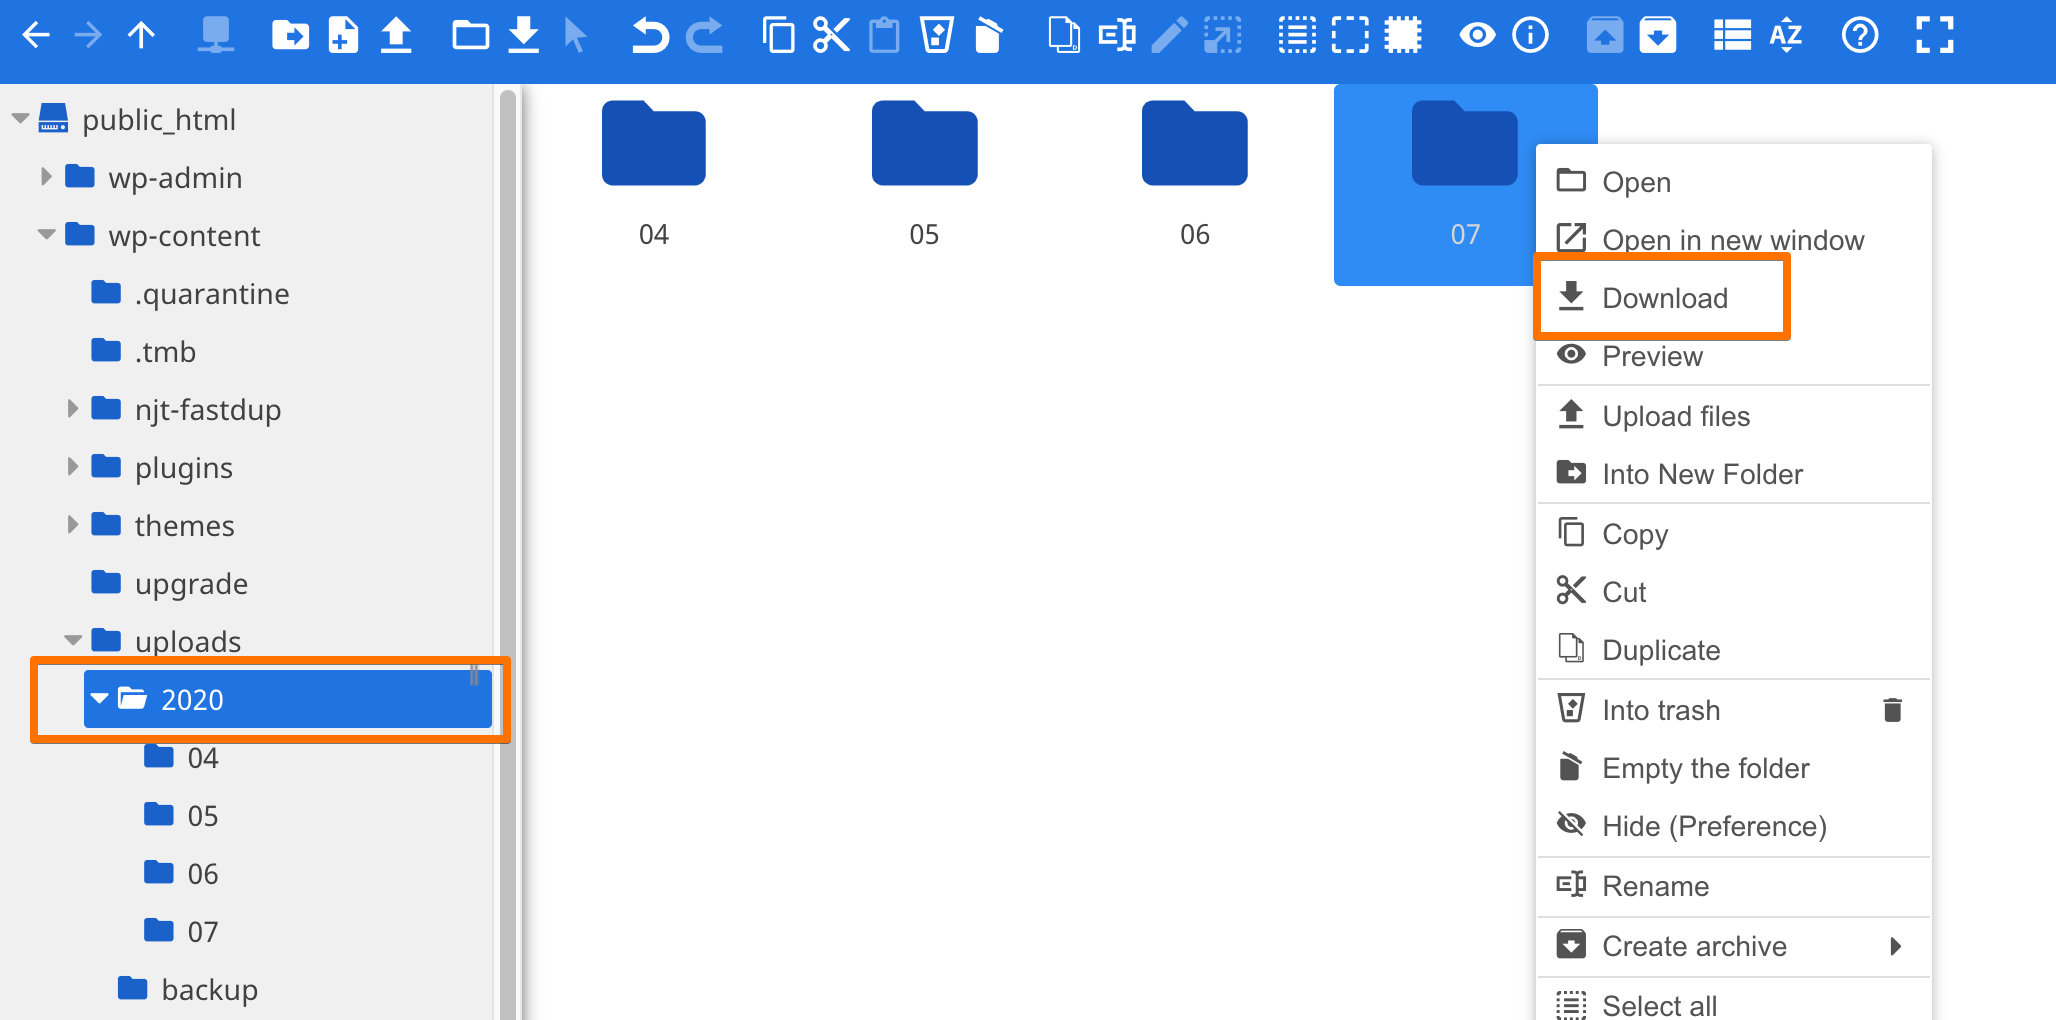
This user-friendly interface allows you to browse files and folders with ease like on your computer. I would expect it’ll be extremely simple for you to find the folder for all WordPress media files. By clicking on the folder wp-content > uploads, you’ll locate all your media files arranged in folders by year and month.
By now you can just right-click the folder you want to download and choose Download to get them automatically downloaded to your computer in a ZIP file.
Quick note:
In case you have many other addons and page builders installed in your WordPress, you’ll see their own folders nested under wp-content/uploads/, too.
For instance: elementor folder & css folder in the screenshot below.
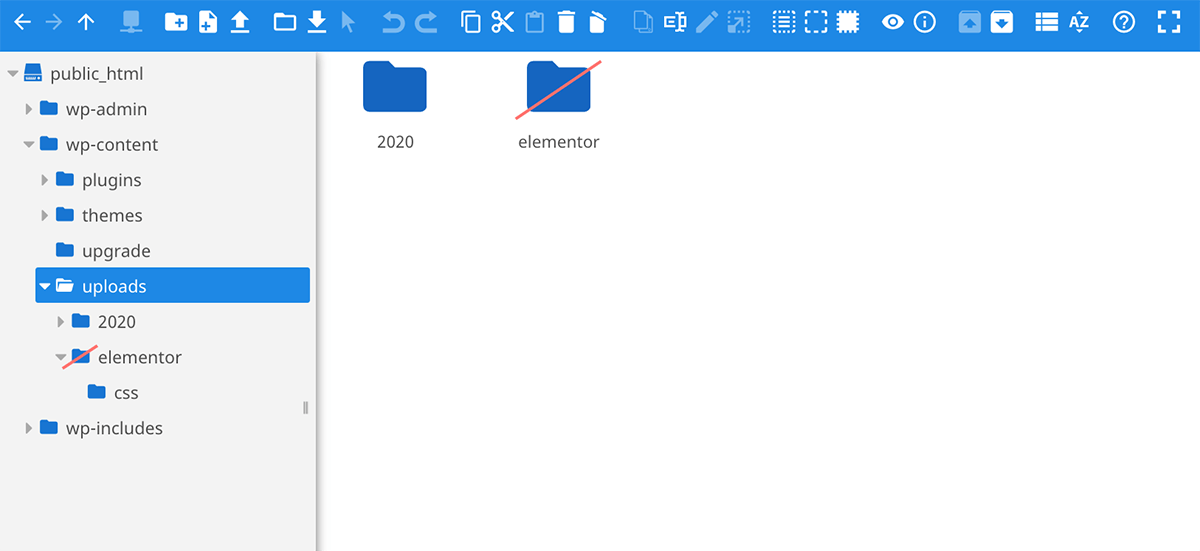
You can just ignore them and only choose the folder you want to keep an extra copy.
Pros:
This download process right from WordPress file manager is conducted very fast and smoothly.
It maps the whole year- and month-based folder structure so that you can import to the new site correctly.
Cons:
If you haven’t set up user role permissions in File Manager, other users might interfere with your settings.
FREE DOWNLOADThat said, for those who are more of a techie, refer to the second method below.
3. Use FTP Client
Your next option is to use the FTP (file transfer protocol), which requires you to download an FTP client and install it on your computer. FTP is basically a method of transferring files between a client (your computer) and a server (your WordPress website).
FTP is, of course, an excellent solution for WordPress management.
Caution: However, if you’re just taking the first steps in creating a blog on WordPress, it’ll be quite frustrating with this file transfer software’s user interface. When you accidentally move or make changes to a file or folder, it can easily break your website.
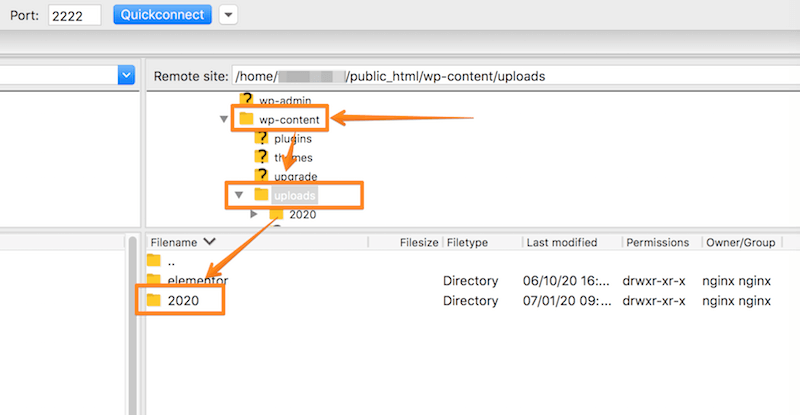
Now that when you feel confident to run FTP client, connect to Site Manager and navigate to your WordPress contents via the path /public-html/wp-content/uploads/.
Every time you upload images and videos to WordPress media library, they will be stored in year- and month- based folders. This system follows a chronological order which means the files uploaded in the year 2020 will be stored in the folder 2020, and so on and so forth for the subfolder of months.
You can do almost the same as the operations of Filester, let’s find the folder you want to keep and right-click to download them.
Pros:
You don’t have to install a new plugin just for the export.
Cons:
Can be hard for WordPress starters.
4. Use Export Media Library Plugin
If you have an excellent collection to be backed up on your system or simply because you need the media files for immediate distribution, using a dedicated plugin for this task is very much recommended. With this WordPress media library export plugin, you can utilize it as a one-off and then uninstall it once all media files are safely stored.
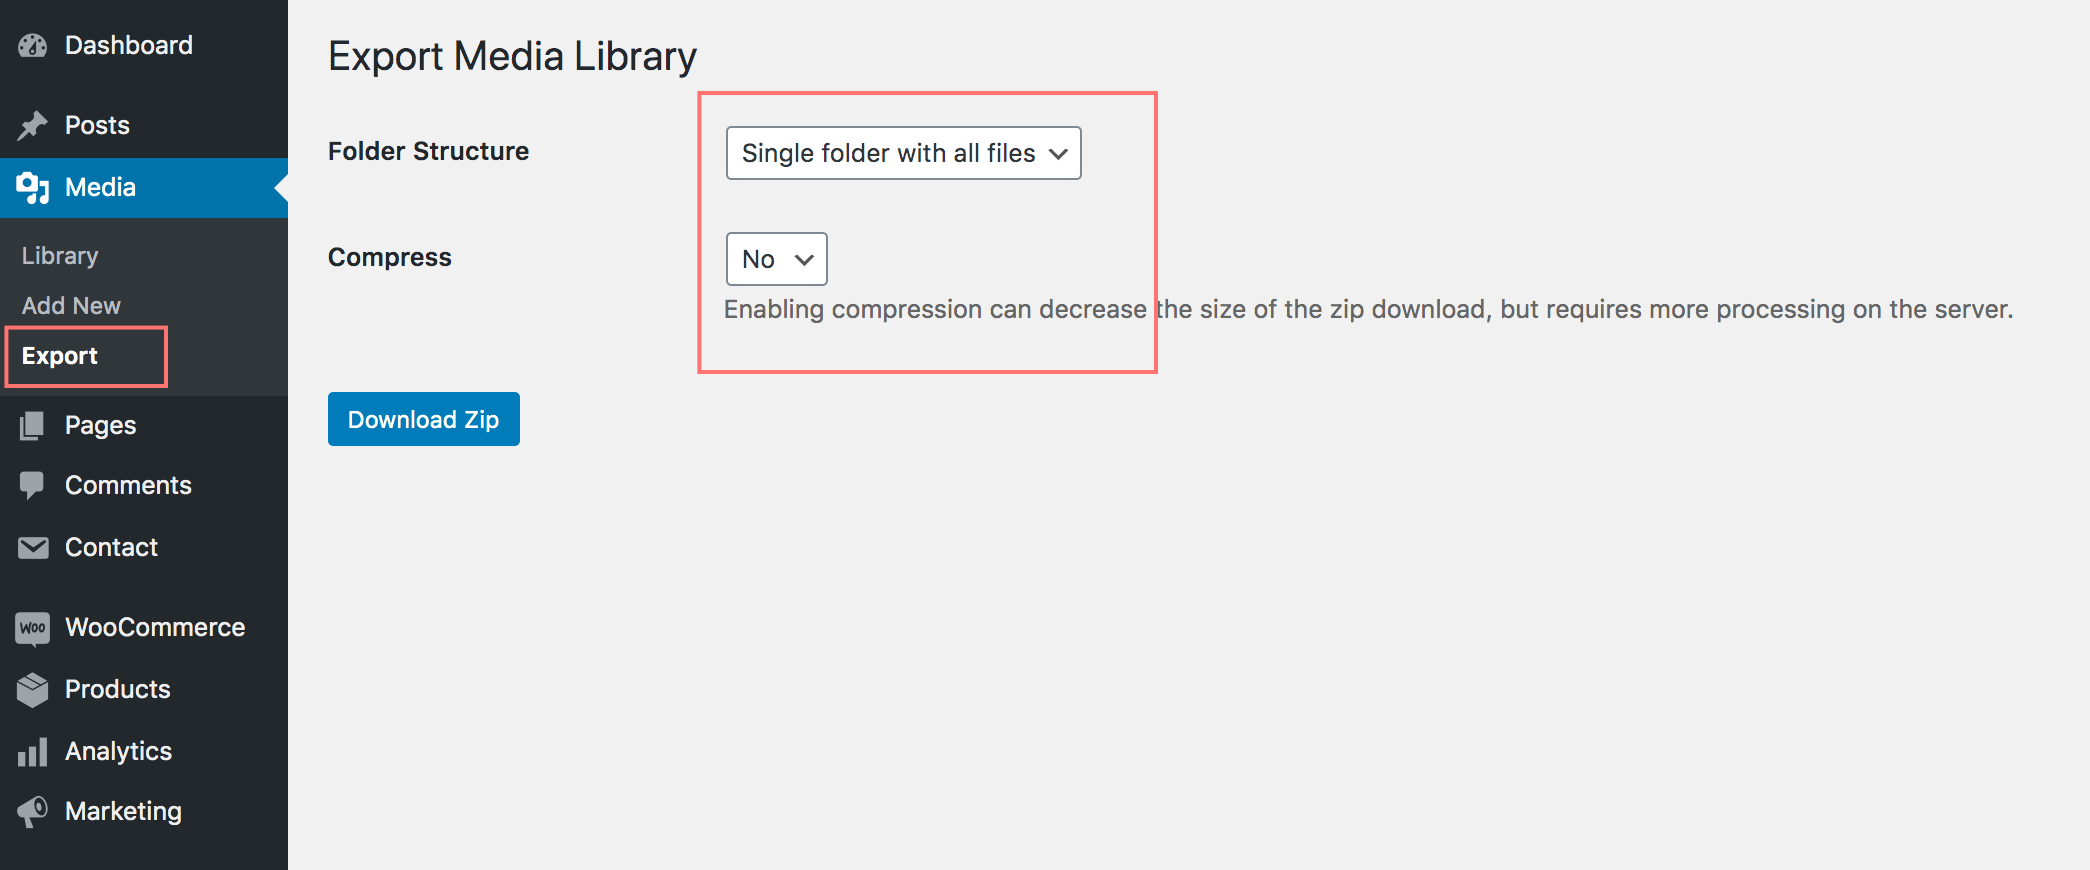
This is an easier way to download the entire media library for non-techies, like me. Just download the free Export Media Library plugin and you’ll be able to download a zip file of your entire library!
Upon activation, you can find the Export settings right under Media menu. Simply choose the folder structure (a single folder for all files OR nested folders) and compression mode for all media.
Those are great for the media library, be sure to check out this additional guide if you want to export WordPress users with custom fields.
Pros:
Simple and easy to use.
Cons:
You have to install a new plugin with the sole purpose of downloading the WP media library.
Note that, depending on your media library capacity, downloading media uploads could take too long and lead to a timeout. You may need to discuss how to best utilize this plugin with your hosting provider.
The WordPress media library seems unresponsive? Check out to learn how to fix WordPress media library not loading.
Conclusion on downloading WordPress media library
Once you have correctly downloaded your WordPress media library, you will have a full backup of WordPress documents and media files. Bear in mind that WordPress generates many different sizes of one image, so the media library you get has more files than the original files.
Therefore, using FileBird folder download (premium feature) comes in handy when you need to sort out all pictures and videos for your next projects later on.
If you would love to organize your WordPress media files better with folders, just install FileBird for free.
FREE DOWNLOADDid I mention that Filester has many other powerful features? Something you can do with the help of Filester includes drag and drop to move files, right-click to the smart context menu, restrict access for user type, advanced settings for different user roles, etc.
If you like this article, you should check out this useful tutorial: How to Upload and Create a Document Gallery in WordPress
See you next time!