The secret to effective marketing automation lies in the customer journey, not in individual channels. Simply put, a journey involves at least two touch points across various channels. The main drawbacks of single-channel solutions is that they only cover one touchpoint and tend not to be integrated with other solutions. This results in contradictory, ineffective personalizations, like receiving a remarketing ad for a product even after you’ve already bought it! To avoid this kind of slip-up, marketers must take a cross-channel approach to marketing automation that courts customers in a systematic effort across various touchpoints.
In this article, we’ll discuss how to develop complete cross-channel marketing automations for WooCommerce using Growmatik.
The case for cross-channel marketing automation
If you’re looking to improve your automations, consider the following changes: go from single-channel to multi-channel, from fragmented to harmonized and from one-time-only to consistent. These shifts in approach make all the difference for your customers. It helps them feel seen and catered to in a highly competitive market saturated with generic marketing materials. What does each of these changes achieve?
Multi-channel
Working across multiple channels lets you collect information about your customer from a variety of sources, helping you to develop a greater understanding of their wants, needs and habits. This means being able to provide them with relevant content, like personalized marketing emails connected to their browsing history on your website.
Harmonized
Using a single, unified automation tool means being able to design and execute materials across channels as diverse as website, emails, SMS and more, so that customers are consistently marketed to at every step of their journey. Targeting a cart abandoner? A harmonized solution lets you send a follow-up email, craft a personalized homepage, provide exclusive discounts and more to convince them to carry out that purchase.
Consistent
Your relationship with any customer will change over time, and your strategy has to develop as well. Advanced triggering criteria will help you support your customer every step of the way, whether your focus is acquisition or retention. Got a new visitor? Offer him a “subscribe” pop up with a freebie, then a welcome email, an exclusive discount and, a few days later, a follow-up email to keep him engaged.
Now let’s dive into the 3 key steps behind cross-channel marketing for WooCommerce!
1- Cross channel data collection
Marketing is all about being relevant, not simply grabbing attention. To make a sales pitch with true relevancy, our focus has to shift from the product to the customer. What are their needs, habits, problems and concerns, and how can we conduct marketing campaigns that address them directly?
But few customers directly communicate their needs to the brands the shop with. Instead, you’ve got to collect that information at every touchpoint of interaction between your brand and your customers. Every time a customer navigates to your landing page, browses through your blog or interacts with emails or pop ups, they tell you more about what kind of customer they are. Their shopping history, how they respond to emails and what kind of offers they respond to will inform you even better about their needs and habits.
To achieve true personalization, our job as marketers is to gather the clues our customers leave at every point of interaction, analyze them and use them to design truly relevant marketing campaigns.
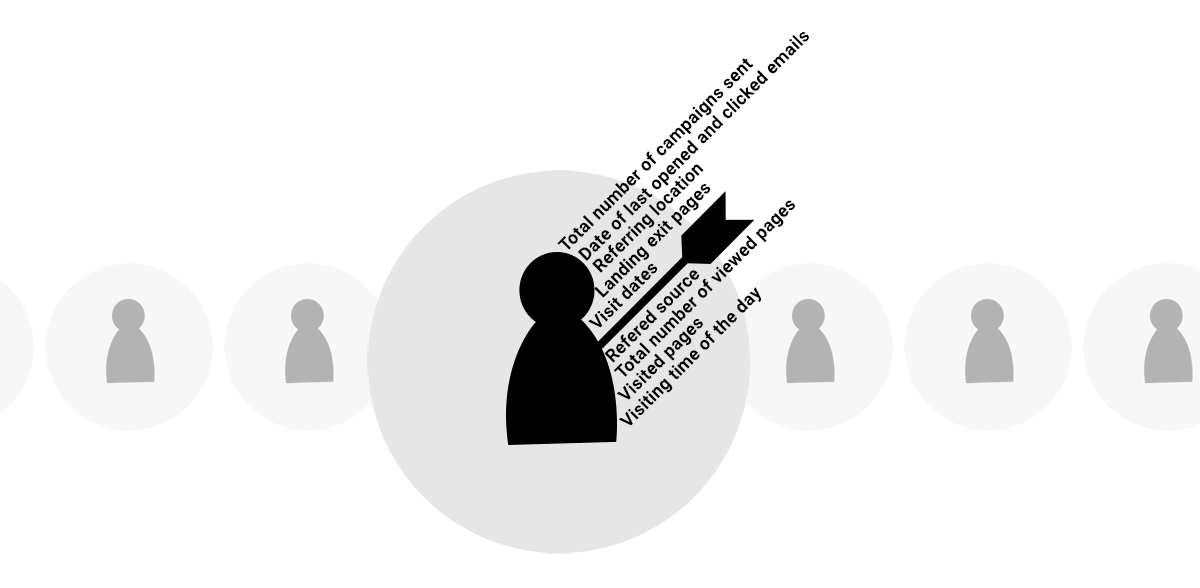
Here’s a comprehensive list of the kind of information you should look for to power your marketing campaigns:
| Referral details | Website activity | Email activity | Shopping activity |
| – Referring location- Referring source website or campaign
– Visiting time of the day – Device and browser used |
– Landing exit pages- First and last visit dates
– Total number of visits – Total number of viewed pages – Visited pages – Average time spent per visit – Total time spent on website |
– Total number of campaigns sent- Date of last opened and clicked emails
– Number of opened, unopened, clicked and unclicked campaigns – Last opened and clicked on email |
– Average days before converting (subscribing, first purchase)- Purchase frequency
– Product category – Top purchased item – Abandoned cart – Total number of orders, purchased items and order value – Number of coupons used – First and last order dates |
We can gather this information from different channels. Unfortunately, using different marketing tools or plugins for each touchpoint will make it difficult to compile all of this disparate data and turn it into actionable conclusions. Instead, it’s best to opt for one cross-channel solution that will allow you to collect each piece of the puzzle and analyze the data as a whole. The most effective options will also have the capability to craft behavioral segments and personalized automations for each segment, as well as monitor how well the automations perform.
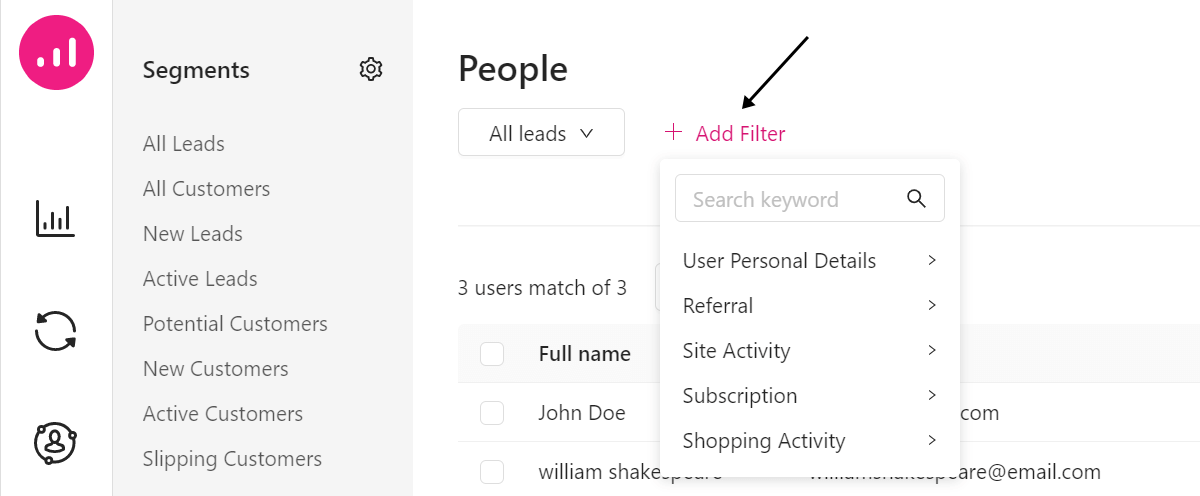
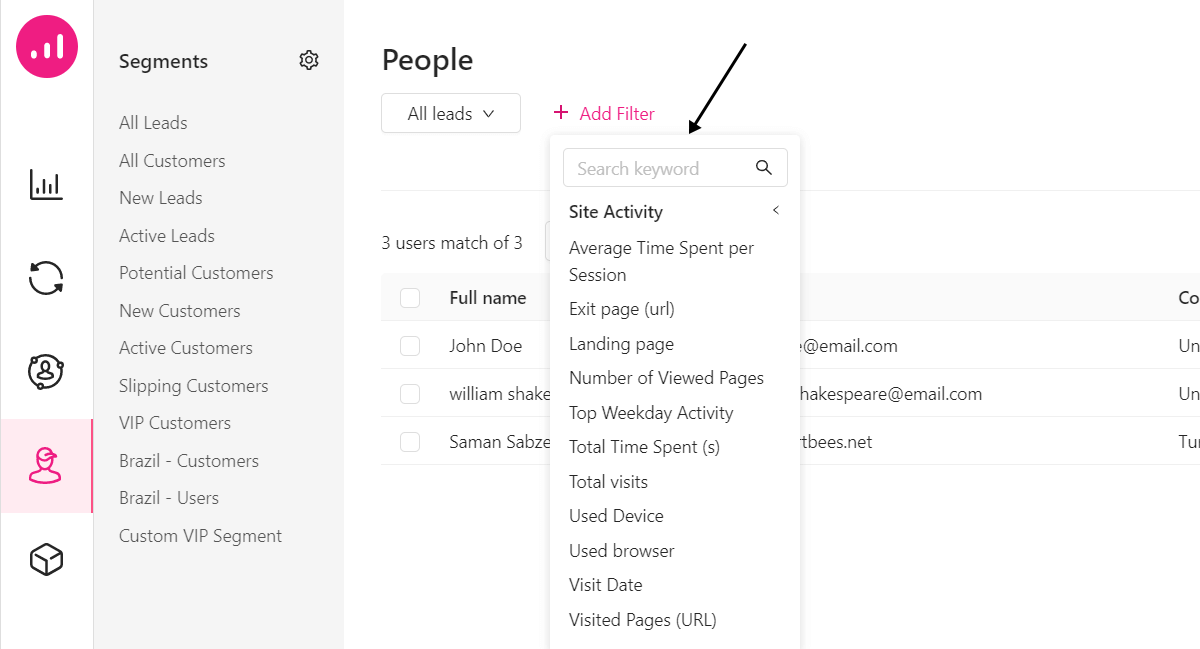
Growmatik is one of the best cross-channel softwares to help you collect and use information about your customers. Growmatik creates user profiles for each new visitor to your website and builds these profiles over time based on user behavior at touchpoints from emails to popups. From the People section, you’ll be able to work with 50+ behavioral filters to help you craft effective segments, no matter how simple or complex.
2- Craft the right customer segmentation
Once we’ve collected enough data, the next step is dividing our customer base into groups depending on their characteristics or behavior. You’ll want to focus on segmentation as it directly relates to customer value. Some strategies for segmentation include defining your ideal customer and deciding if order size or number of orders is more important. You can also choose to target a specific country or region and decide how often you want your customers to visit your site.
One key way that a lot of e-commerce businesses measure customer value is via RFM values (recency, frequency and monetary). Growmatik allows you to segment your customers based on RFM values via filters in the People section. This in turn makes it possible for you to craft custom campaigns, such as VIP exclusive offers, that will boost customer activity even more:
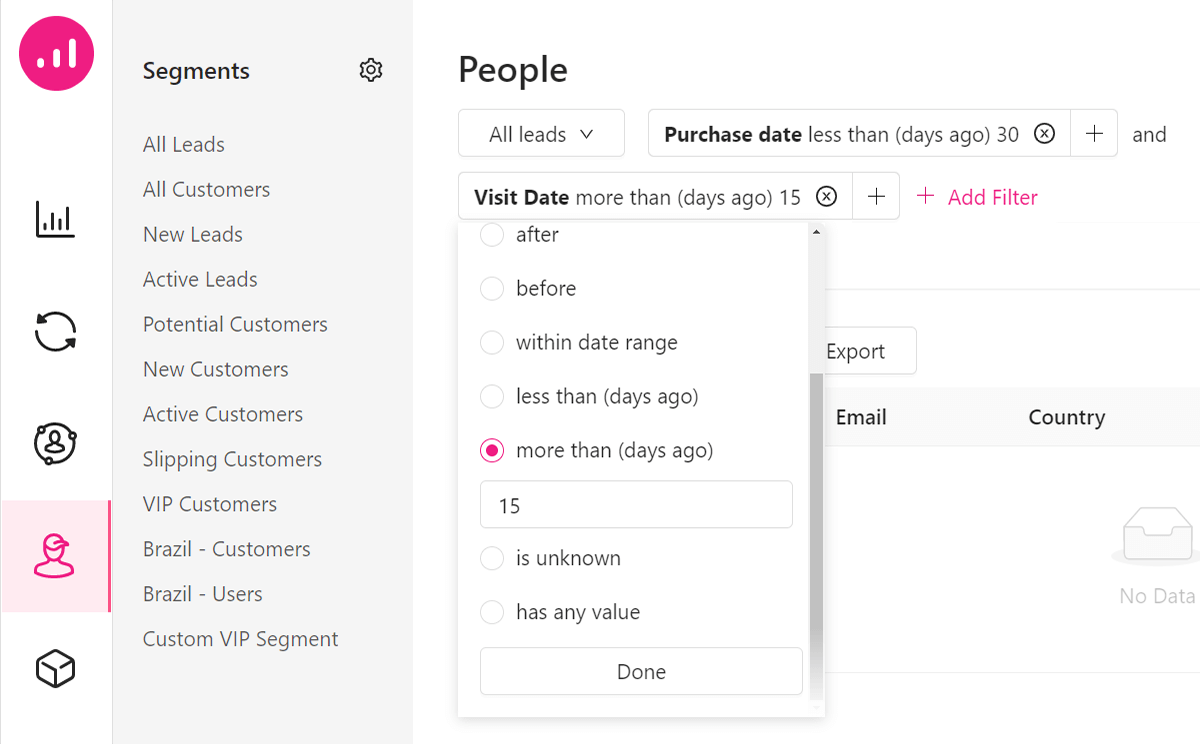
If certain customers do not meet your RFM expectations, you can target them using relative time selectors (like ‘not on’ and ‘more than’) and serve them a reactivation campaign to boost their engagement.
Two key—and often neglected—elements you can use when creating segments. The first involves leading/lagging segmentation and the second has to do with the quality of segments. Fortunately, cross-channel marketing automation covers both leading and lagging segmentation, allowing you to provide holistic support at any point in the customer journey. Let’s quickly define these two categories of segmentation:
● Lagging segmentation involves any activity in the past. With lagging segmentation you analyze customer behavior over their lifetime by looking at metrics like shopping history, on-site activity, or options like last visit date, last purchase date & count, number of campaigns sent. You can then design and execute specific campaigns with these in mind.
● Leading segmentation involves any present or future activity. With leading segmentation, you can customize user experience from the very first interaction, such as a new visitor navigating to your site. Key metrics in this form of segmentation include referring location & timezone, referring website source, referring device, first landing page and similar details.
Any marketing automation tool you choose should be able to cover both bases. Growmatik’s automation dashboard lets you create personalized automations for any step in the customer’s journey. One way to greet brand new visitors, for example, is to include their location in the hero section, or add a welcome message based on their local time zone.
3- Build raft cross-channel automations
For anyone practicing WooCommerce marketing automation at scale, this is one of the most difficult parts of the process—and perhaps the most important. Before you move on to this step, it is vital that you have researched your website funnels, created a comprehensive profile for your ideal customer, and defined your key customer segments. Once you have, you can craft customized campaigns to target each segment, depending on their status, need and preferences. Your best friend in this process will be a comprehensive cross-channel software capable of organizing, serving and monitoring a variety of automations from a single dashboard. A software like Growmatik!
Next, let’s dive into how to create cross-channel automations in Growmatik! No time to waste!
Automation Step 1- Set your segments
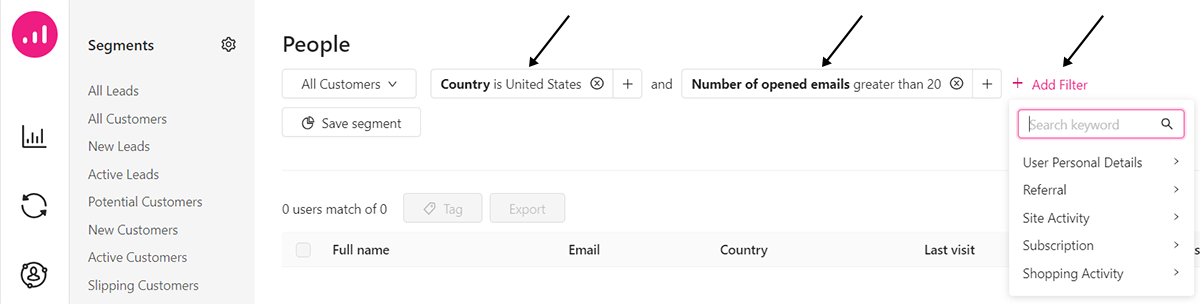
From Gowmatik’s People section, craft your segments by defining a variety of personal or behavioral attributes or by creating groups of attributes. You’ll have over 50 filters in six different categories to experiment with. The six categories include: personal details, referral details, site activity, email activity, shopping activity and custom attributes.
To get started, select a user type and add or modify your filters, using as many filters as you wish. Each filter comes with a custom set of options to further refine your segmentation.
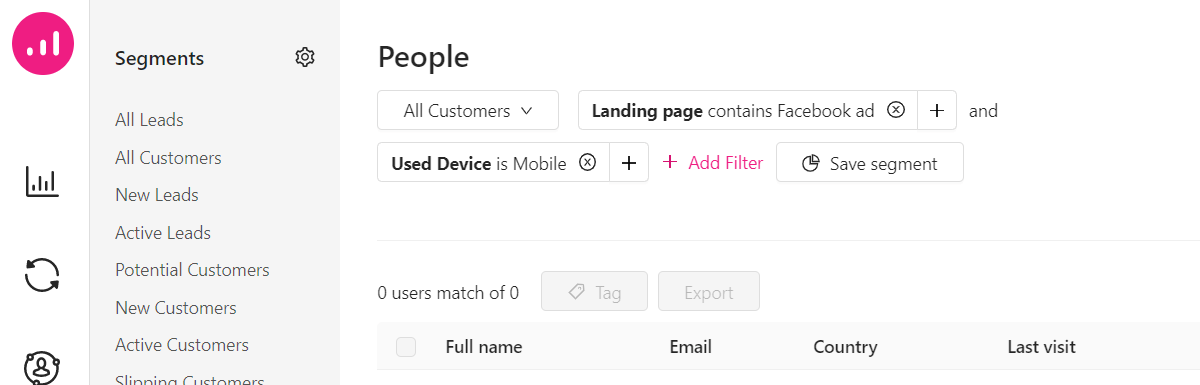
Growmatik also offers a number of pre-made custom segments via the sidebar. These include common segmentation options such as new leads or VIP customers to help you save time. Be sure to check the filters and ensure they line up with your marketing strategy. Once you’ve started experimenting with the filtering options for your segments, you’ll be able to monitor the results via the user table, which will provide you with information such as user name, country, last visit and more.
Automation step 2- Target each segment with custom-made automations
Each segment’s specifications will help you decide which personalizations and channels to use to target them. Growmatik automations all use the familiar “IF … THEN” structure, and each comes with the following:
Defining Condition(s)
This defines the subject of your automation. Generally this involves a group of people with one or more of the attributes in Table 1.
Defining Action(s)
Once the set condition is met, an action is triggered. Potential actions include:
-
-
- Showing a popup,
- Personalizing a webpage
- Sending an email
-
…and more!
To make more complicated automations, simply define a chain of conditions and actions. This could involve targeting users living in a specific country or searching for a specific product, or users who have opened a certain number of emails over their lifetime.
The simplest option is to assign any automation to a segment by selecting the Automate Section option on the People page in Growmatik. You can execute these automations at any touchpoint simply by selecting the relevant action(s), such as email, webpage, popups and more:
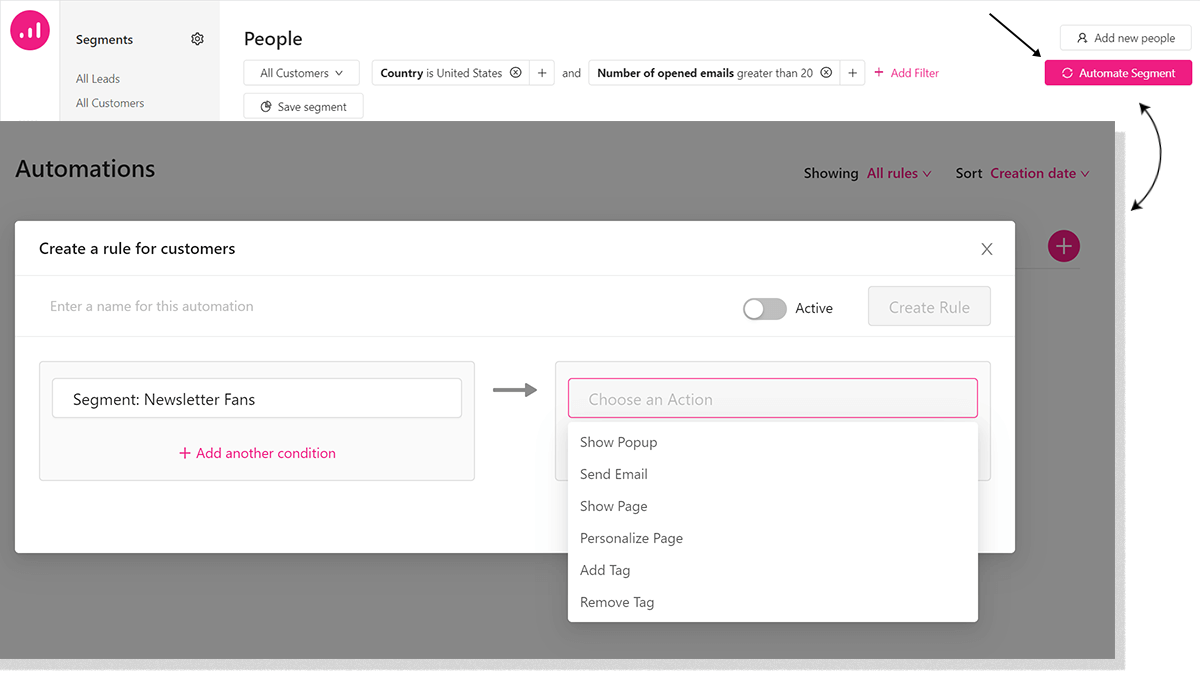
The capacity to create multi-step automations is a vital feature of any holistic cross-channel marketing automation platform.
Automation step 3 – Craft customized content for marketing campaigns
Targets are locked, guns are drawn…but where’s your ammo? The next step in the process is creating the content that makes up your personalized campaigns. But remember, it pays to be picky about this content! You’ll need custom-made materials rather than generic content to snag new customers.
Personalize visual content as needed
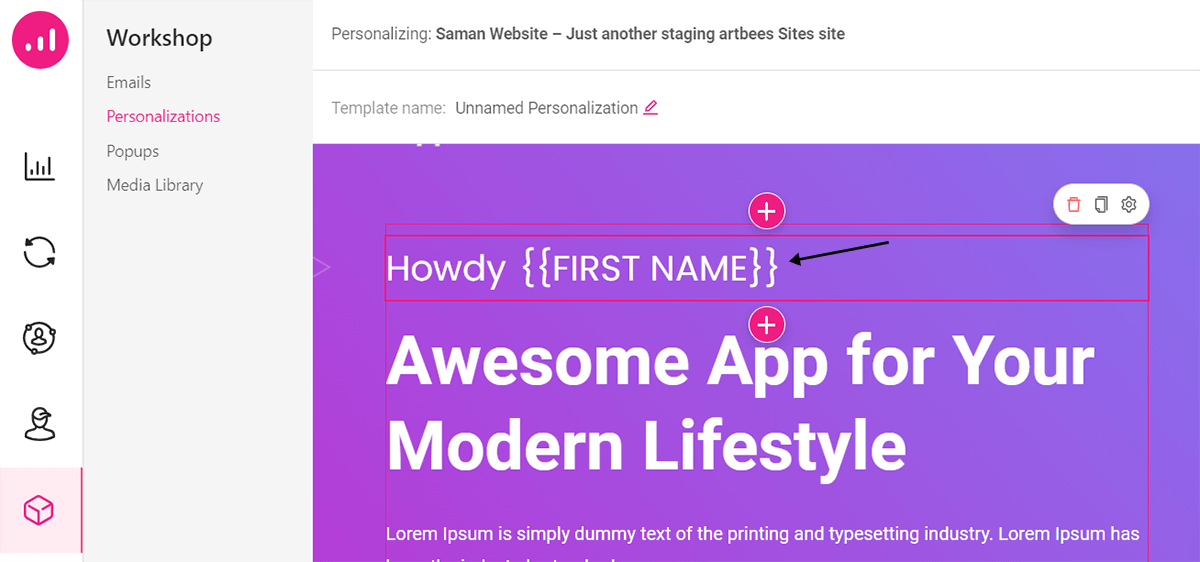
Each automation tool will offer different options for personalization. Growmatik comes complete with a special visual interface for web page personalization. This tool will help you edit your page content from the frontend, no coding necessary! This intuitive interface allows you to drag and drop new elements such as buttons, product and blog lists, text, image and video from the elements library.
Once you choose “page personalize” as your action, you’ll need to select a page to personalize. You’ll then be taken to the personalizer environment where you can make the changes you need.
Try dynamic keywords
With Growmatik, you can create custom emails, landing pages and personalized popups for WordPress. To achieve this, the software offers a variety of dynamic keywords to help you personalize your textual content across each channel. Here are the categories of keyword to choose from:
-
-
- General info keywords such as date, daytime, weekday, month
- Referral details keywords such as UTM parameters in the URL
- Personal info keywords such as name, city, country
- Behavioral info keywords such as user’s time spent on the website, number of viewed pages, number of clicked and opened emails
- Shopping info keywords such as first and last purchase dates, number of purchases and orders, total order value
-
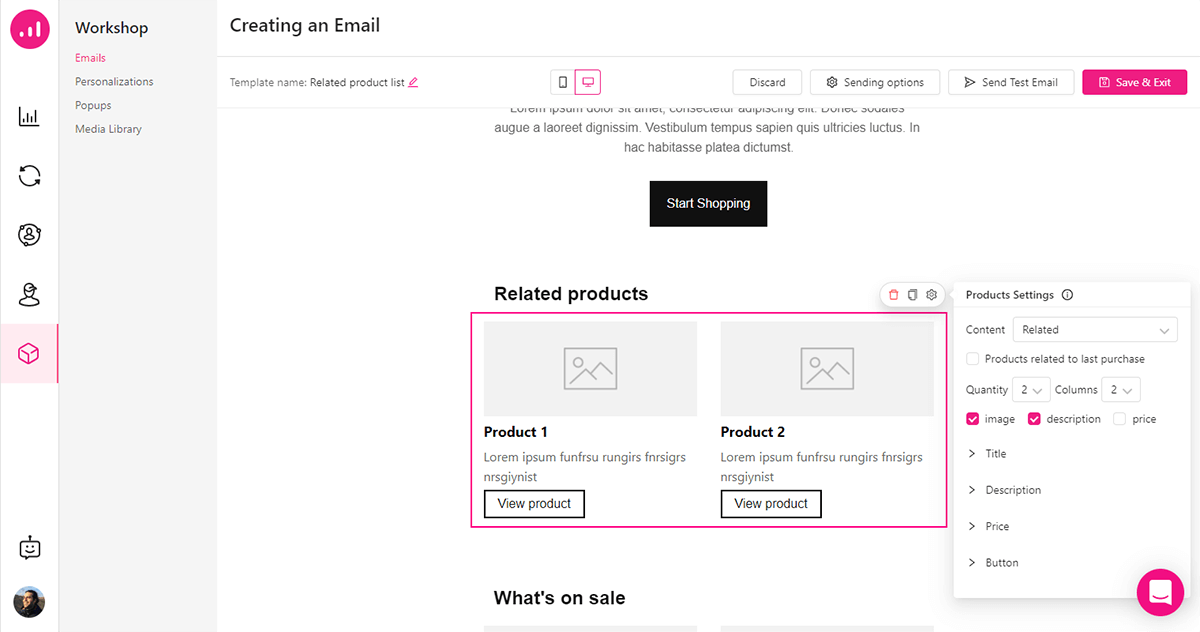
Add custom product or blog lists to your emails and web pages
Using your customer’s shopping or browsing history, you can add personalized product or blog lists to your marketing materials. In Growmatik, this could mean lists containing any of the following: related products, product categories, abandoned items, related upsells, related cross-sells, related discounted items.
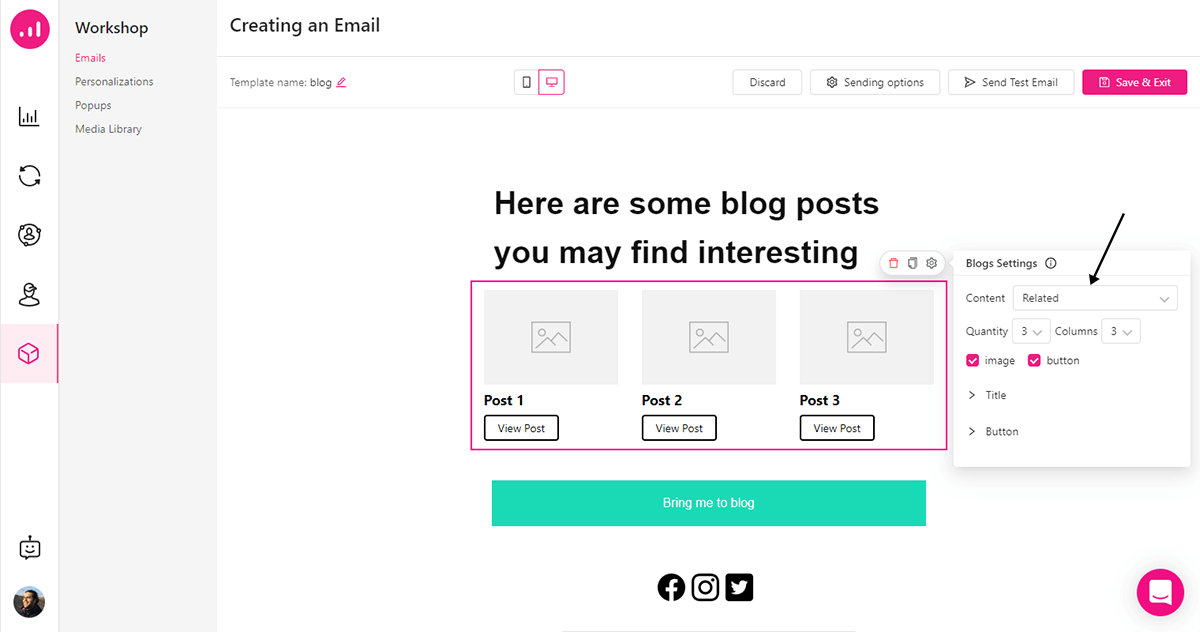
With your user’s reading history, you can do the same by providing suggested blog posts or blog lists via web pages or emails.
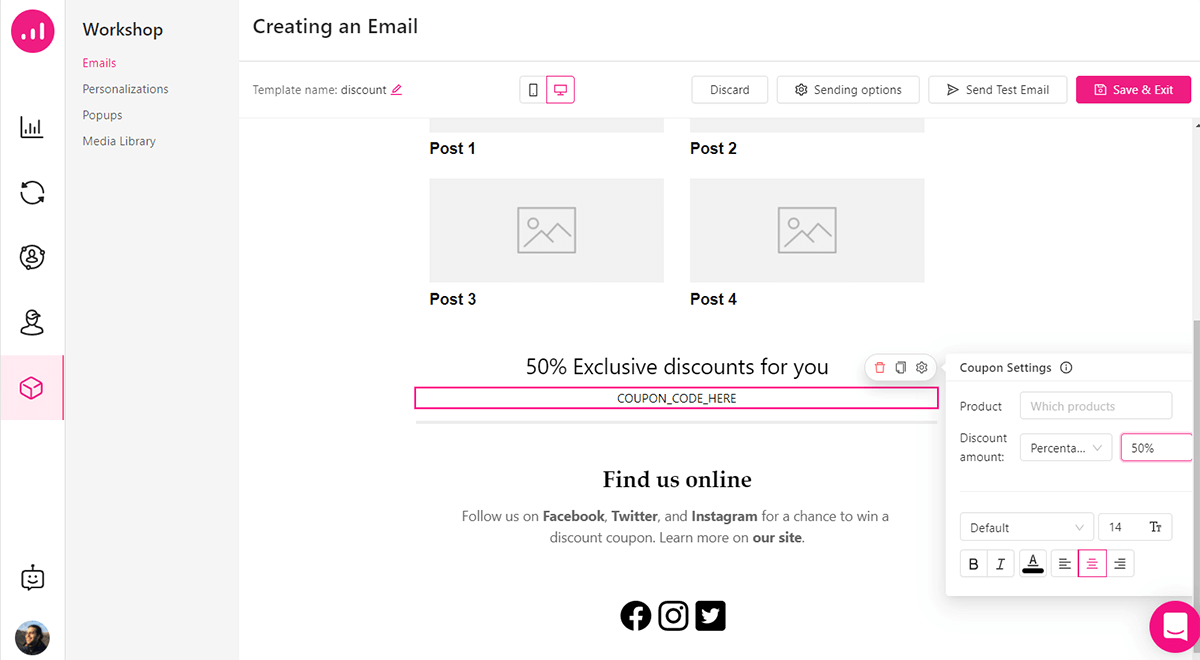
Use your popups and emails to serve exclusive offers
The goal of personalized marketing materials is to make your user feel seen and appreciated. To trigger this positive bias, offer exclusive deals to your customers at key moments and touchpoints. For new subscribers, for example, you can send an exclusive coupon for their first purchase a few days after they’ve subscribed.
Growmatik is the perfect tool to craft functional coupons to embed in pop ups and emails. Define the coupon settings and the software will generate a functional code to be served to the user in the page frontend.
Wrapping Up…
In this article, we’ve covered all the bases of cross-channel marketing automation: the theory behind it, the advantages it presents over single-channel automation and how to use it to boost efficiency, customer engagement and overall growth. We also went over the 3 key steps in any effective automation strategy: collecting user data, crafting user segments and developing custom automations.
Although setting up basic marketing automations doesn’t need to eat up all of your time, it may be necessary to invest time and resources to get actionable observations about user behavior. Once you’ve built your automation foundation, however, each new iteration will be more and more streamlined and much faster. As you develop your system, you’ll come to understand what’s missing, what touchpoints are most important and how to leverage personalization to engage customers and convert leads. Most important of all, you should recognize that marketing automation is ultimately a long term strategy and requires continuity, patience and dedication to reach its full potential.