If you’ve just launched your WordPress website for an online store, a blog, or a service-based business, chances are you’ll want an easy way for visitors to reach out – whether they have a question, feedback, or a project proposal. Instead of leaving your email address exposed to spammers, the smarter solution is to add a contact form.
The good news? You can have one up and running in just 5 minutes. In this step-by-step guide, we’ll walk you through the entire process of adding a professional, fully functional contact form to your WordPress site in just five minutes – no coding experience required. Let’s get started and make your website more interactive and user-friendly today!
Why Every WordPress Site Needs a Contact Form?
Think of your WordPress website as your online home. A contact form? That’s your front doorbell! It’s not just a box for people to send you messages – it’s a little bridge between you and your visitors. Here’s why it’s such a must-have:
- Builds trust and professionalism: Having a contact form shows that you’re open, approachable, and serious about your website. It makes your site feel complete and trustworthy.
- Keeps the spam away: Putting your email out in the open is like inviting spam bots to a party. A contact form hides your email and uses tools like CAPTCHA to keep unwanted junk out of your inbox.
- Saves time: If you’re running a WooCommerce discount campaign, it’ll help collect the exact details you need.
- Organizes messages better: Want to know if someone’s asking about support, sales, or just saying hi? Custom fields in a form help you collect the right details so you can reply faster (and smarter).
A contact form makes your site more professional, safer, and way more user-friendly. It helps you connect with your visitors while protecting your inbox.
How to Add a Contact Form to Your WordPress Site
Creating your first contact form on your WordPress site is easier than you might think, and with just a few simple steps, you can have it up and running in under five minutes. Here’s a straightforward guide to help you get started:
Step 1: Install and Activate Contact Form 7
Contact Form 7 is one of the most popular free plugins for creating contact forms in WordPress. It’s lightweight, flexible, and supports unlimited forms. It’s simple at its core – create forms, display them with shortcodes or blocks – but it’s also flexible enough to handle more advanced needs with custom fields, integrations, and add-ons.
Begin by logging into your WordPress dashboard. Navigate to Plugins > Add New, then in the search bar, type “Contact Form 7”. Click “Install Now” and then “Activate”.
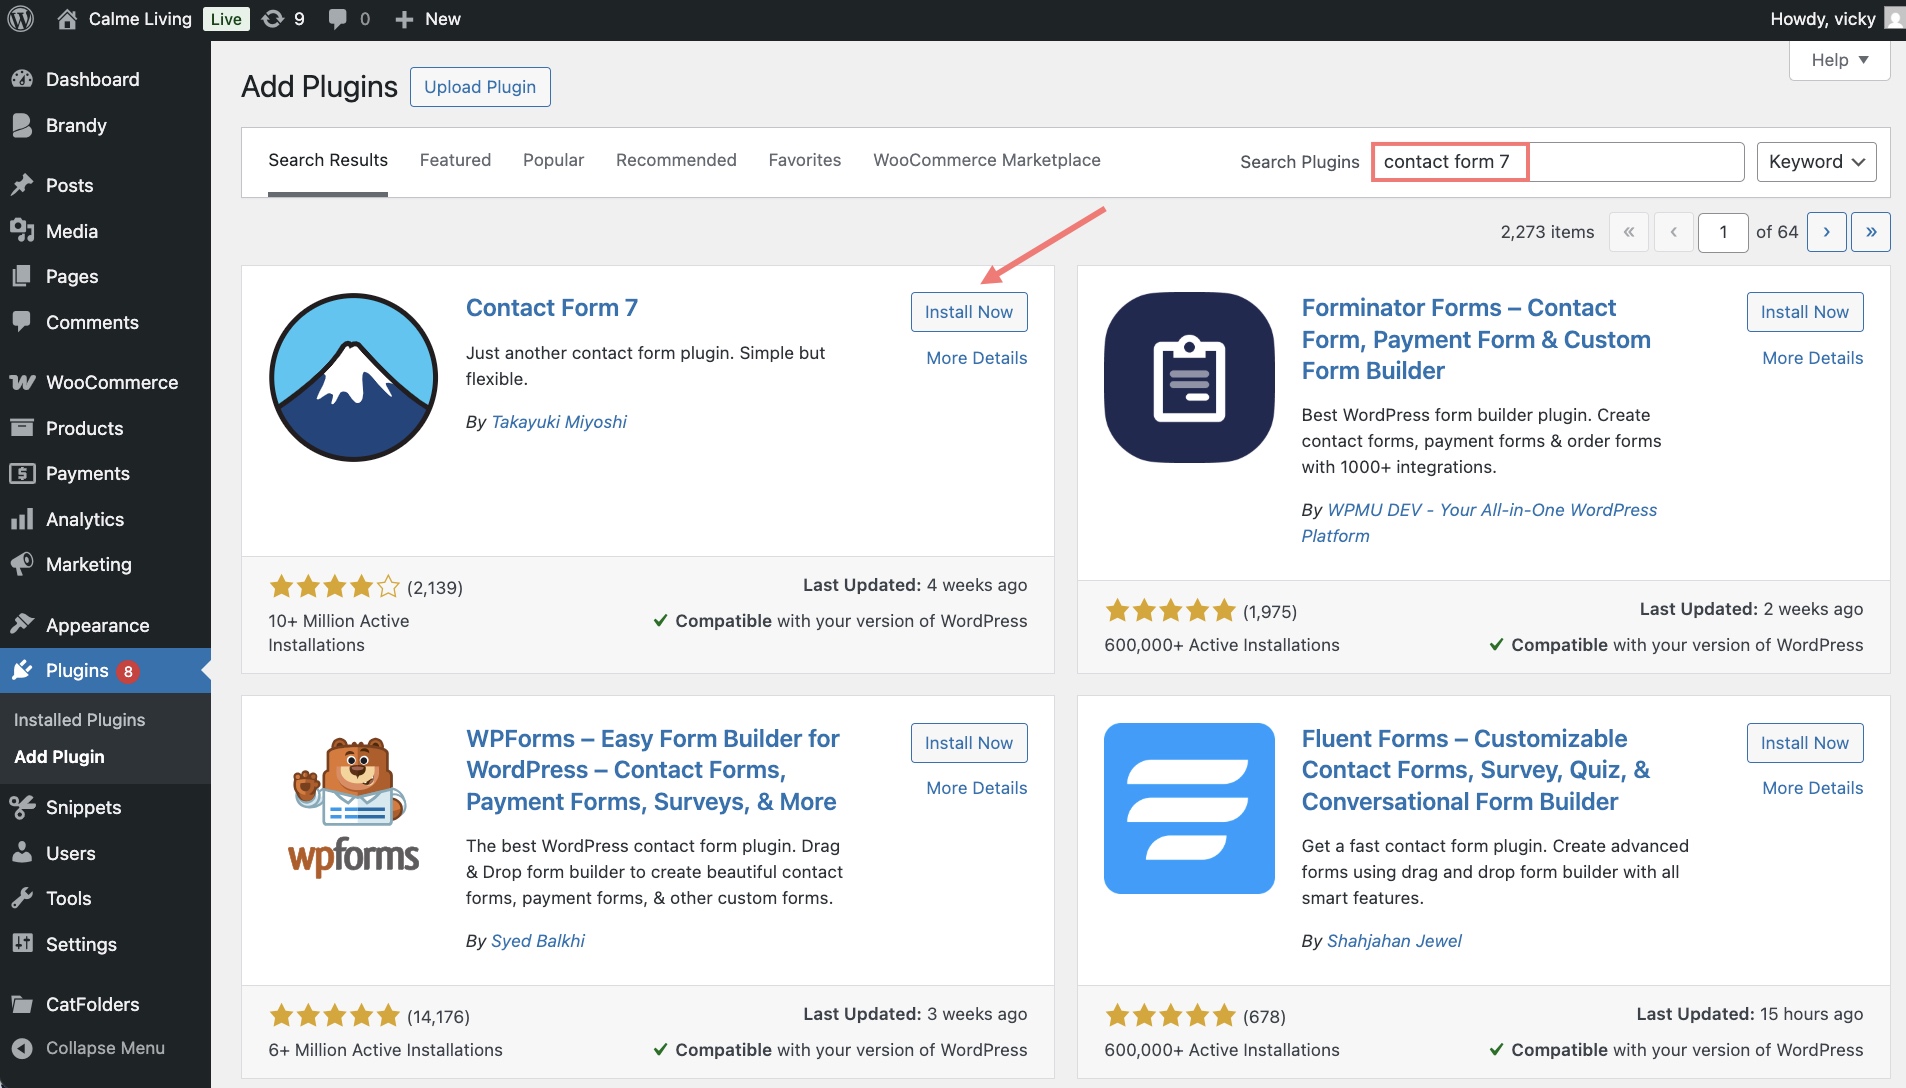
Once done, you’ll see a new Contact menu in the sidebar.
Step 2: Create and Customize A Contact Form
On your WordPress site, go to Contact, then Add Contact Form. Give it a name. A default contact form will be created for you.
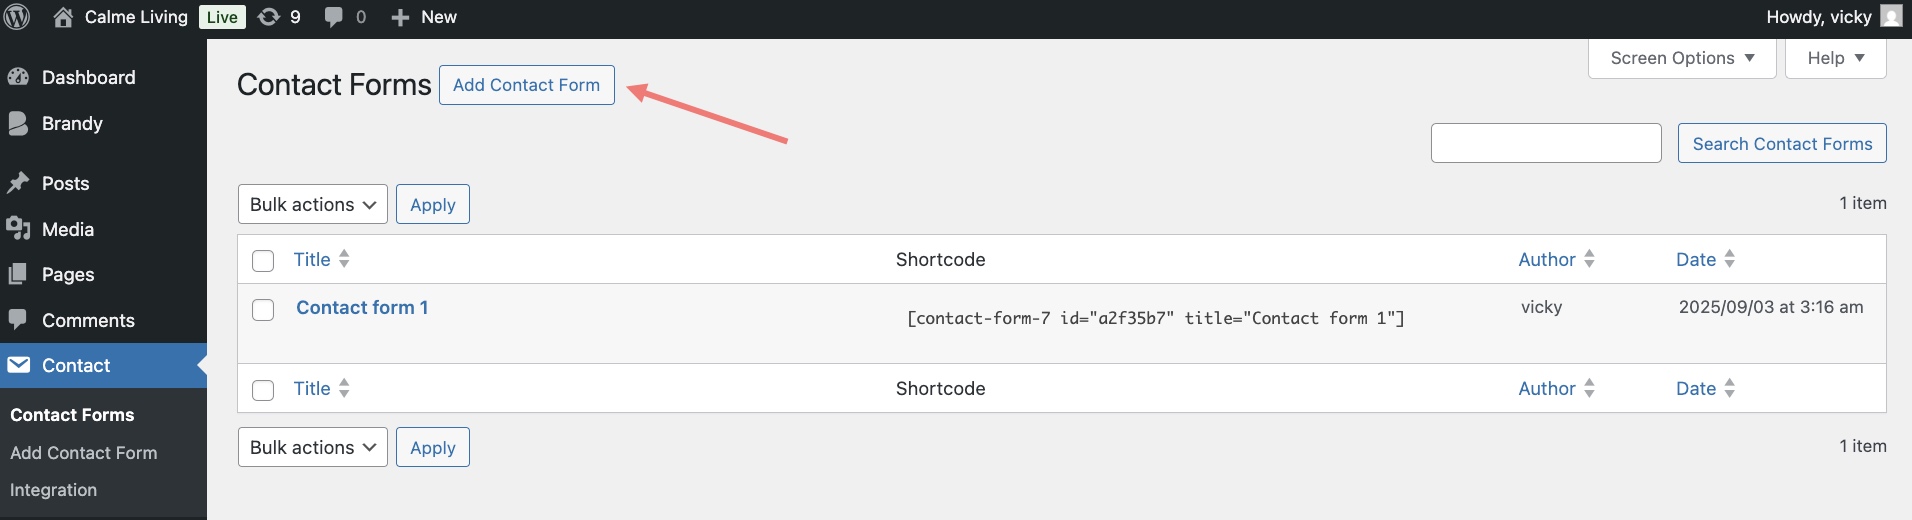
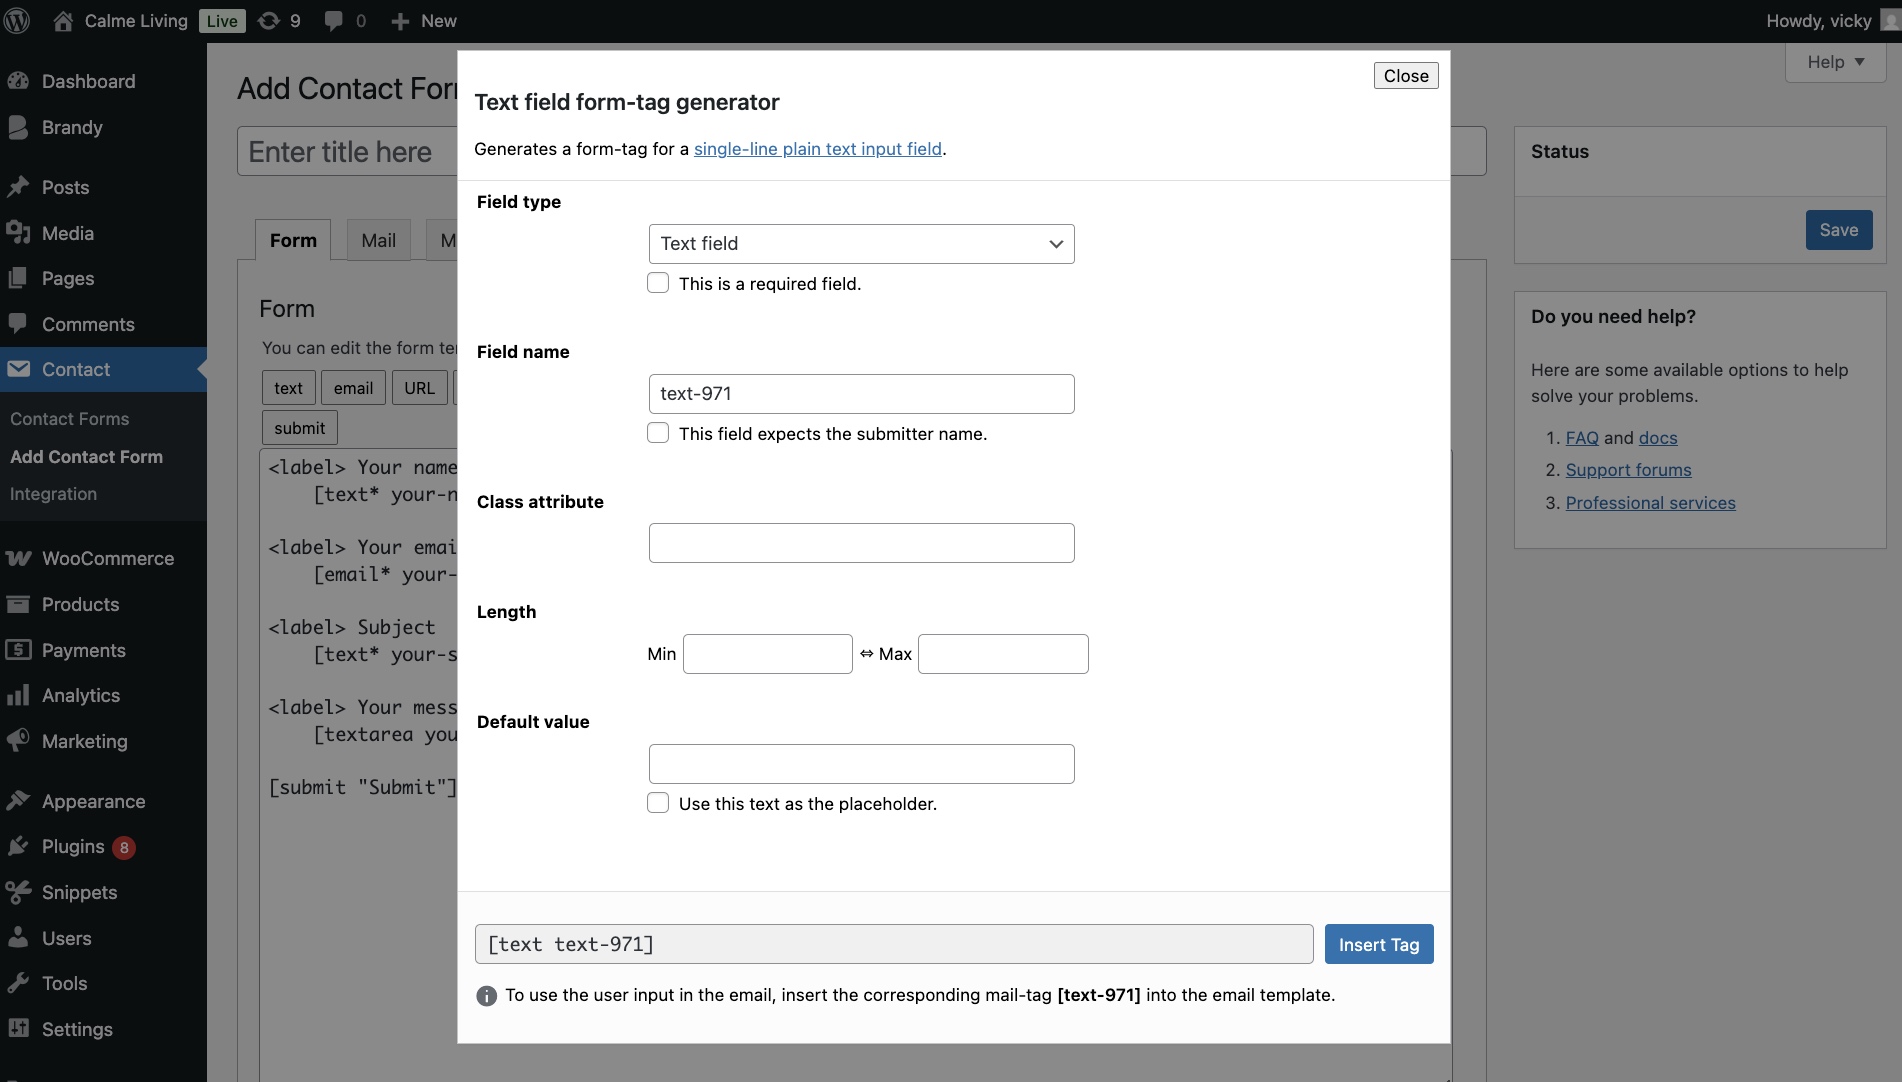
You can configure the elements from text, email, URL, number, and much more, and insert tags on the contact form. Then, ready to add a contact form to your site with a shortcode.
Save it and Boom! You now have a fully functional contact form in under 5 minutes. You can create as many forms as you want, each with different fields and settings.
Moreover, you can set up email notifications to ensure you receive messages submitted through the form. Double-check that the recipient email address is correct so no inquiries are missed.
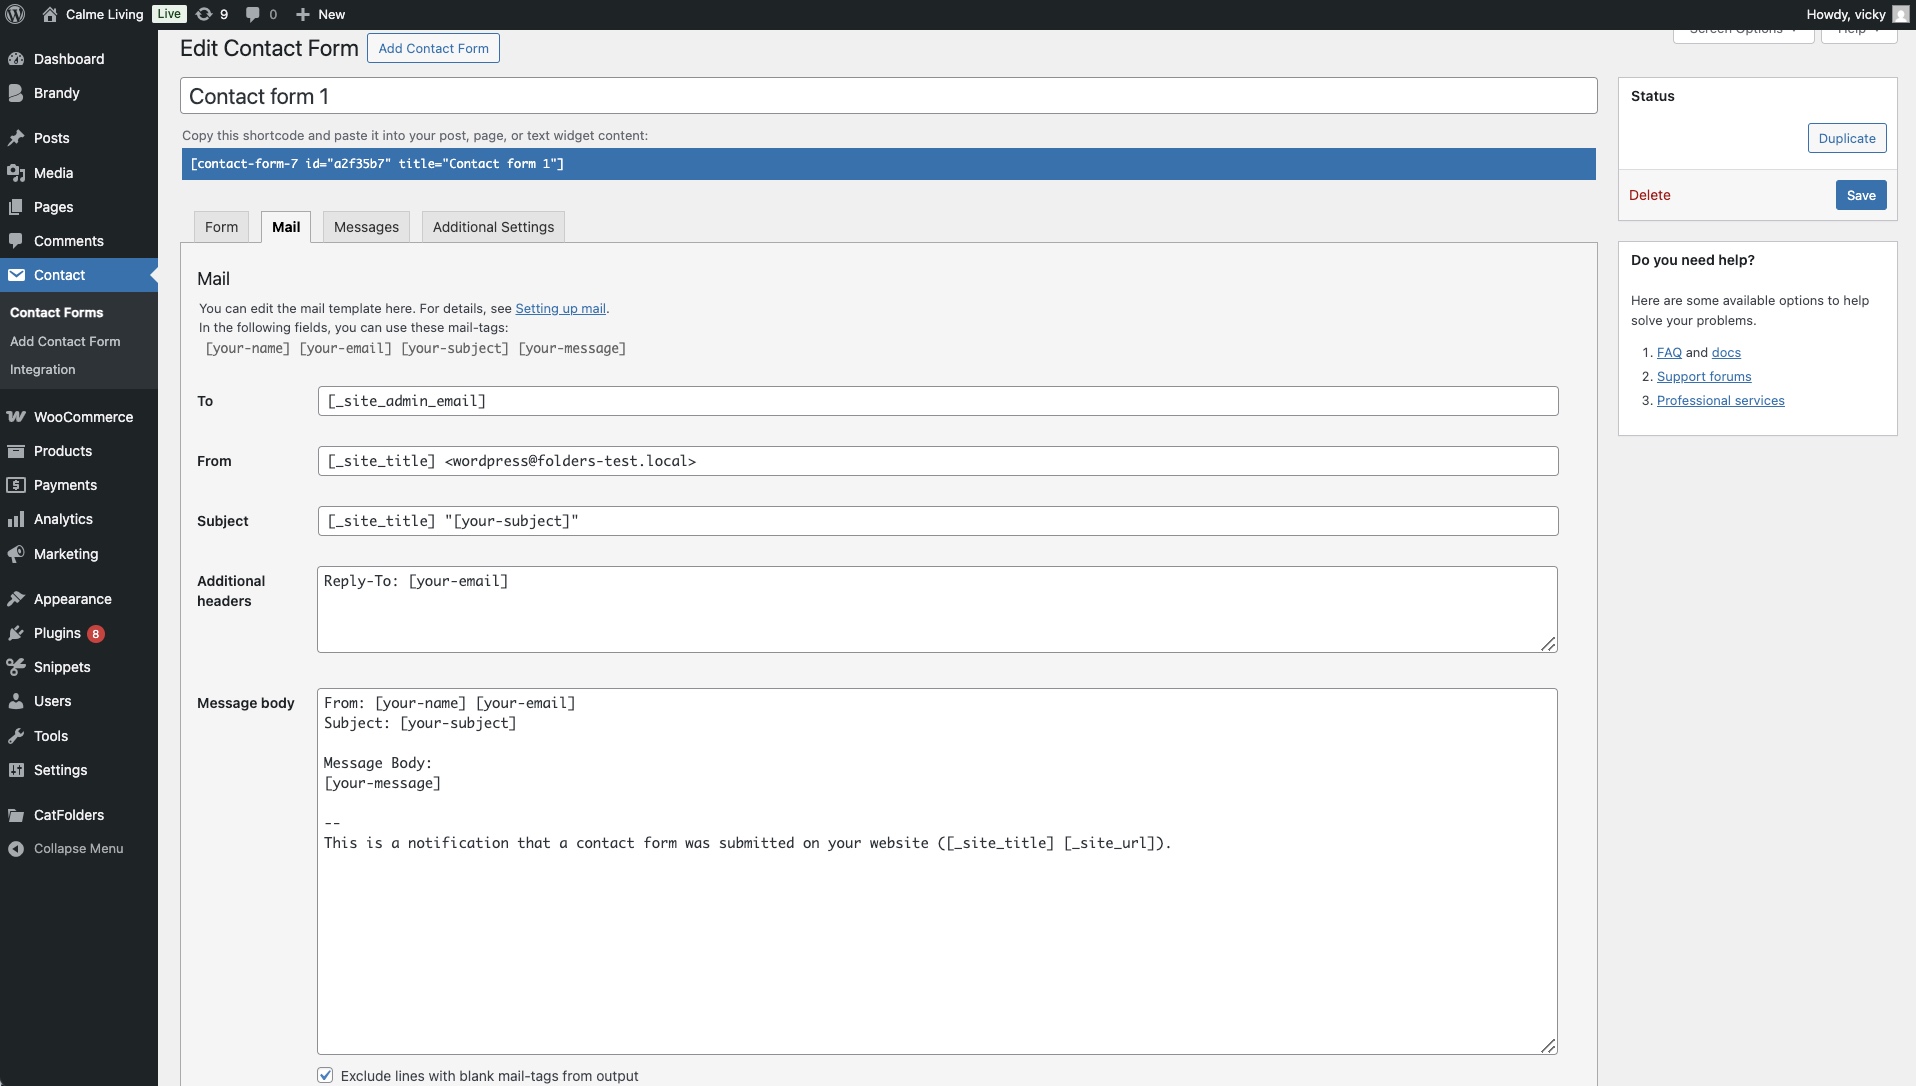
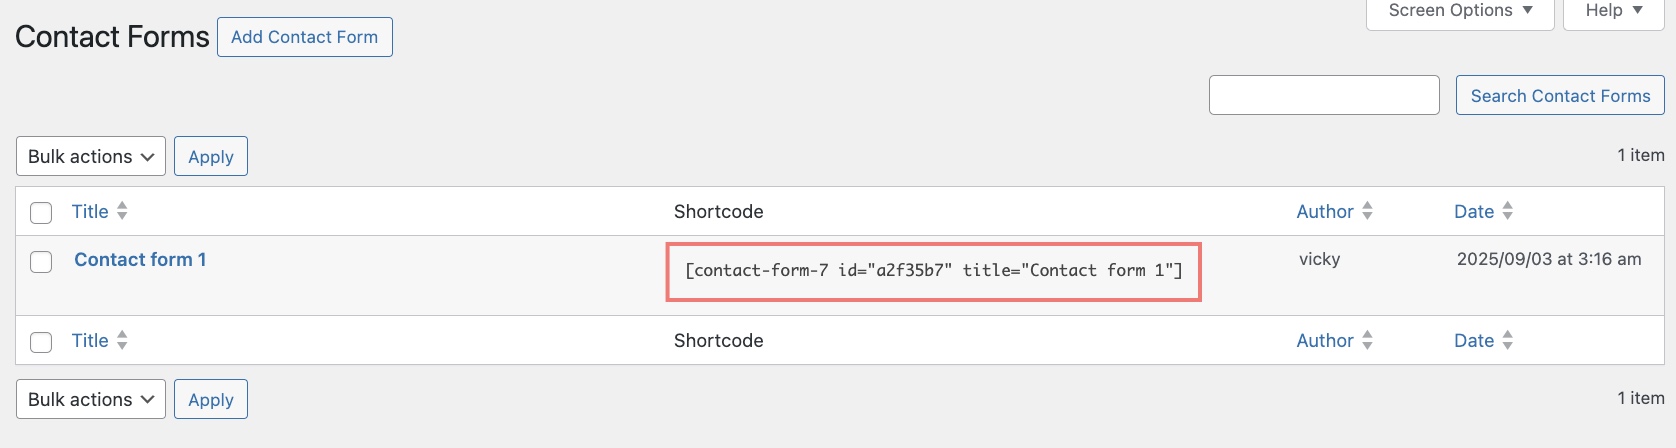
Contact Form 7 provides shortcodes to insert into pages where you want to display the contact form. Paste the shortcode into the content area, and update or publish the page. Thus, visitors will fill it out, and CF7 will send the data to your inbox.
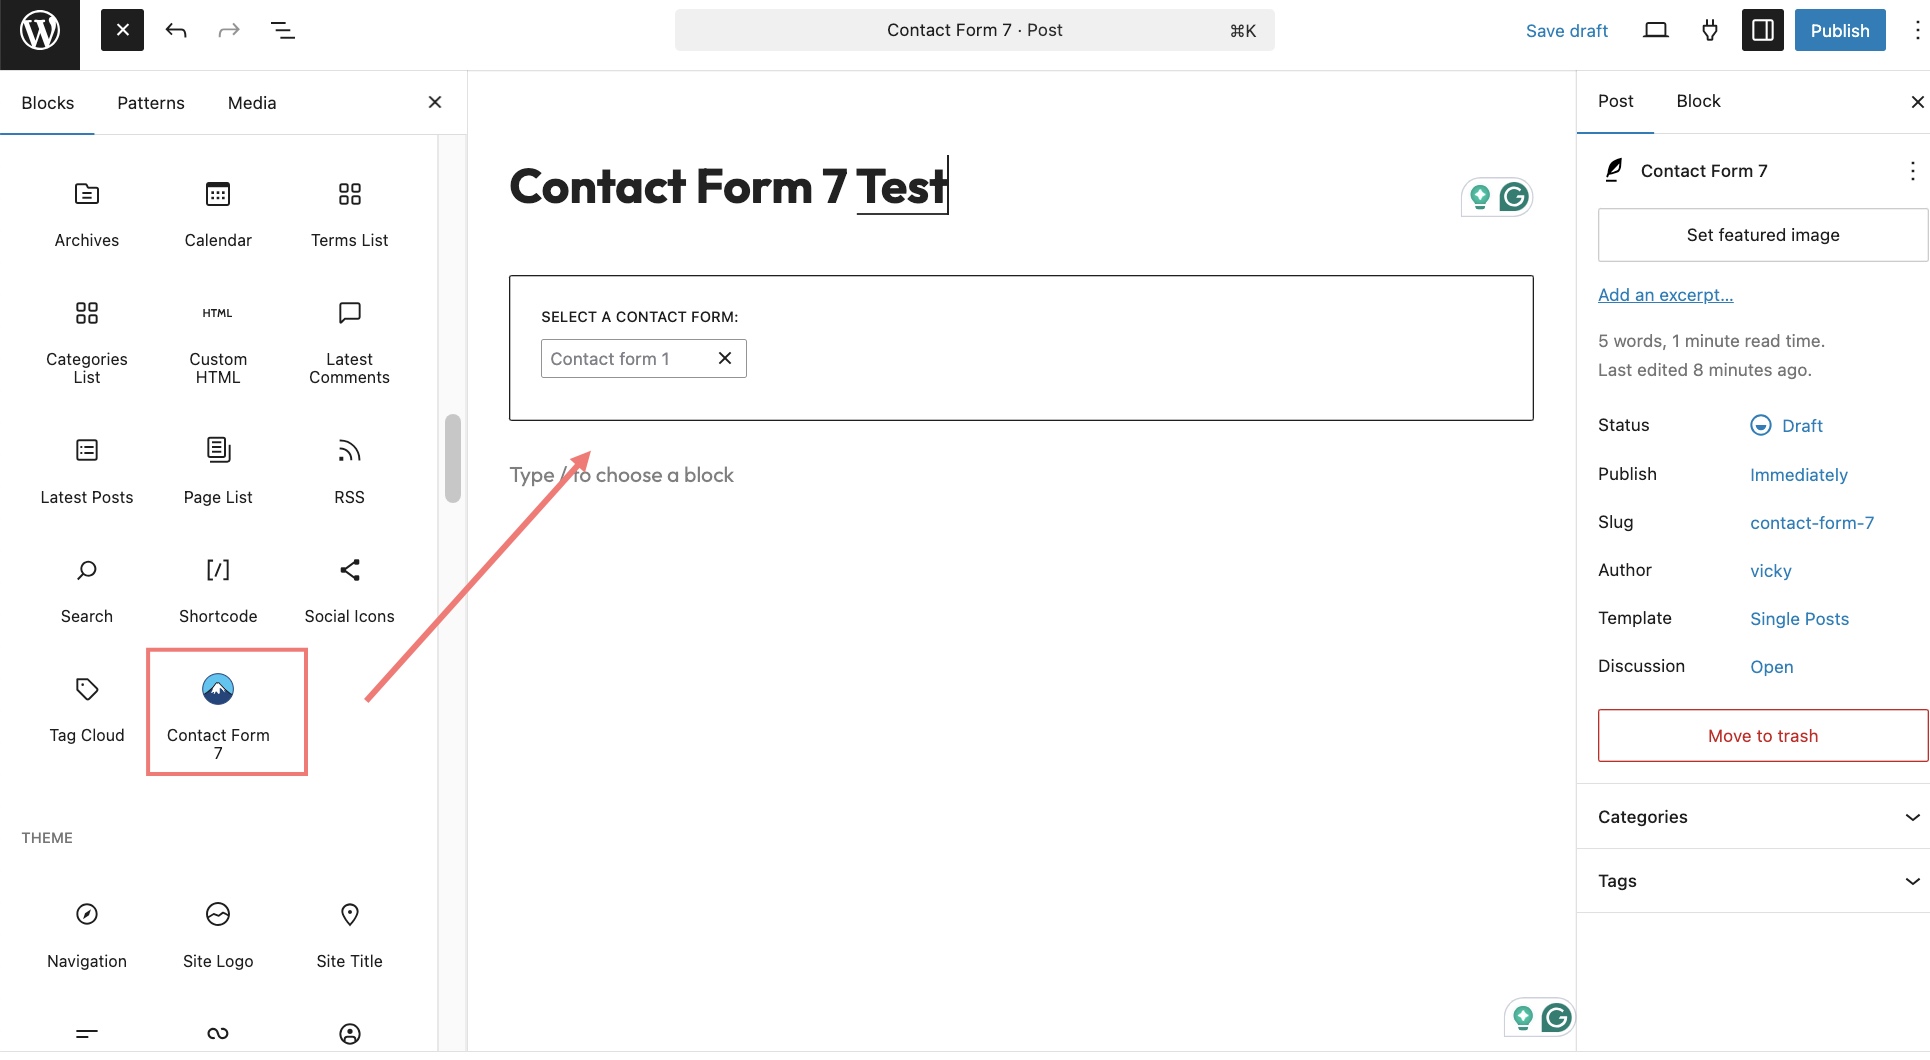
Moreover, in the Gutenberg Block, CF7 also provides a block where you can choose a pre-built form and display it on your website.
Step 3: Make Contact Form 7 Even Better
Contact Form 7 is great out of the box, but if you want to collect and manage submissions more effectively – or guide users through longer forms – you’ll love what NinjaTeam offers with Contact Form 7 Multi-step and Contact Form 7 Database.
Set up Page-per-step multi-step (Contact Form 7 Multi-Step Module)
If you’ve ever tried filling out a long form, you know it can feel overwhelming. With Contact Form 7 Multistep by NinjaTeam, you can break your form into multiple pages (or steps).
- Makes long forms less intimidating.
- Improves user experience and completion rates.
- Perfect for surveys, event registrations, or detailed service requests.
Instead of one giant form, visitors complete it step by step, making it easy and stress-free.
How to set it up:
– Install and activate the Contact Form 7 Multistep plugin from NinjaTeam.
– Go to Contact, then Add New, and create multiple forms (for each step).
– In the CF7 editor, place your fields as usual. But in this dashboard, you can divide your contact form into multiple steps.
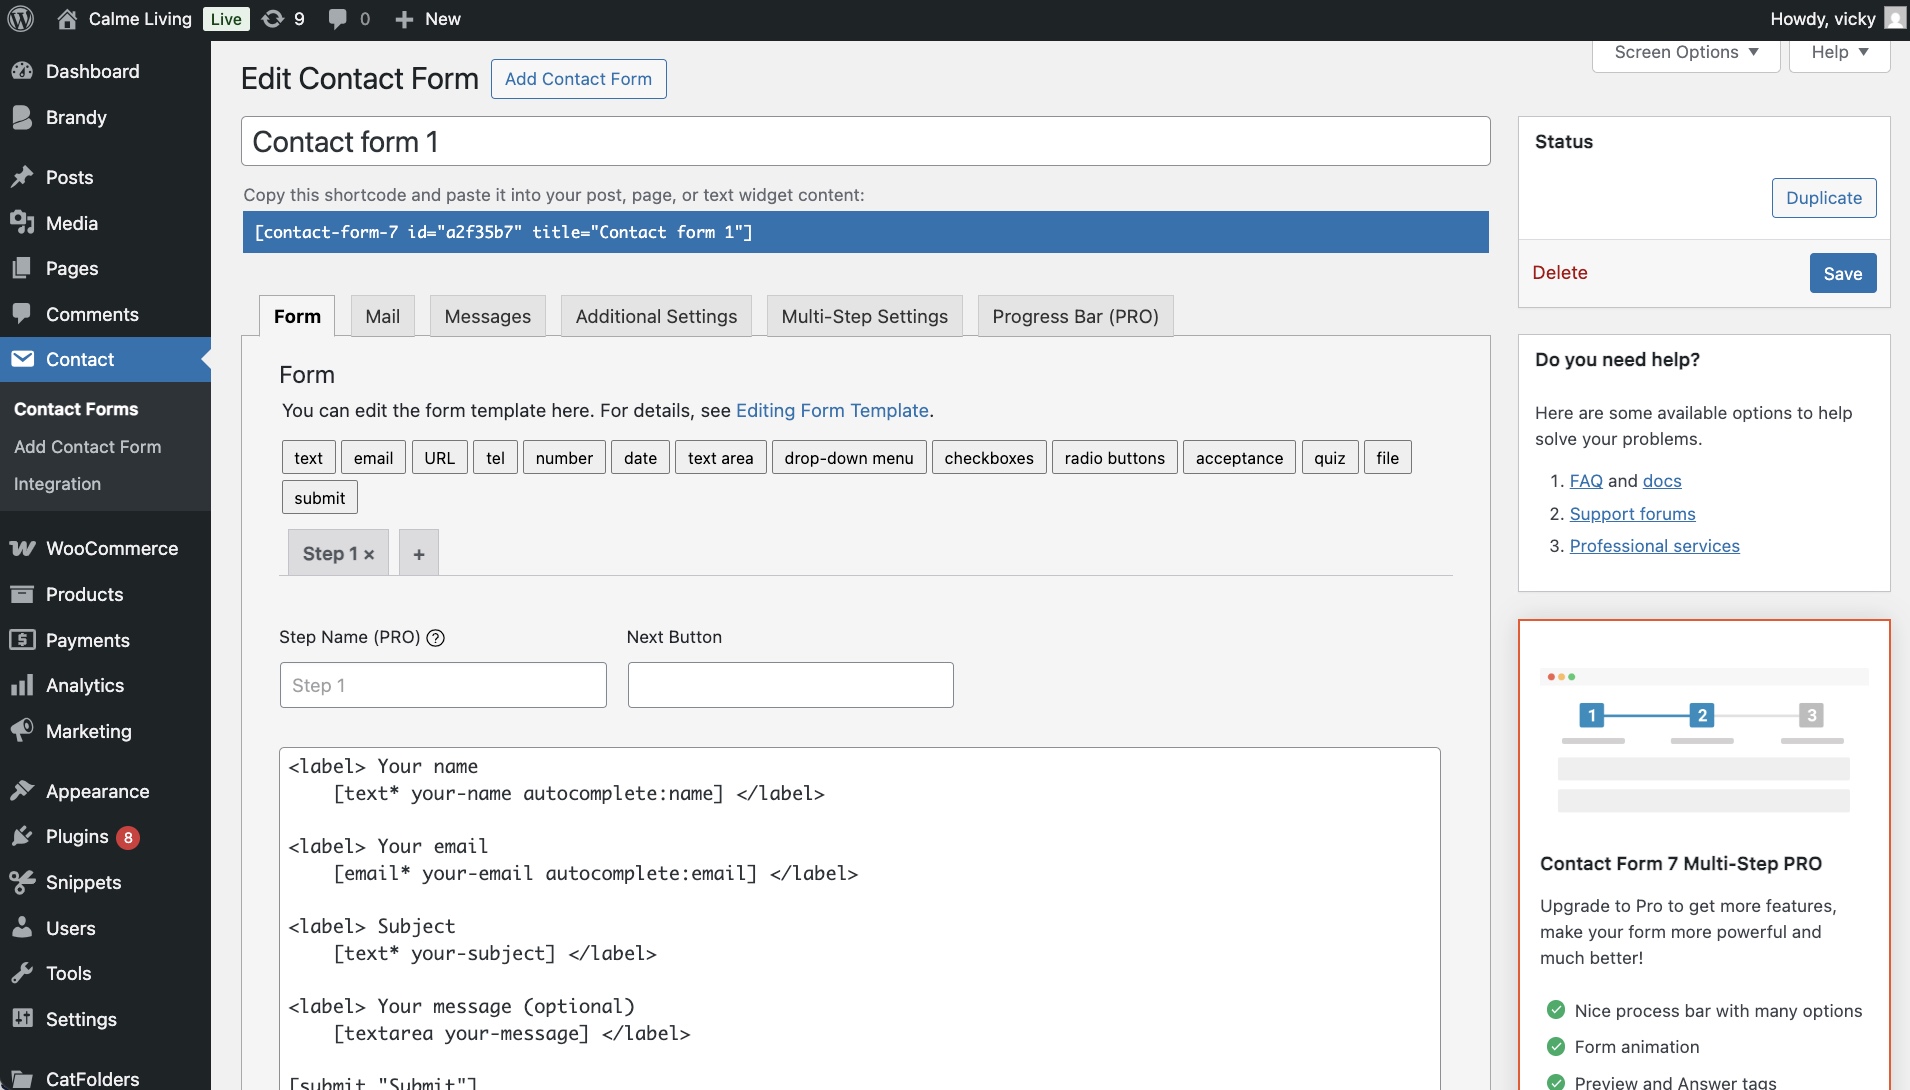
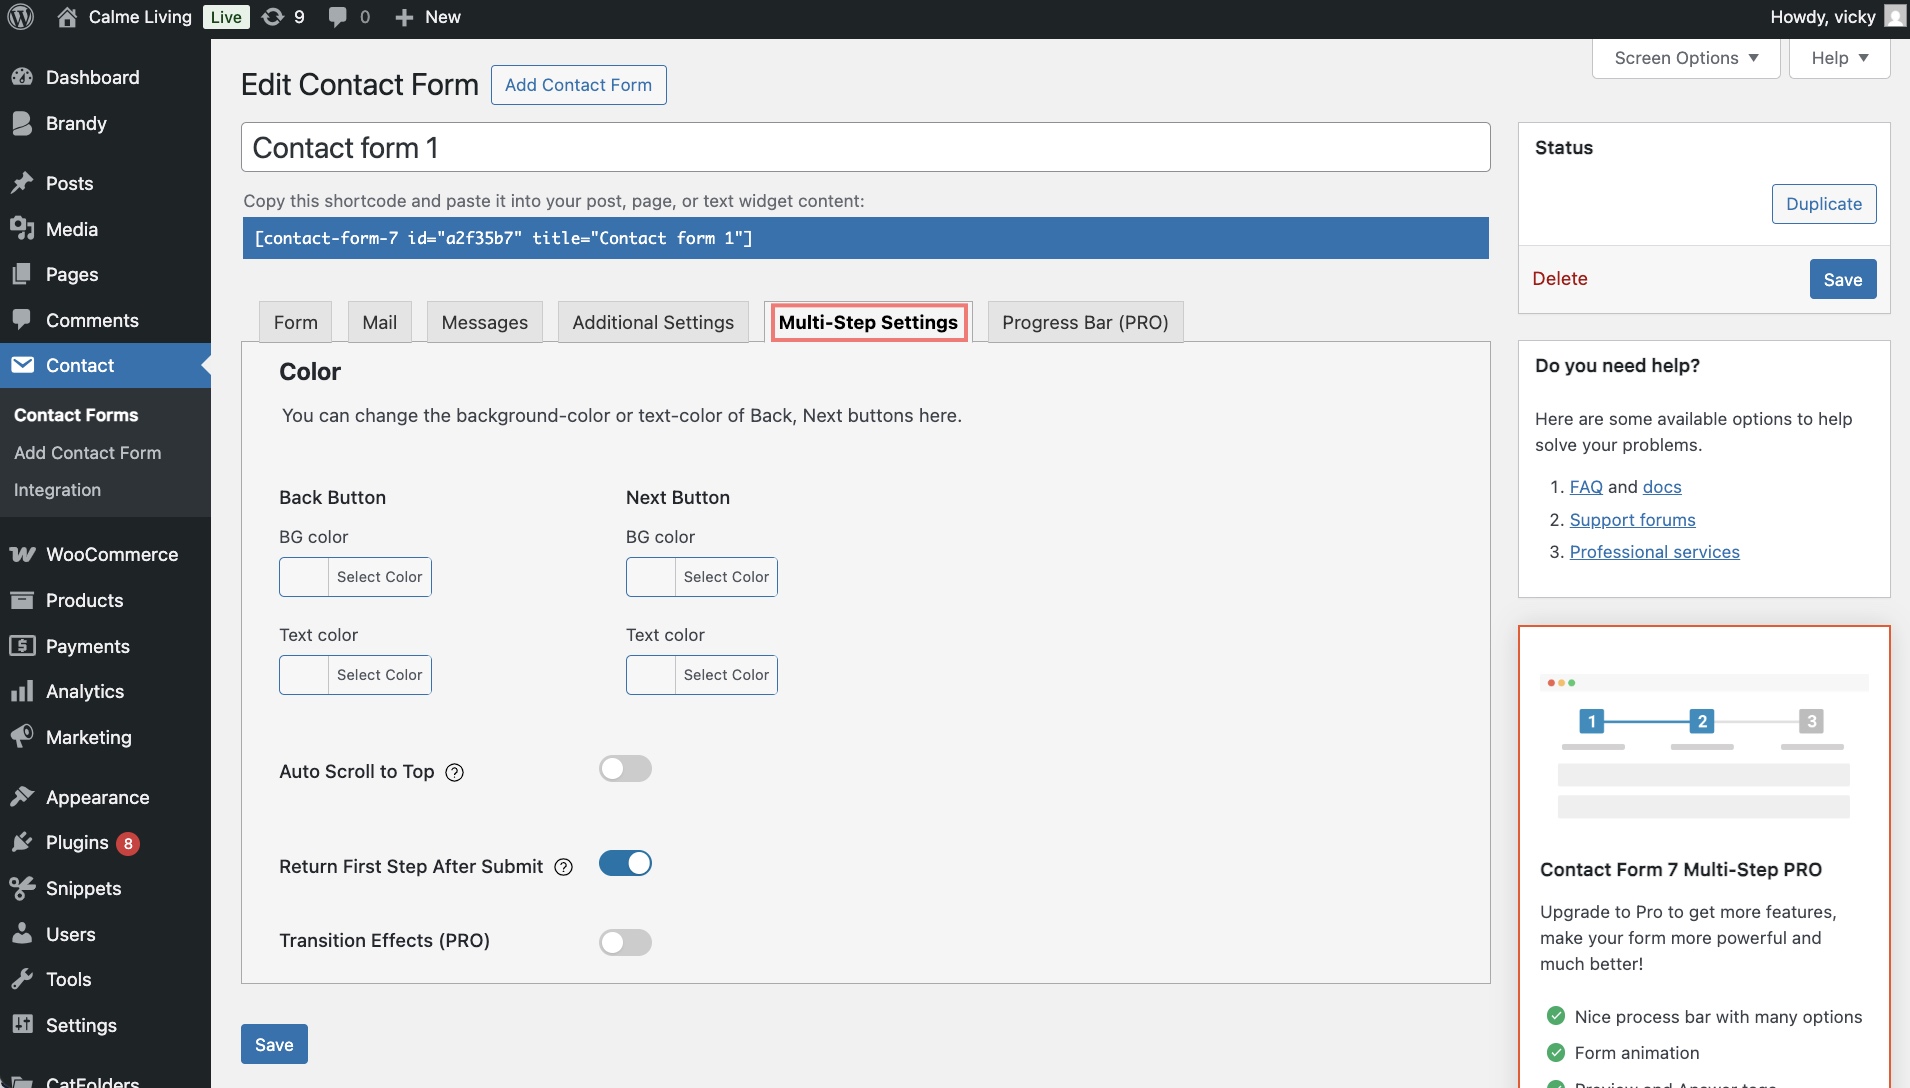
If using Multi-Step Pro, you can give the title for your form steps, custom Back and Next buttons, animation effects, and more.
About the style of each step in your contact form, you can customize it in the Multi-Step Settings tab.
If you want to check more details about each section of Multi Step for Contact Form 7, you can visit its documentation.
Publish the forms, and now visitors will progress through your form step by step instead of seeing everything at once.
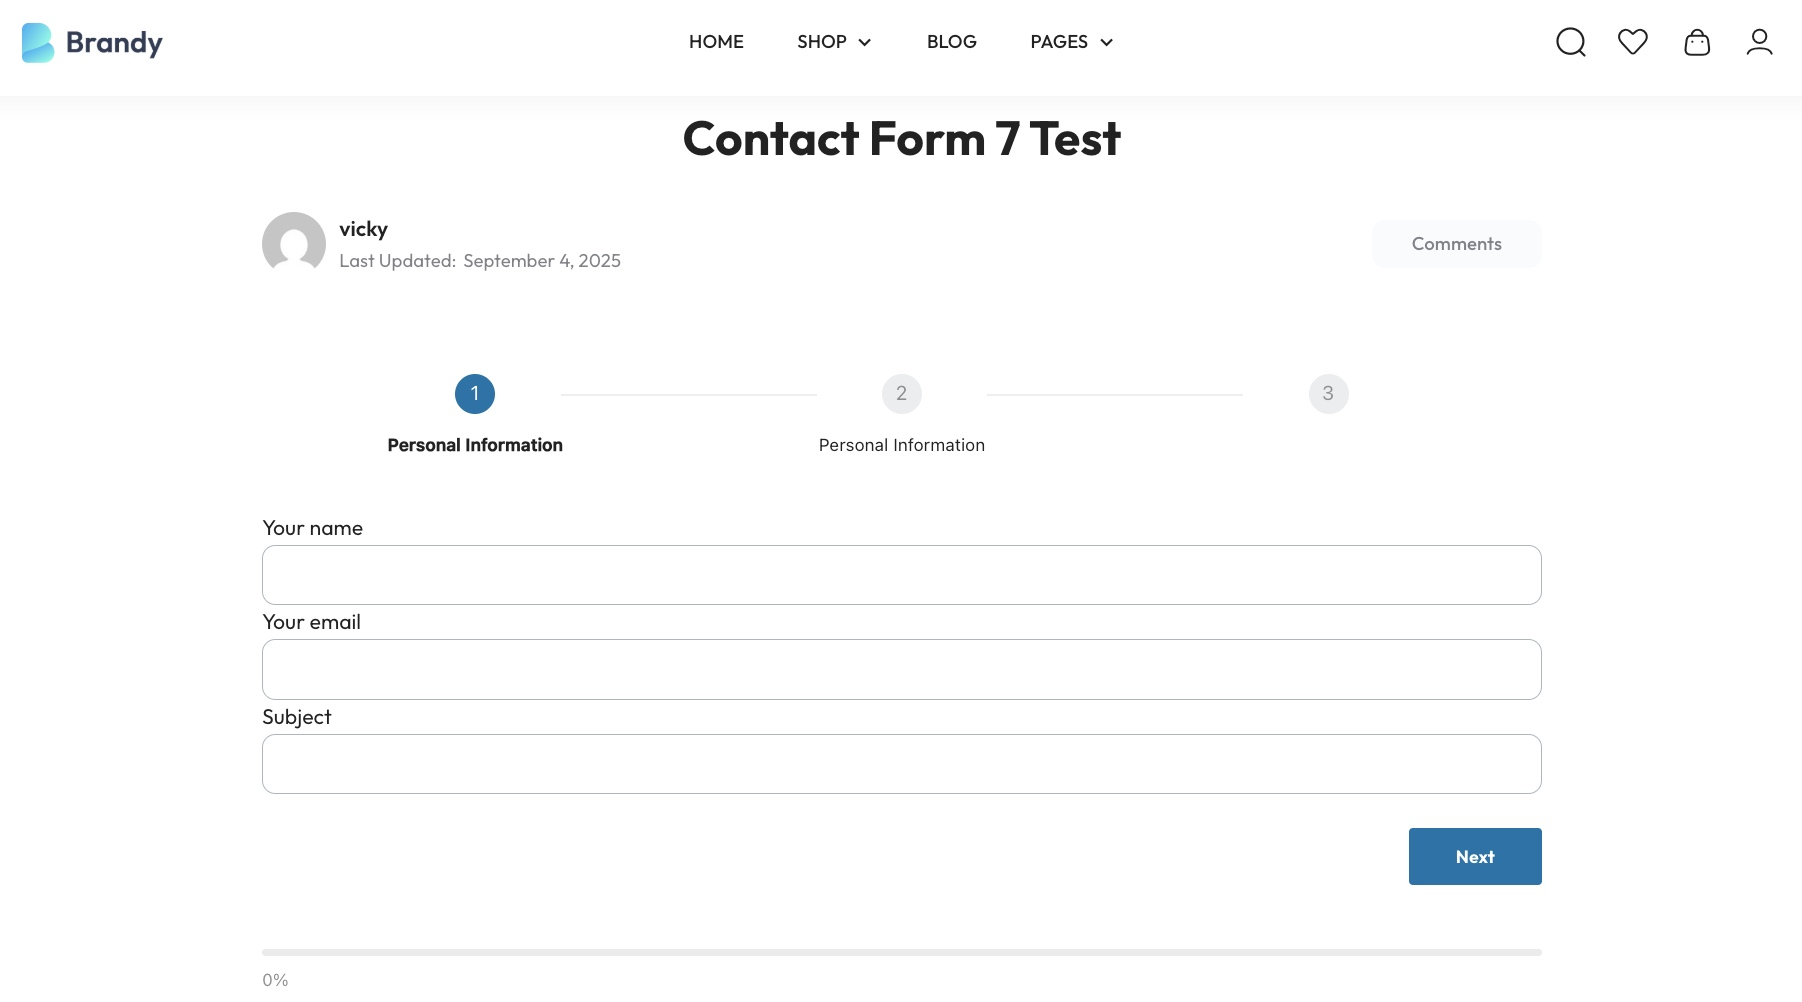
With multistep forms, users won’t feel overwhelmed, and you’ll collect more complete and accurate submissions.
Manage your Customers Database by Contact Form 7 Database
By default, Contact Form 7 only sends submissions to your email inbox. That’s fine – until an email goes missing, lands in spam, or gets accidentally deleted.
That’s where the Contact Form 7 Database plugin by NinjaTeam becomes a lifesaver. It automatically stores all form submissions directly inside your WordPress dashboard. This way, you’ll never lose a lead or request again.
How to set it up:
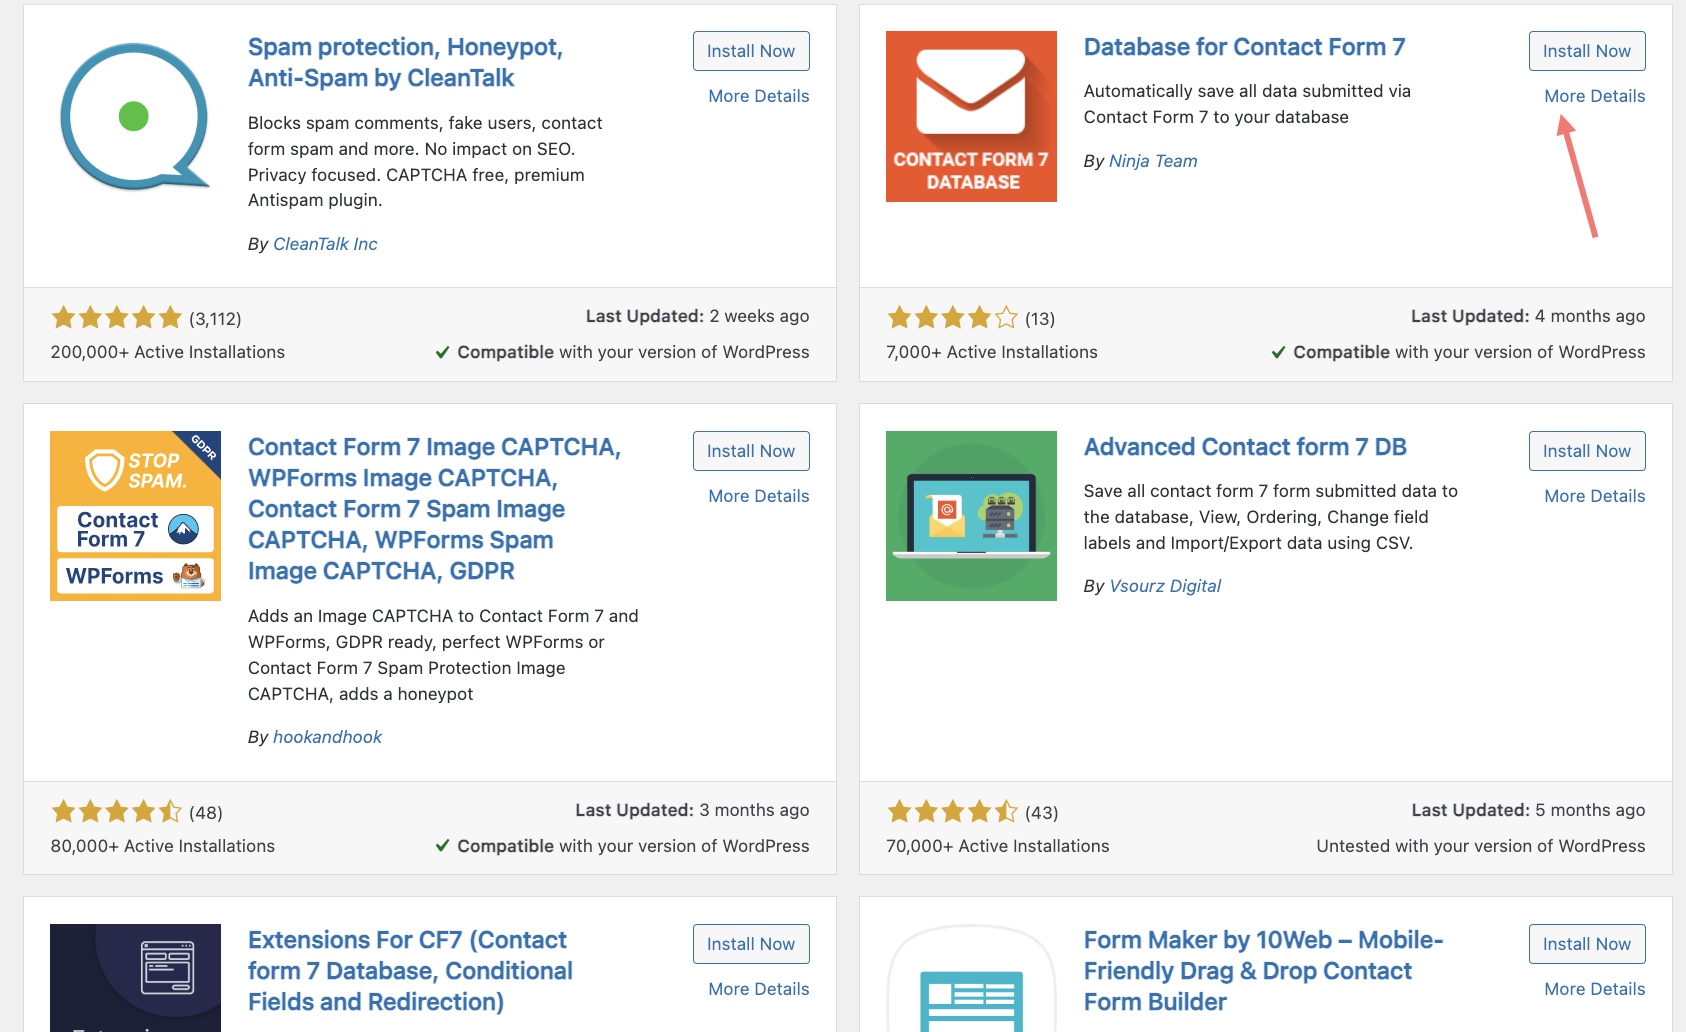
- Install and activate the Contact Form 7 Database plugin from NinjaTeam.
- Go to your WordPress dashboard, Contact, then you will see Database (a new tab will appear).
- Every time a visitor submits a form, their data will now be stored here automatically. Go back to Contact, then Database in your dashboard. You’ll see your test entry listed in a table with details like: Name, Email, Message, Submission date/time, and so on.
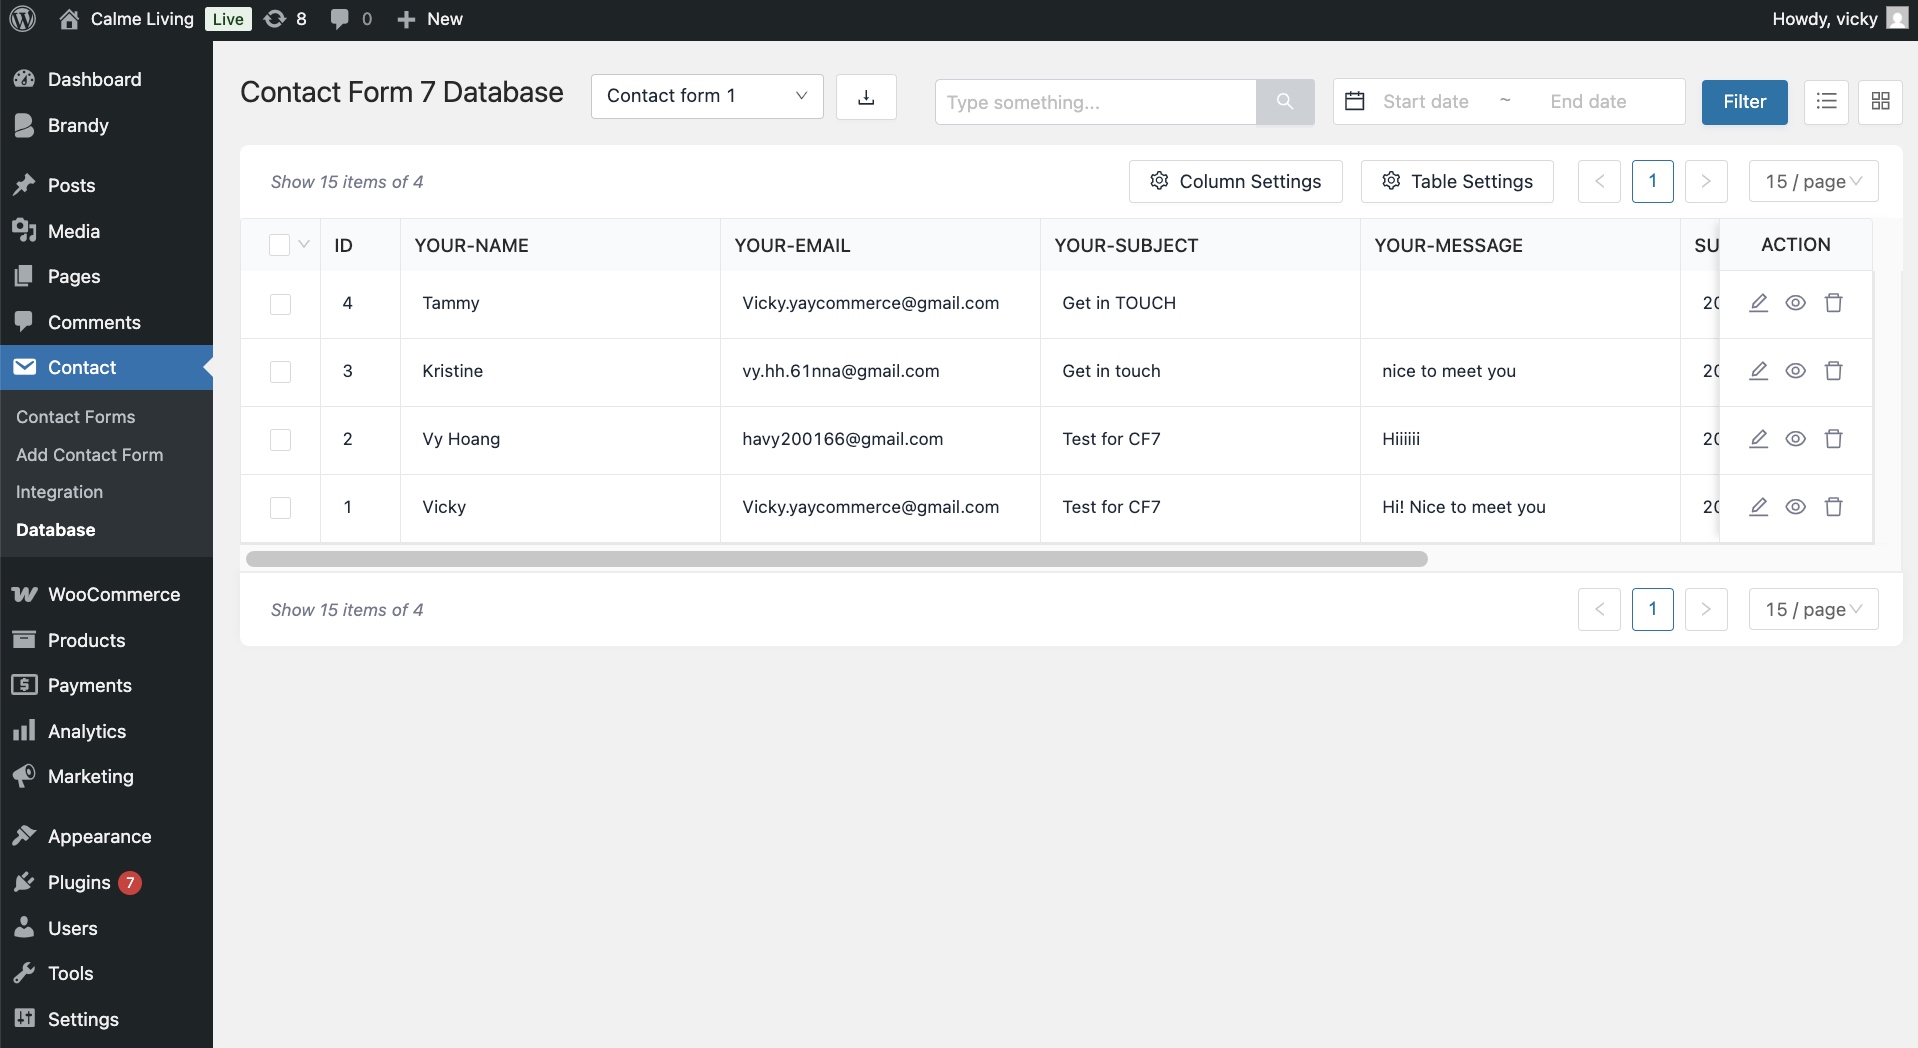
With each submission sent to your WordPress site, it is neatly stored, searchable, and filterable. Also, you can export the data to a CSV file.
Check the documentation of the Database for Contact Form 7 here.
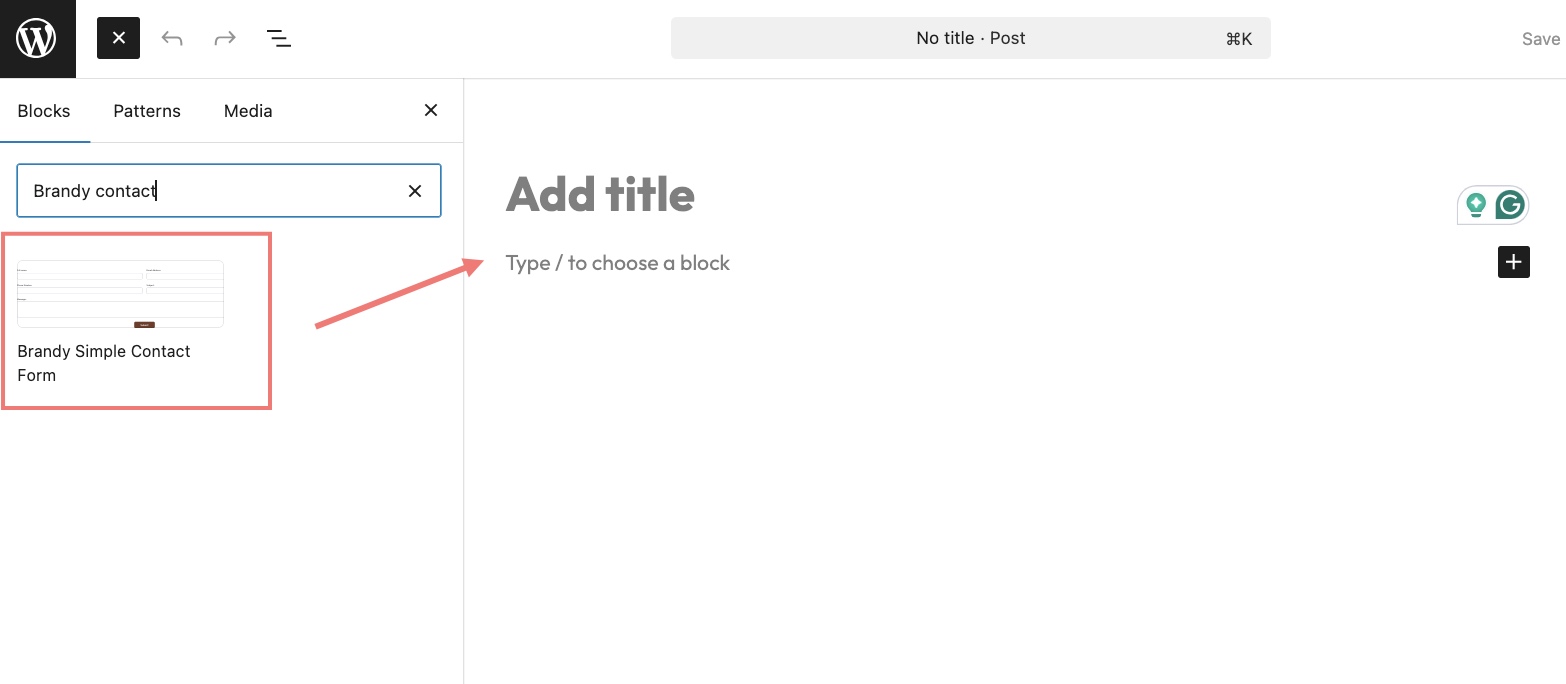
Bonus Tip: Try Brandy Simple Contact Form Block
Another way, if you’re a fan of the Gutenberg block editor (the default editor in WordPress), you’ll love the Brandy Simple Contact Form Block. Unlike Contact Form 7, which works with shortcodes, Brandy gives you a drag-and-drop block that you can insert directly into any page or post.

It’s perfect if you just want a clean, modern contact form without the extra setup hassle.
From your WordPress dashboard, you can install and activate Brandy Blocks – the powerful addon of Brandy Theme.
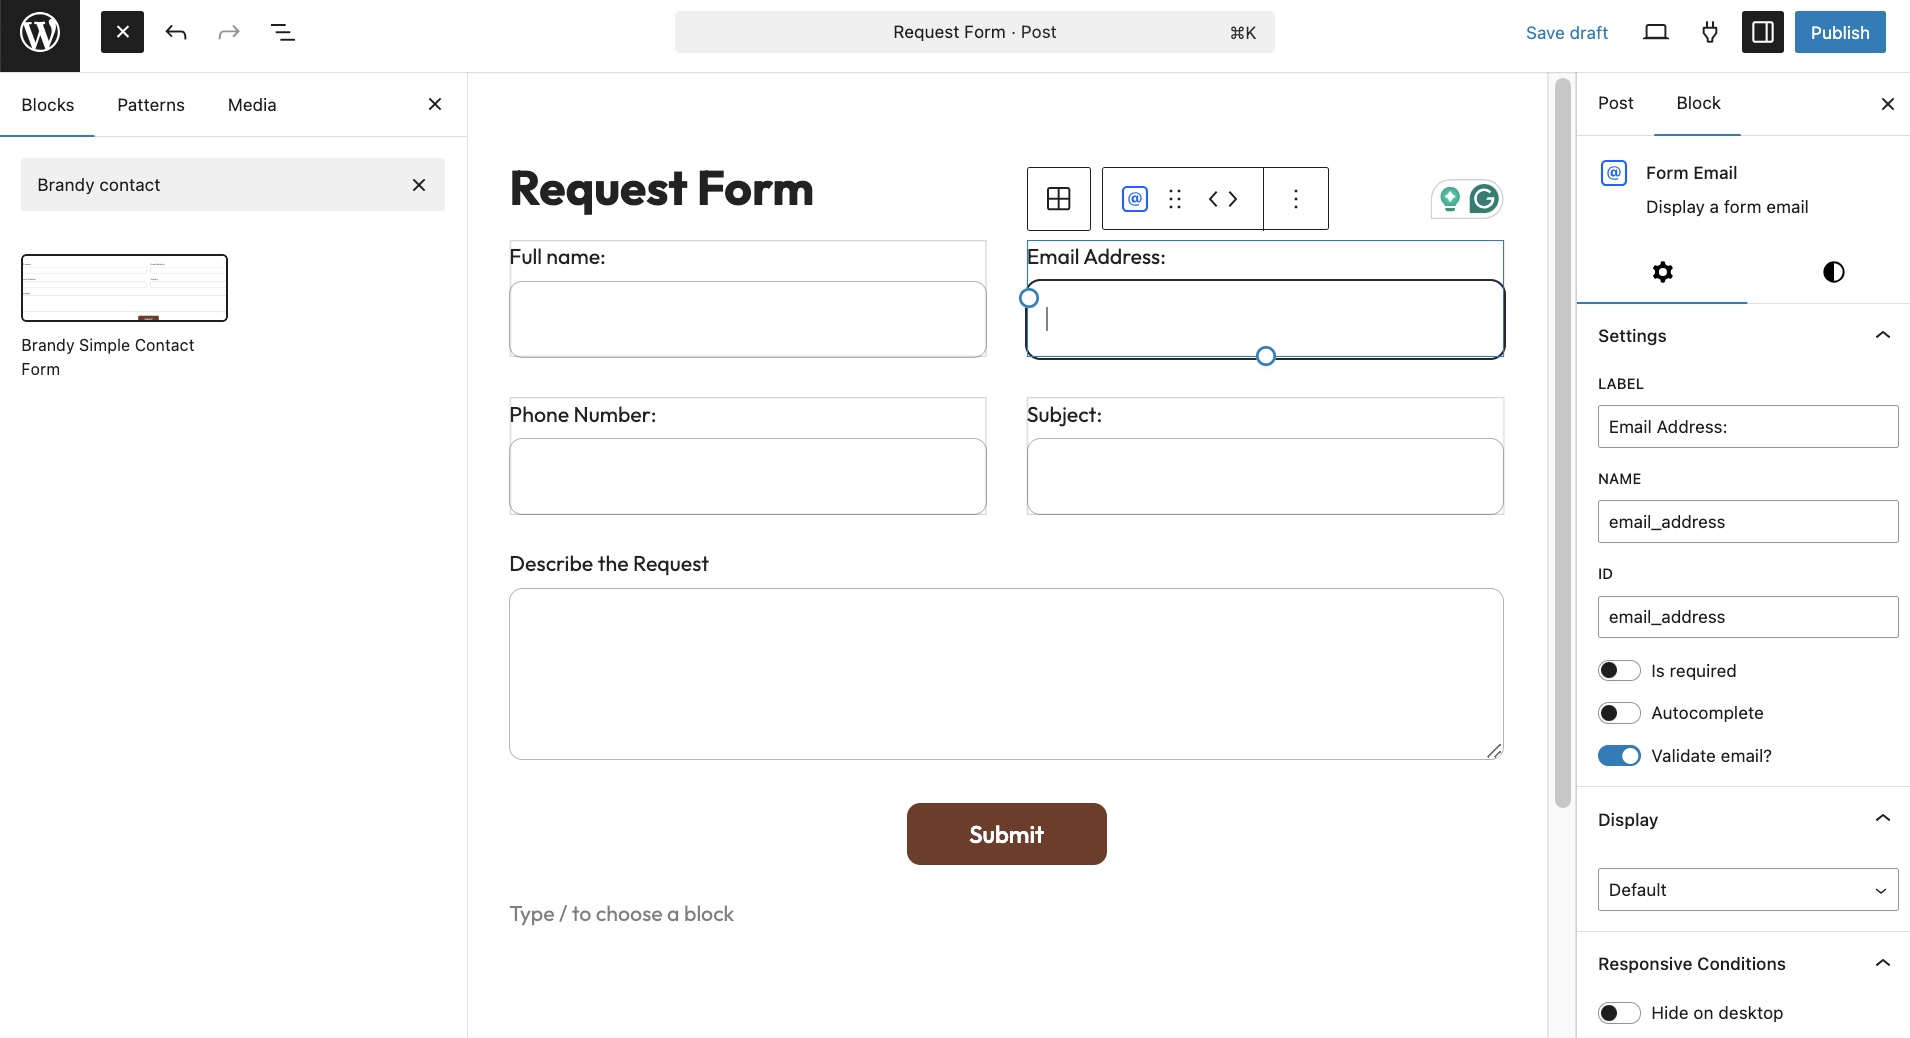
There you have Brandy Blocks on your site, open the page where you want to add your contact form, search for the Brandy Contact Form block, and click to insert it.
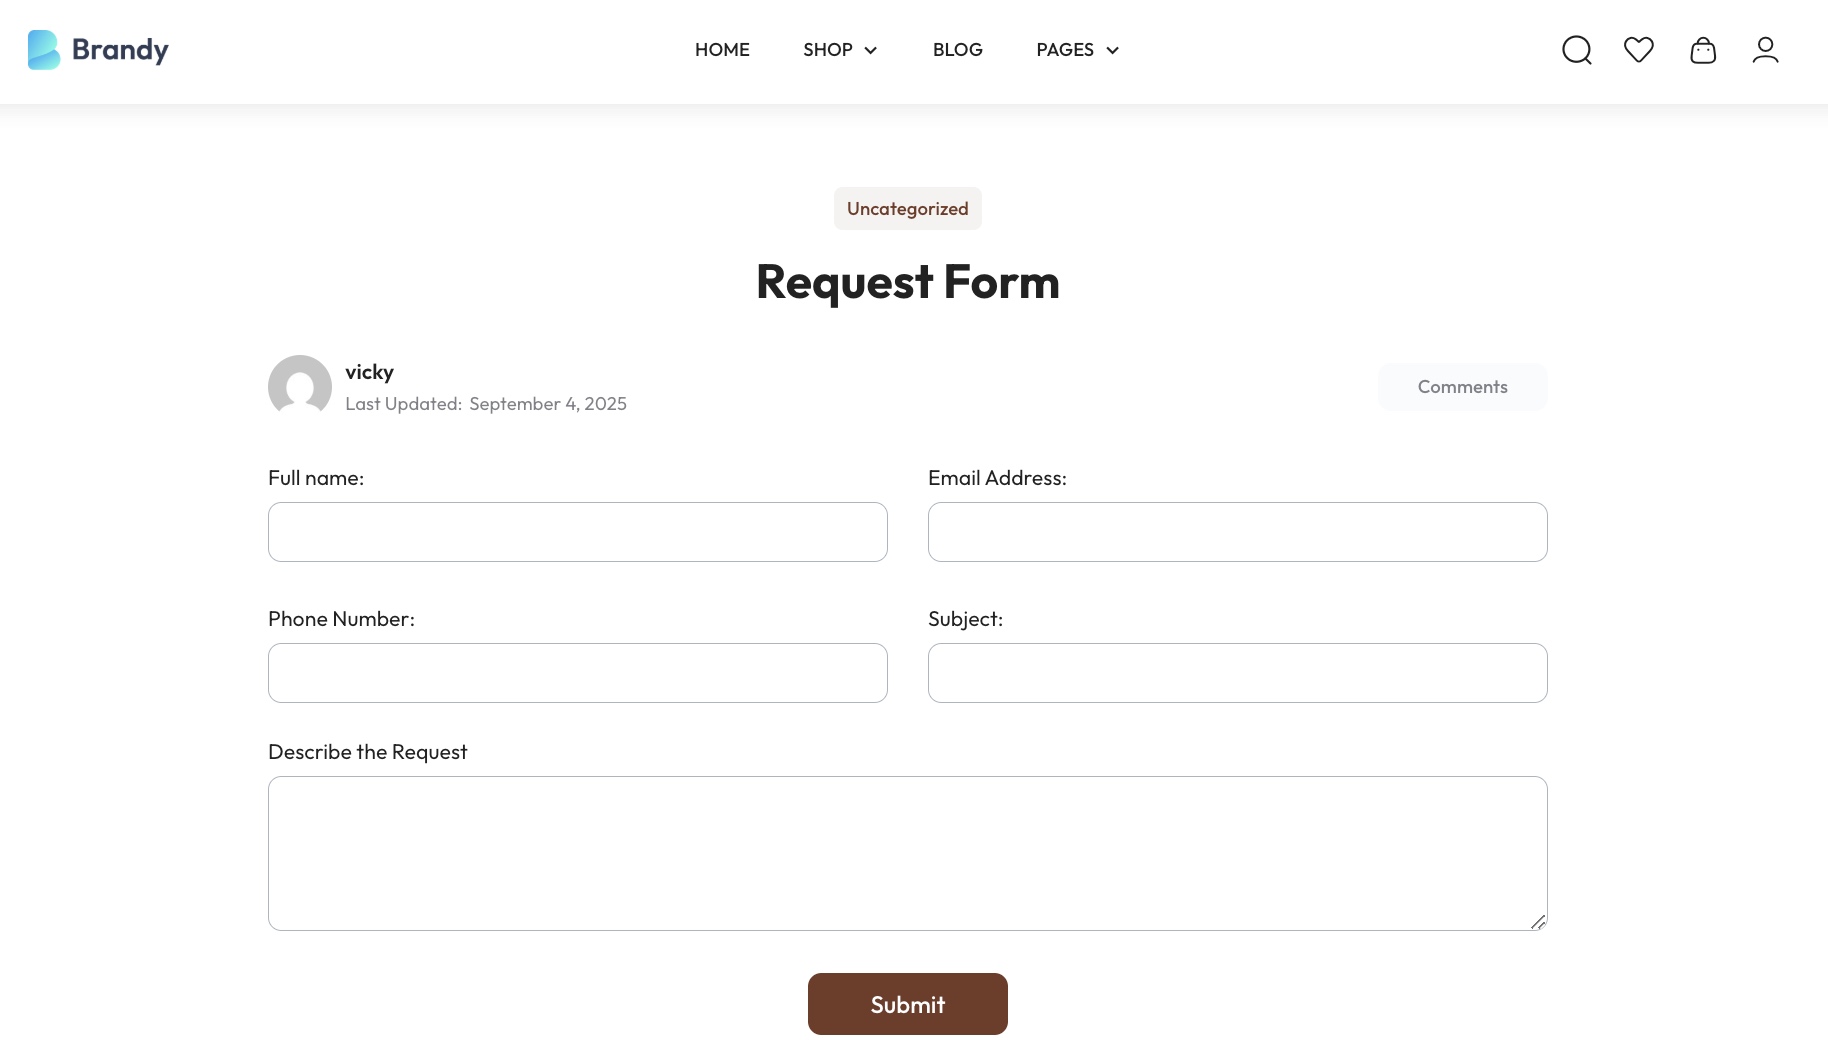
By default, the form comes with name, email, and message fields. You can customize all the fields on your form in block settings. There is also a section to make sure all the information about your customers is valid.
Then, click to Publish on your page. Visit your site, fill out the form as a test, and make sure the email lands in your inbox.
If you want a simple, stylish form for a personal blog, small business website, or portfolio, Brandy Blocks is very suitable for your website.
Final Thoughts
Thus, after walking through the article above, adding a contact form to your WordPress site doesn’t have to be complicated or time-consuming. With the free and reliable Contact Form 7 plugin, you can create a simple contact form in just a few minutes.
But if you want to go beyond the basics, the NinjaTeam add-ons take Contact Form 7 to the next level:
- Contact Form 7 Multistep makes long forms easier to complete by breaking them into multiple steps. This is a game-changer for registrations, bookings, and quote requests.
- Contact Form 7 Database ensures every form submission is safely stored in your WordPress dashboard, so you never lose a lead – even if emails fail to arrive.
And if you’re building with the Gutenberg editor, the Brandy Simple Contact Form Block is a fantastic option for beginners. It lets you insert a stylish, no-code contact form directly into your page-fast, clean, and beginner-friendly.
Whether you’re running a business website, blog, online shop, or portfolio, having the right contact form ensures smoother communication with your visitors, improves user experience, and helps you capture every valuable inquiry.
Now’s the time to take action. Install your preferred solution today and start building stronger connections with your audience tomorrow.