WordPress media library is responsible for storing the site’s multimedia files: images, videos, audio files, and documents. Many a time, you might encounter the issue in which WordPress media library is not loading/showing thumbnails. So you have to follow this 6-step tutorial to fix this error. Otherwise, you can’t upload files, and users may face difficulties when visiting your site.

We want you to never have to deal with such an error. However, bookmark this post to help you fix this issue if it arises. Here is a complete guide showing you how to troubleshoot WordPress Media Library not loading error step by step. Each step is thoroughly described, so even less-trained users will be able to follow the instructions.
IMPORTANT: In the best-case scenario, plugin incompatibility may generate an error, and fixing the issue takes around five minutes. In the worst-case scenario, the issue is with file permissions, and you’ll have to change the sites’ files. Before taking action, we strongly recommend performing a complete site backup. No matter what you do, a site backup gives you that needed peace of mind when fixing a site.
Recommended: Use WordPress Media Library Folders
FileBird – WordPress Media Library Folders was born to help you manage thousands of files in the WordPress media library quickly and easily.
This will help you save a ton of time trying to solve the WordPress media library not loading issue. The hierarchical view of your folders will help you quickly find specific folders in just a blink of an eye. And FileBird loads one folder at a time, so the risk of the media library’s inability to load will be reduced.
How FileBird troubleshoots the WordPress media library not loading?
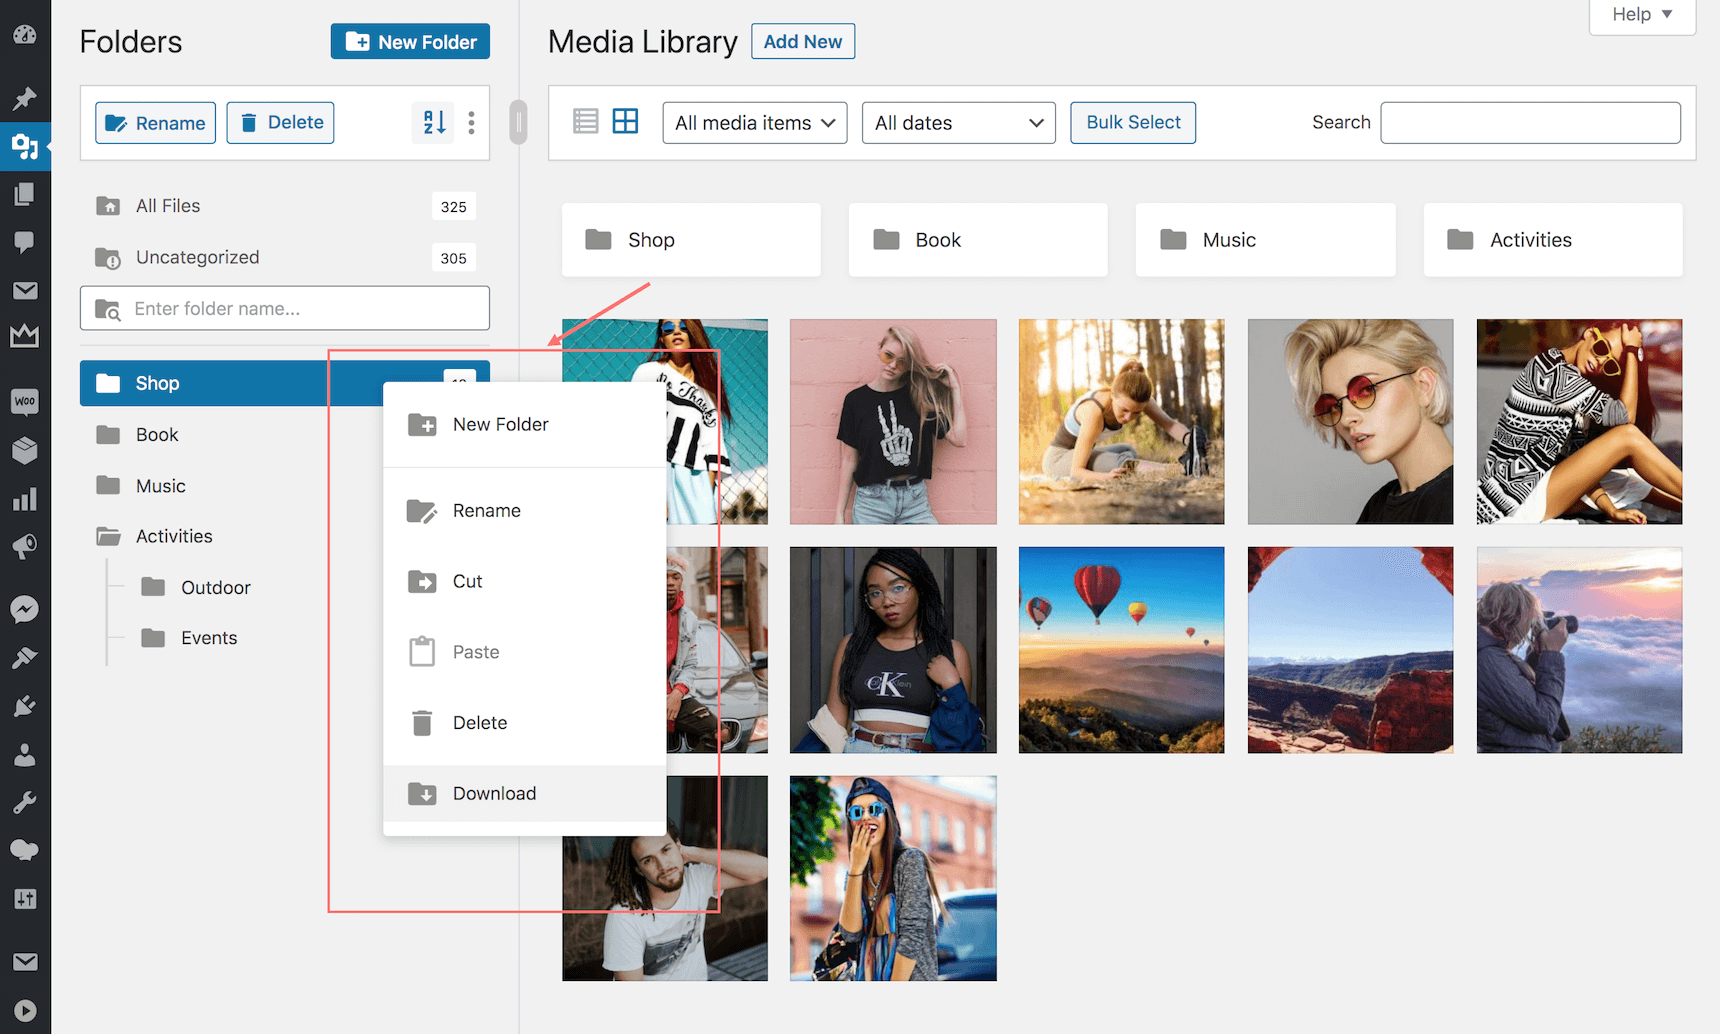
Once you install the plugin, you will be able to organize thousands of your images and other media files into folders/ categories, drag and drop to upload/move files into folders and drag and drop to rearrange folders.
You have the toolbar on the left which allows you to control all of your folders/ files. You can create, rearrange, rename or delete folders.
Right-click your mouse to quickly create, rename or delete folders like what you do on your computer.
More than that, you can even get your entire folder and files in a downloadable ZIP file with a single click.

Give FileBird a try and WordPress media library not loading issue will not exist anymore.
The FileBird plugin allows an infinite list of uploaded media library files. But if you’re looking for some alternatives around troubleshooting this issue, you can hop on how to fix the issue in which WordPress images are not showing by following the next steps.
1. Check Plugin Incompatibility
Even if you use premium plugins or ones from the WordPress repository, they might not be perfect and could conflict with each other. Some incompatibilities don’t have a visible impact on your site, but some result in major problems, like making it impossible to upload images or videos. Here is what you have to do to find the culprit:
1. Go to your WordPress admin dashboard and click on Plugins. You’ll see a list of plugins. Select all of them and choose Deactivate from the Bulk Action drop-down menu.

2. Clear the cache memory if you have installed a caching or performance plugin.
3. Visit the Media Library and check if it works. Even if you see the thumbnails properly, upload a new image to make sure it works.
4. If the Media Library works, then a plugin was causing the issue. Reactivate each plugin one at a time and check the Media Library after each reactivation. If you see the Library’s thumbnails and uploading works fine, then the plugin is okay. Repeat the process until you find the guilty plugin. It’s boring, but it’s the only way to find the culprit.
5. If the problem persists after deactivating all the plugins, then there is no plugin incompatibility. Reactivate them and go to the next potential source of the problems: the theme.
Hints:
- According to Murphy’s law, the last plugin you re-installed generated the issue. To save time and break this law, we suggest starting with the plugin you most recently installed or updated before the Media Library stopped working. Most likely, that’s the one that generated the issue.
- Contact the team that developed the plugin responsible for your issue. Explain the problem and work with them to update the plugin. It won’t help your site get more visitors, but it’s always nice to help the WordPress community.
2. Check Theme Incompatibility
Install and activate a new theme – let’s say a default one, such as Twenty-Twenty. Check the Media Library, and if it works, then the problem is your theme. In this instance, contact the theme developer and describe your issue.
There is a good plugin called Health Check to help you troubleshoot plugin- or theme-related issues. It allows you to toggle your plugins on/off and switch between themes.
Good news: Using the Health Check plugin won’t affect normal visitors to your site.
3. Update WordPress Core
You have to update the WordPress core from time to time. While the team behind WordPress works hard to make it faster, more secure, and more versatile, errors do happen. Don’t worry, many of these errors are fixed so fast that you won’t even notice them. Still, your version of WordPress may produce such an error, and there is a slight chance that the WordPress core is guilty of the Media Library malfunction.
The deficient WordPress update is the most probable cause of the Media Library not loading issue. A poor internet connection or a server misconfiguration may result in an incomplete update of your site’s WordPress core. All you have to do is to make sure that the update works fine. Head to your WordPress admin dashboard, click on Home > Update > Re-install now to re-install the WordPress core.

4. File Permissions
The next suspect could be invalid file permission if there is no problem with your plugins, theme, or WordPress core. Here is what you have to do:
1. Open your FTP client of choice (Filezilla, Cyberduck, FreeFTP) and connect to your site host.
2. Access your site’s files and go to the wp-content/ folder. Identify the upload/ folder.

3. Select File Permissions and change them to 755, unless there is a different numeric value. Check the Recurse into the subdirectories box and choose Apply to directories only.

4. Pay Attention! Go back to the upload/ folder and select File Permissions once again. This time, change the numeric value to 644, check the Recurse into subdirectories box, and choose Apply to files only.

5. Go to the Media Library and check if it works. If it still doesn’t work, apply this algorithm again but choose 777 instead of 755. Verify the Media Library, but bear in mind that 777 presents a serious security issue for your site.
In theory, you have done everything possible to fix this problem. Contact your hosting provider if the problem persists; it might be a server malfunction or an issue out of your control.
Types of File Permissions
You can change file permissions without having a clear idea of what they are. However, it helps if you have a basic understanding of file permissions.
File permissions determine what actions a user can perform on a file: read, write, or execute. Consider the following rules:
- Read (4): Allowed to read files
- Write (2): Allowed to write or modify files
- Execute (1): Read, write, delete, modify, or direct files

Each digit of the numeric values from above has a particular meaning. The first digit says what actions a user can perform (read, write, or execute), the second says what a group can perform, and the last says what a site visitor can perform. You calculate the value of each digit of a permission’s numeric value by adding the value for each type of action.
For example, 755 means that the users read, write, and execute (4 + 2 + 1 = 7), the group members can read and execute (4 + 1 = 5), and the site visitors can read and execute (4 + 1 = 5). Check out this resource for more information about file permissions.
5. Image Hotlinking
Hotlinking refers to instances when a website links to images hosted on an external hosting platform. The fair method is to link to the image, credit the artist, and store the image on your site’s server—that is, of course, if the image owner allows it.
While copyright infringement is beyond the scope of this article, image hotlinking is a way to poorly display images and reduce the site’s performance. The site using hot-linked images doesn’t consume its own bandwidth; instead, it uses the original host’s bandwidth. Fortunately, most hosting providers offer hotlinking protection. Many security plugins also package this feature.
However, there are cases where webmasters prefer hotlinking—for instance, people who run multiple sites. No matter the reason, they use a single site to store images.
The hotlink images won’t work if you don’t set up the proper configuration from cPanel (or a similar account) or the .htaccess file. Check out these steps to disable hotlinking while whitelisting particular websites.
Disable Image Hotlinking from cPanel
Go to cPanel (or a similar account) and search for Hotlinking Protection in the Security area. It depends on your site’s host, but Hotlinking Protection usually falls under the Security area.

Click on it to enable hotlink protection. You also list the URLs you want to allow access to. You can also block access to particular types of file extensions. Include here the image extensions used on your websites, such as .jpeg, .jpg, .bmp,.gif, and .png.

IMPORTANT: Pay attention when you create your list of URLs with access to your site. Include the www, non-www, http, and https versions to avoid any potential errors.
Disable Image Hotlinking from .htaccess
Access your site’s files using an FTP client or through the File Manager on cPanel. Go to the site’s root directory and look for the .htaccess file.

IMPORTANT: The files starting with a dot are hidden by default. Check the FTP client’s or File Manager’s settings and change them to allow you to view the hidden files. That’s why you won’t see .htaccess file directly when you open up the root directory.
Edit the site’s .htaccess file and paste the following snippet of code:
RewriteCond %{HTTP_REFERER} !^$
RewriteCond %{HTTP_REFERER} !^http(s)?://(www\.)?yourwebsite.com [NC]
RewriteCond %{HTTP_REFERER} !^http(s)?://(www\.)?yourwebsite1.com [NC]
RewriteCond %{HTTP_REFERER} !^http(s)?://(www\.)?yourwebsite2.com [NC]
RewriteRule \.(jpg|jpeg|png|gif)$ - [F]
Replace “yourwebsite” with the name of your site and “yourwebsite1” and “yourwebsite2” with the name of the sites you will allow to hotlink. Delete the lines of code for “yourwebsite1” and “yourwebsite2,” and you will block the sites from hotlinking your site’s images.
Over to You
Fixing WordPress errors isn’t the most fun activity, but you should be prepared for the worst-case scenario. Don’t panic if your site’s Medial Library doesn’t work; check this article instead and carefully apply the suggestions.
Have you ever experienced the Media library not loading error? How did you resolve it? Please leave a message in the chatbox below and share your experience!
[av_button_big label=’Free Download FileBird Plugin’ description_pos=’below’ icon_select=’yes-right-icon’ icon=’ue925′ font=’entypo-fontello’ link=’manually,https://wordpress.org/plugins/filebird/’ link_target=” title_attr=” color=’custom’ custom_bg=’#0085ba’ color_hover=’custom’ custom_bg_hover=’#006799′ color_font=’theme-color’ custom_font=’#ffffff’ id=” custom_class=’ninja-nofollow’ av_uid=’av-i9jne6′ admin_preview_bg=”][/av_button_big]
You may also like: How to Upload and Create a Document Gallery in WordPress
