Think about it: you upload images, videos, and documents for every post. Even adding just 10-20 images to WordPress per day can result in a chaotic sea of files after just a few months! You might be wondering, in WordPress, how best to organize the media library?
WordPress simply doesn’t offer the tools you need to efficiently manage that volume of files.
Without WordPress media library folders, finding a specific image feels like searching for a needle in a haystack. This leads to:
- Endless scrolling
- Difficulty finding files
- Slow workflows
- An overwhelming number of images and documents mixed up together
But there’s a solution! In this article, we’ll explore how to bring order to the chaos with a simple yet powerful technique: organizing your WordPress media library with folders.
TL;DR
You can organize your WordPress media library with folders, though not natively, you’ll need a plugin like FileBird or CatFolders to make it happen.
Real vs. Virtual Folders
- Real folders: Change the actual file location on the server (can break links if not handled carefully).
- Virtual folders: Organize files visually in the dashboard with a folder tree view, by custom taxonomy, which is safer and more flexible for most users.
On this page:
- How to Create Folders in Your WordPress Media Library?
- How Folder Plugins Work
- Getting Started with the FileBird Plugin
- Creating Your Media Folders
- Uploading Files to Specific Folders
- Moving and Locating Existing Files
- Renaming & Deleting Folders
- Searching Folder Names
- Making Media Folders Work Better for You
- Smart Context Menu
- Optimize Image Filenames and Alt Text
- Color-Coded Folders and Folder Tree Theme Skins
- Tips for Naming Conventions
- Sort Media Files by File Size
- Folders for Pages, Posts, and Custom Post Types
Let’s dive in!
How to Create Folders in Your WordPress Media Library?
By default, WordPress only groups file uploads by year and month (e.g. /uploads/2025/06/). You can’t create custom folders or sub-folders. So once your site grows, your Media Library becomes a long feed of images, videos, and documents.
This structure isn’t always ideal for managing large or multilingual content libraries.
How Folder Plugins Work
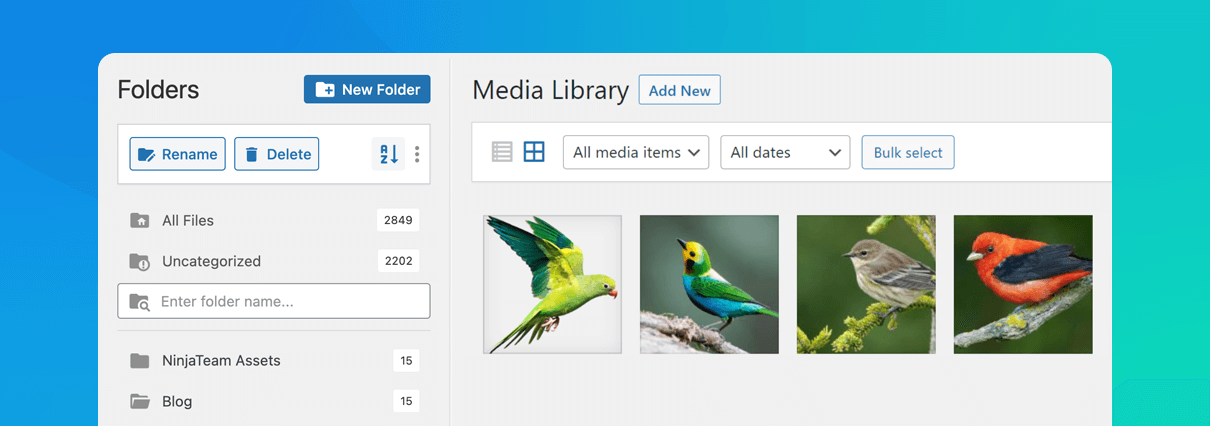
Folder plugins like FileBird inject a familiar “folder tree” sidebar into your Media Library. Key features include:
- Drag-and-drop to move files between folders
- Create, rename or delete folders and sub-folders easily
- Instant folder search/filter to jump to the right category
- Built-in image gallery and document library on the frontend
There are several alternatives like CatFolders, HappyFiles, or Wicked Folders, all of which provide a similar tree-style file manager.
Caution: Some plugins attempt to create real physical media library folders, which will change the file URLs and can lead to broken links (404 errors) across your site.
Info: That said, FileBird uses a virtual folder organization, so your media permalinks remain intact.
Getting Started with the FileBird Plugin
The installation & activation process is easy:
1. In your WordPress dashboard, go to Plugins > Add New
2. Search for “FileBird – WordPress Media Library Folders”
3. Click Install Now, then Activate
Within FileBird free or pro version, you won’t be prompted to add any license or input your email.
You can start accessing the new interface right away:
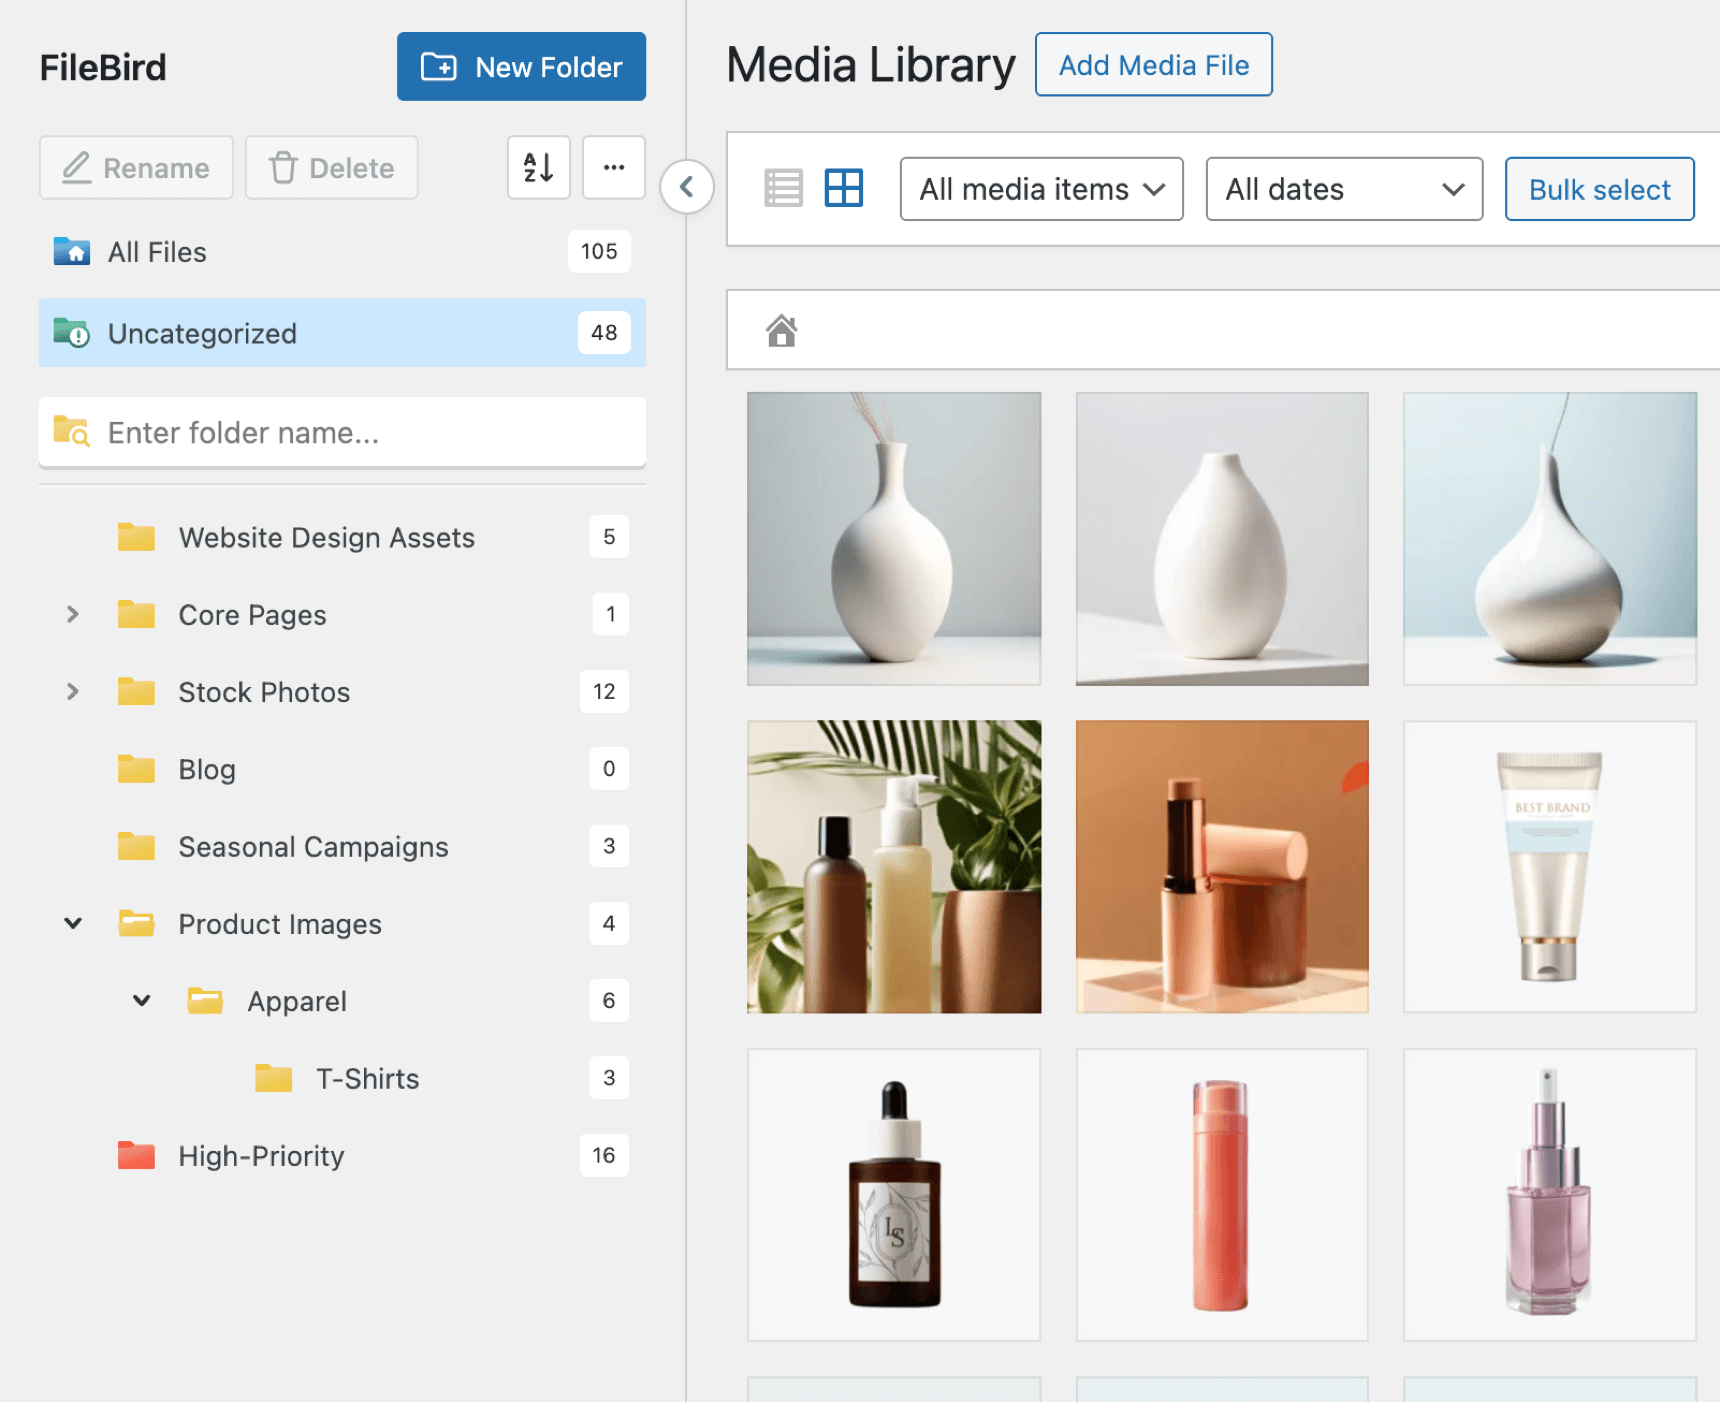
- Navigate to Media > Library
- You’ll see a Folder Tree panel on the left, which is FileBird’s interface
- Toggle to the Grid View or List View as you like
Feel free to explore the settings by clicking on the three-dots-icon, where you can set the default sort mode and startup folder.
For instance, if you set the startup folder as “Uncategorized,” it will open the Uncategorized folder whenever you first open the media library, so you can quickly see what needs to be sorted.
If “Previous folder” is selected, it will automatically open the most recently used folder, allowing you to easily pick up where you left off.
CHECK OUT DEMOCreating Your Media Folders
To create your first folders, follow these steps:
1. In the left panel, click the + New Folder button
2. Enter a folder name (e.g. “Blog Images” or “Product Photos”)
3. Press Enter to save
4. To create sub-folders, right-click an existing folder and choose New Folder
Pro Tip: To bulk create a list of parent folders, you can type multiple folder names, separated by a comma. E.g. “Blog Images, Product Photos, Logos, Banners, Home Page, About Us.” Then, simply press Enter to create those six folders instantly.
Uploading Files to Specific Folders
The FileBird plugin helps you organize files right from the uploading moment:
- Select the target folder in the FileBird panel, or the dropdown in “Upload Media” modal
- Click Add New or just drag and drop files
- Any files you upload now will go directly into the selected folder
Moreover, FileBird supports directing multiple folders to a specific folder. Which means you can drag and drop a folder with nested folders from your computer right onto your selected WordPress media folder.
Moving and Locating Existing Files
You can move a single file or bulk move many files anytime. Just follow these steps:
1. Click a file thumbnail or bulk-select multiple files (no matter whether in List View or Grid View)
2. Drag it onto the desired folder in the sidebar
In the file view window, you can quickly check the folder location of the file by looking at “FileBird Folder.”
There, you can also use the dropdown select to move the file to another location if necessary.

Renaming & Deleting Folders
Rename: Right-click the folder → Rename → enter new name → Enter
Delete: Right-click → Delete → confirm. (Files inside will move to the default “Uncategorized” area; you can reassign them later.)
Searching Folder Names
Whether in the main WP media library screen or in the upload modal, the instant search function is always at your disposal! Here’s how to make use of this search power:
- At the top of the FileBird panel is a Search box
- Start typing, and the folder name results appear instantly
- Click a search result to jump directly to that folder and its contents
Above are just several popular actions to help you overcome the frustrations related to media library clutter.
With FileBird’s intuitive folder tree, you’ll spend less time hunting for media and more time creating. That’s exactly why FileBird was born: to rescue your workflow!
Next Up: smart context menu, cloud storage integration, tips for naming conventions, color-coding your folders, and enhancing SEO effectiveness with categories! 💪
Making Media Folders Work Better for You (Beyond Just Looking Tidy!)
More than being organized, your WordPress media library is now ready for its upcoming tasks, which can feel overwhelming without FileBird!
Let’s dive into the pro tips to help you make the most of FileBird’s advanced features.
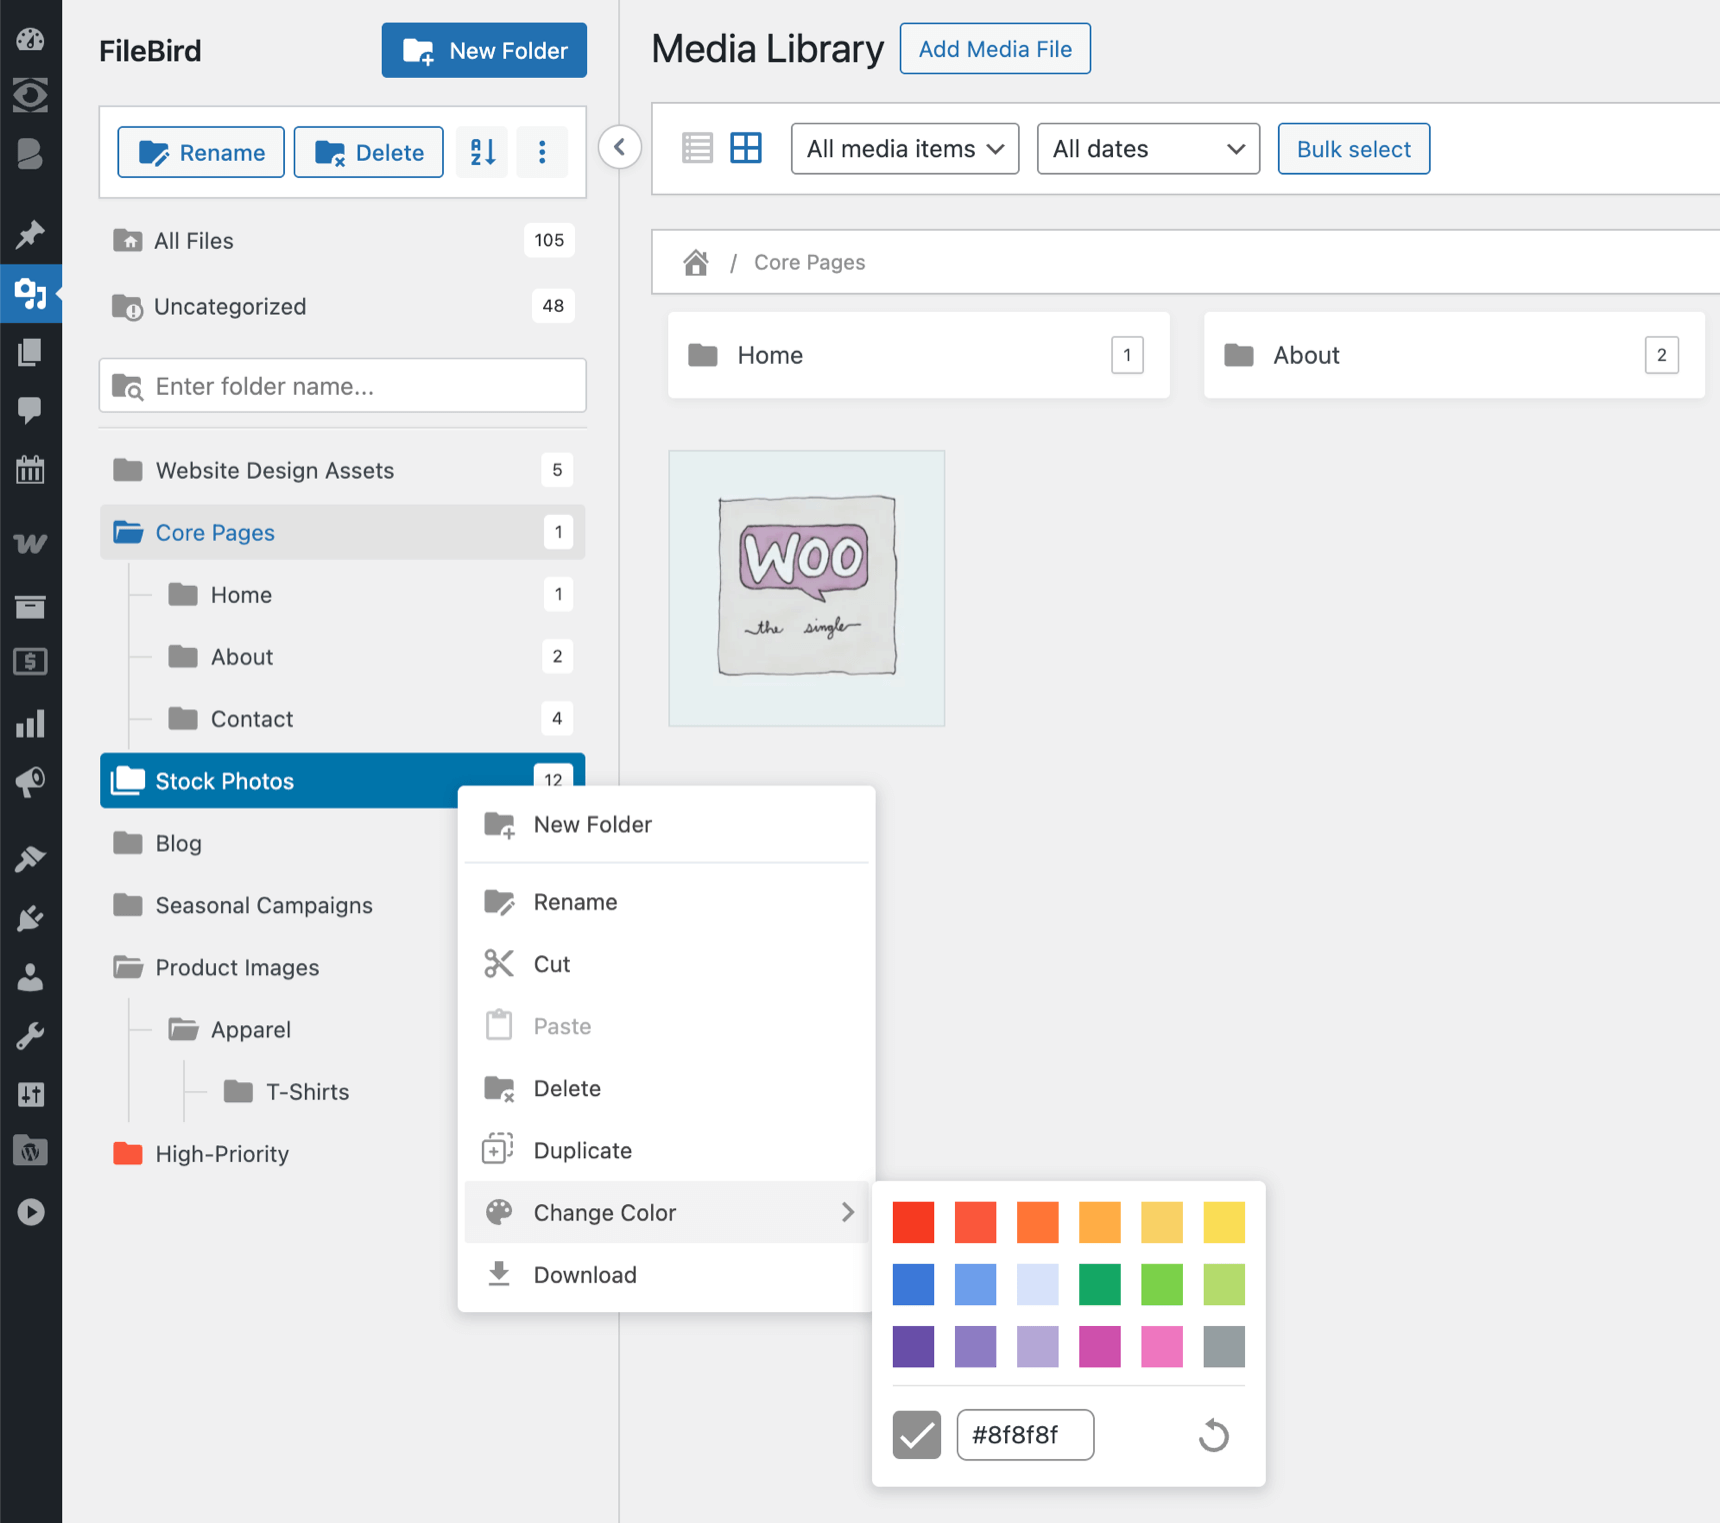
Smart Context Menu
FileBird comes with a smart context menu! For those who are not clear about it, smart context menu is a right-click menu that adapts its options based on the selected item.
This option is not provided in those plugins like Real Media Library, or Media Library Organizer by Optimole.
Thanks to FileBird’s smart context menu, it takes only a single click to:
- Delete, rename, create a folder
- Download an entire media folder
- Color-code a folder with preset color or custom color
Optimize Image Filenames and Alt Text
You might wonder, how to reinforce good SEO practices with folders?
A well‑organized folder structure doesn’t just speed up your workflow, it turbocharges your SEO. By grouping images into topic‑specific folders, you can instantly spot files that need better names or missing alt text.
Imagine opening a folder called “best hair extension salon.” Instantly, you’re in the right mindset to audit and improve every image’s filename and alt attribute, boosting your chances to rank in that exact search.
Color-Coded Folders and Folder Tree Theme Skins
Not only color-coded folders, you can make use of FileBird’s folder theme skins and turn your media library into a practical “Folder-ella.”
Here’s how it works.
Firstly, instead of gray folder icons from material design, you can now switch your folder skin between Windows 11 and Dropbox styles.
Then, start color-coding special folders. Those setups used by most clients and web agencies are common folders like Quick Access (most frequently used files) and Reuse Assets (consistent branded banners and logos).
Imagine, without such common folders, your WordPress site will host the same media with different file sizes, dimensions, and versions!
Been there, done that. This is not a site-specific case, especially in multi-author blogs, where every author has the right to upload images to their own articles. And more often than not, they upload duplicate files whenever they post an article with a topic similar to those previously published!
By combining theme skins with strategic color‑coding, FileBird lets you build a visual hierarchy in your Media Library. So every asset is exactly where you need it, and reflects the consistent branding of your website.
Oh, I almost forgot. To be truly effective, we cannot overlook standard naming practices!
Tips for Naming Conventions
Creating a folder is super easy.
Creating a system of folders that everyone can be familiar with and use without any mix‑ups is challenging.
Although there isn’t a one-size-fits-all naming convention, here are the top tips we’ve collected from our website agencies and ecommerce store owners.
From top down, we often have these primary folders:
Website Design Assets
Needless to say, this should be the first and foremost folder you create. Site identity’s images and videos related to your branding should stay here.
Static Pages/Core Pages
Here, the nested folders can be “Home,” “About Us,” and “Contact Us” as these contents don’t change frequently. And once you need to revamp or replace their media, they also often go together.
Stock Photos
These are generic assets that can be used repeatedly in multiple articles or web pages. Trust me, you don’t want to have 10x version of a photo of “Woman holding a coffee next to a working desk” in every folder of each blog post title.
Optionally, you can nest a “Paid Photos” folder for paid imagery, plus a “Freebies” folder for royalty-free images to ensure correct image credit practices.
Blog Post Assets
Keep all featured images, infographics and charts in a “Blog Graphics” subfolder. Then add more sub‑folders by post title or article slug.
Organizing post titles by publish month, or adding publish month as prefix to folder name, is also a great idea for even finer organization. If you aim to revamp articles every 12 months, simply by looking at your folder structure, you can identify which “Month” folders are due for review. For example, in August 2025, you’d be looking to revamp content from August 2024. This strategy can be used in conjunction with folders for pages and posts as well!
Seasonal Campaigns
Create “Holiday Sale,” “Black Friday,” or “Summer Promo” folders, add year prefix, and color‑code by campaign so you never mix up last event’s banners.
Product Images
Separate folders for each product category: “Apparel,” “Electronics,” “Home Goods” so your e‑commerce store managers can quickly grab the right shots.
High‑Priority / Urgent
Last but not least, a bright red “Urgent” folder for time‑sensitive files, so your team will handle those first!
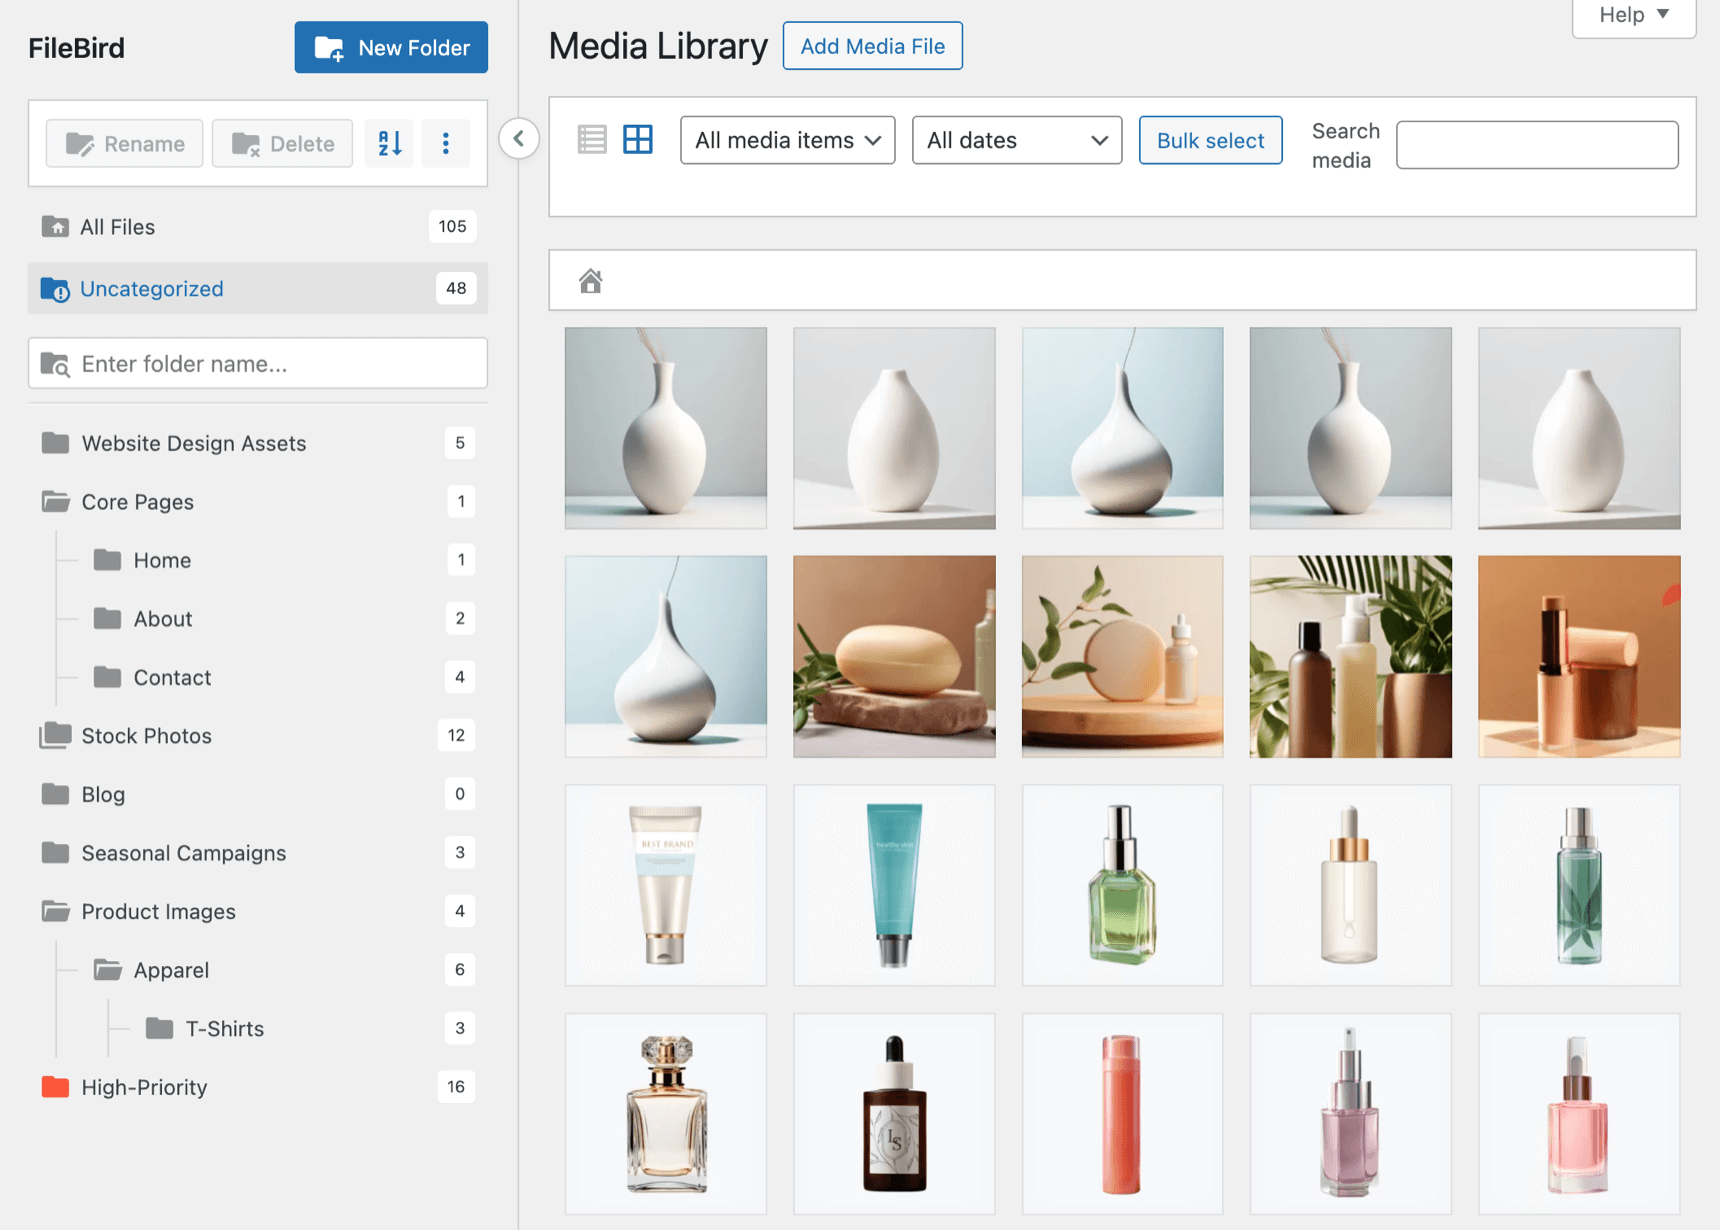
So far, here’s the shared folder tree we have drafted:
- Website Design Assets
- Core Pages
- Stock Photos
- Paid Photos
- Freebies
- Blog Graphics
- 2024 January
- organize-wordpress-media-library-folders (folder for specific post, named by article slug)
- 2025 July
- wordpress-seo-tips (folder for specific post)
- 2024 January
- Seasonal Campaigns
- Product Images
- T-shirts
- High‑Priority / Urgent (color-coded and can be dragged to top for better exposure)
Of course, you can change the folder order to best suit your website’s operations.
Also, extra rules of thumb are:
- Consistency is key. If syntax included, it should be used accordingly by everyone: Vendor Name/Project Name/Product, or Year/Month/Topic (Yes, here you can use the slash (/) in naming a folder!)
- Don’t over-nest, just use three-level folders to refine organization (e.g., Products > Apparel > T-Shirts).
- Schedule periodic cleanups to delete unused files and reorganize.
Sort Media Files by File Size
Speaking of cleanups, FileBird Pro comes up with an innovative tool: Sort by File Size!
Sorting files by size can help you quickly identify large media files that may be taking up unnecessary space.
Here’s how to do it:
- Calculate File Size
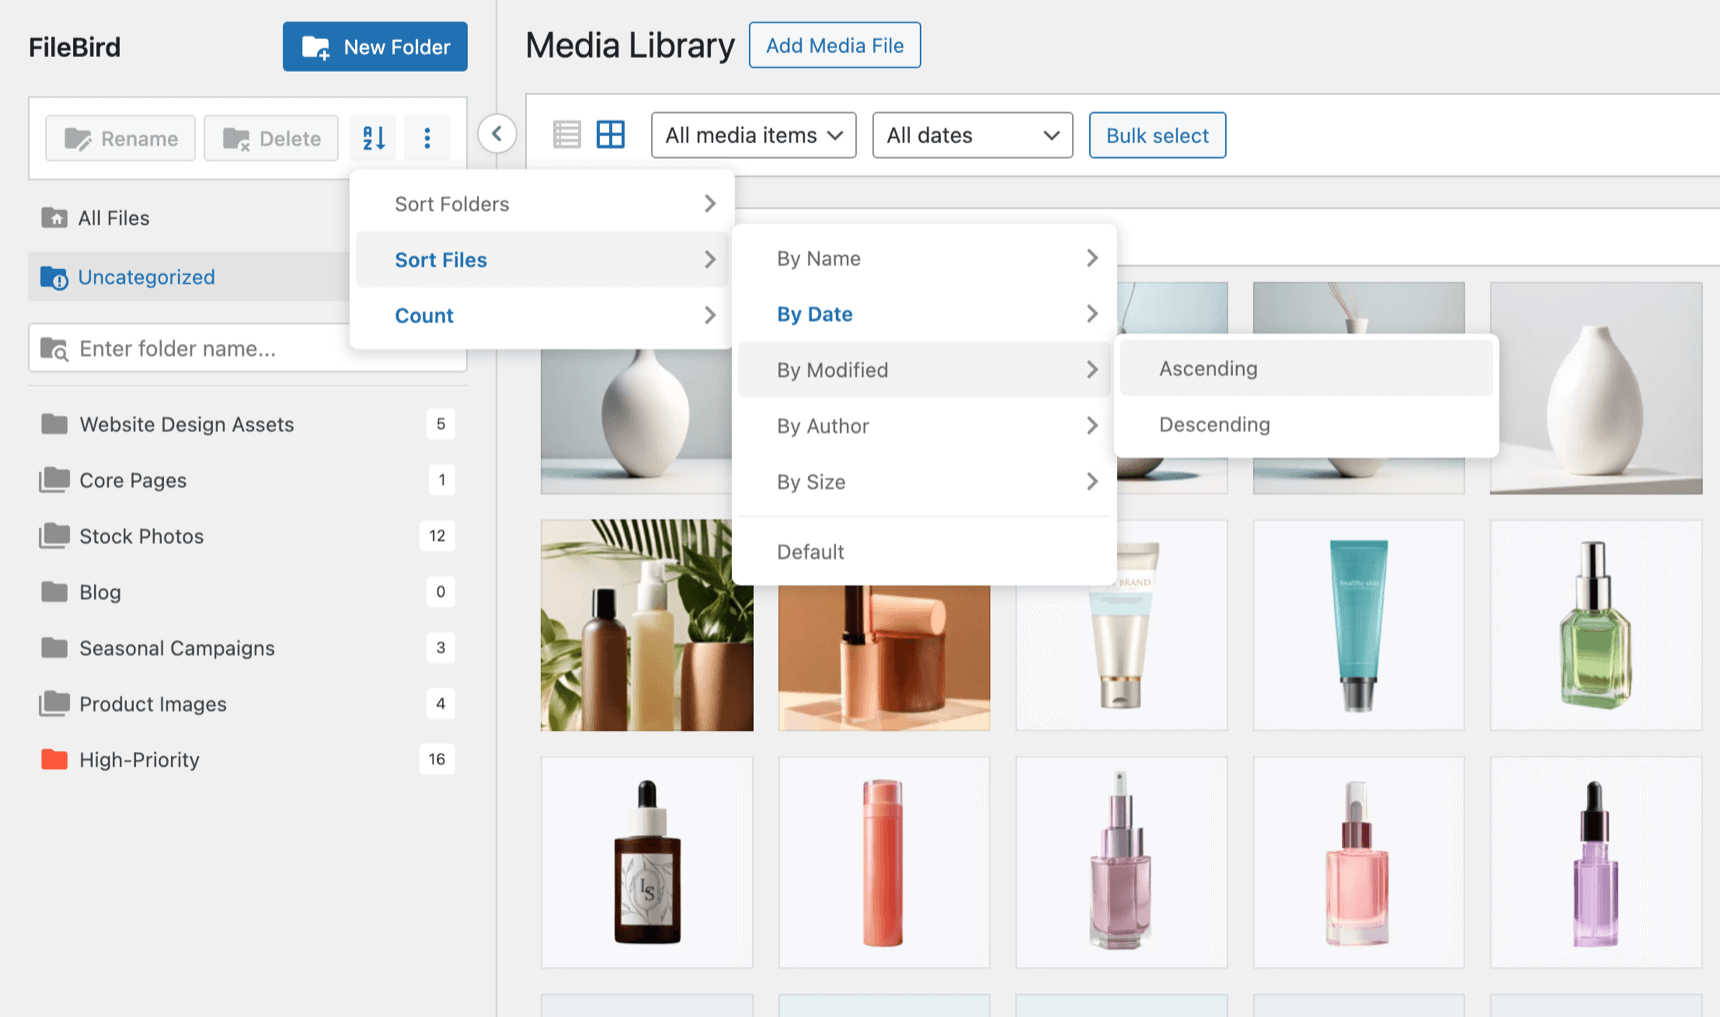
In your WP dashboard, open FileBird Settings > Tools > Attachment Size. Click on the “Calculate File Size” button to scan and generate file size data for all media items. - Sort by File Size
Once the file sizes are calculated, click the Sort icon in the top-right of the folder panel. Then choose Sort Files > “File Size” from the dropdown list.
That’s it! Your files will now be sorted from smallest to largest (or vice versa). From then on, you can easily replace bulky files with optimized, lighter versions.
💡 Tip: This feature is available in FileBird Pro only.
Folders for Pages, Posts, and Custom Post Types
And I haven’t mentioned that FileBird Pro plugin also supports folder tree for pages, posts, and custom post types, have I?
This means your folder structure isn’t limited to just your media files!
TEST DRIVE FILEBIRD PROYou can create a parallel, logical folder structure for WordPress pages, posts, CPTs such as WooCommerce products, coupons, templates, etc.
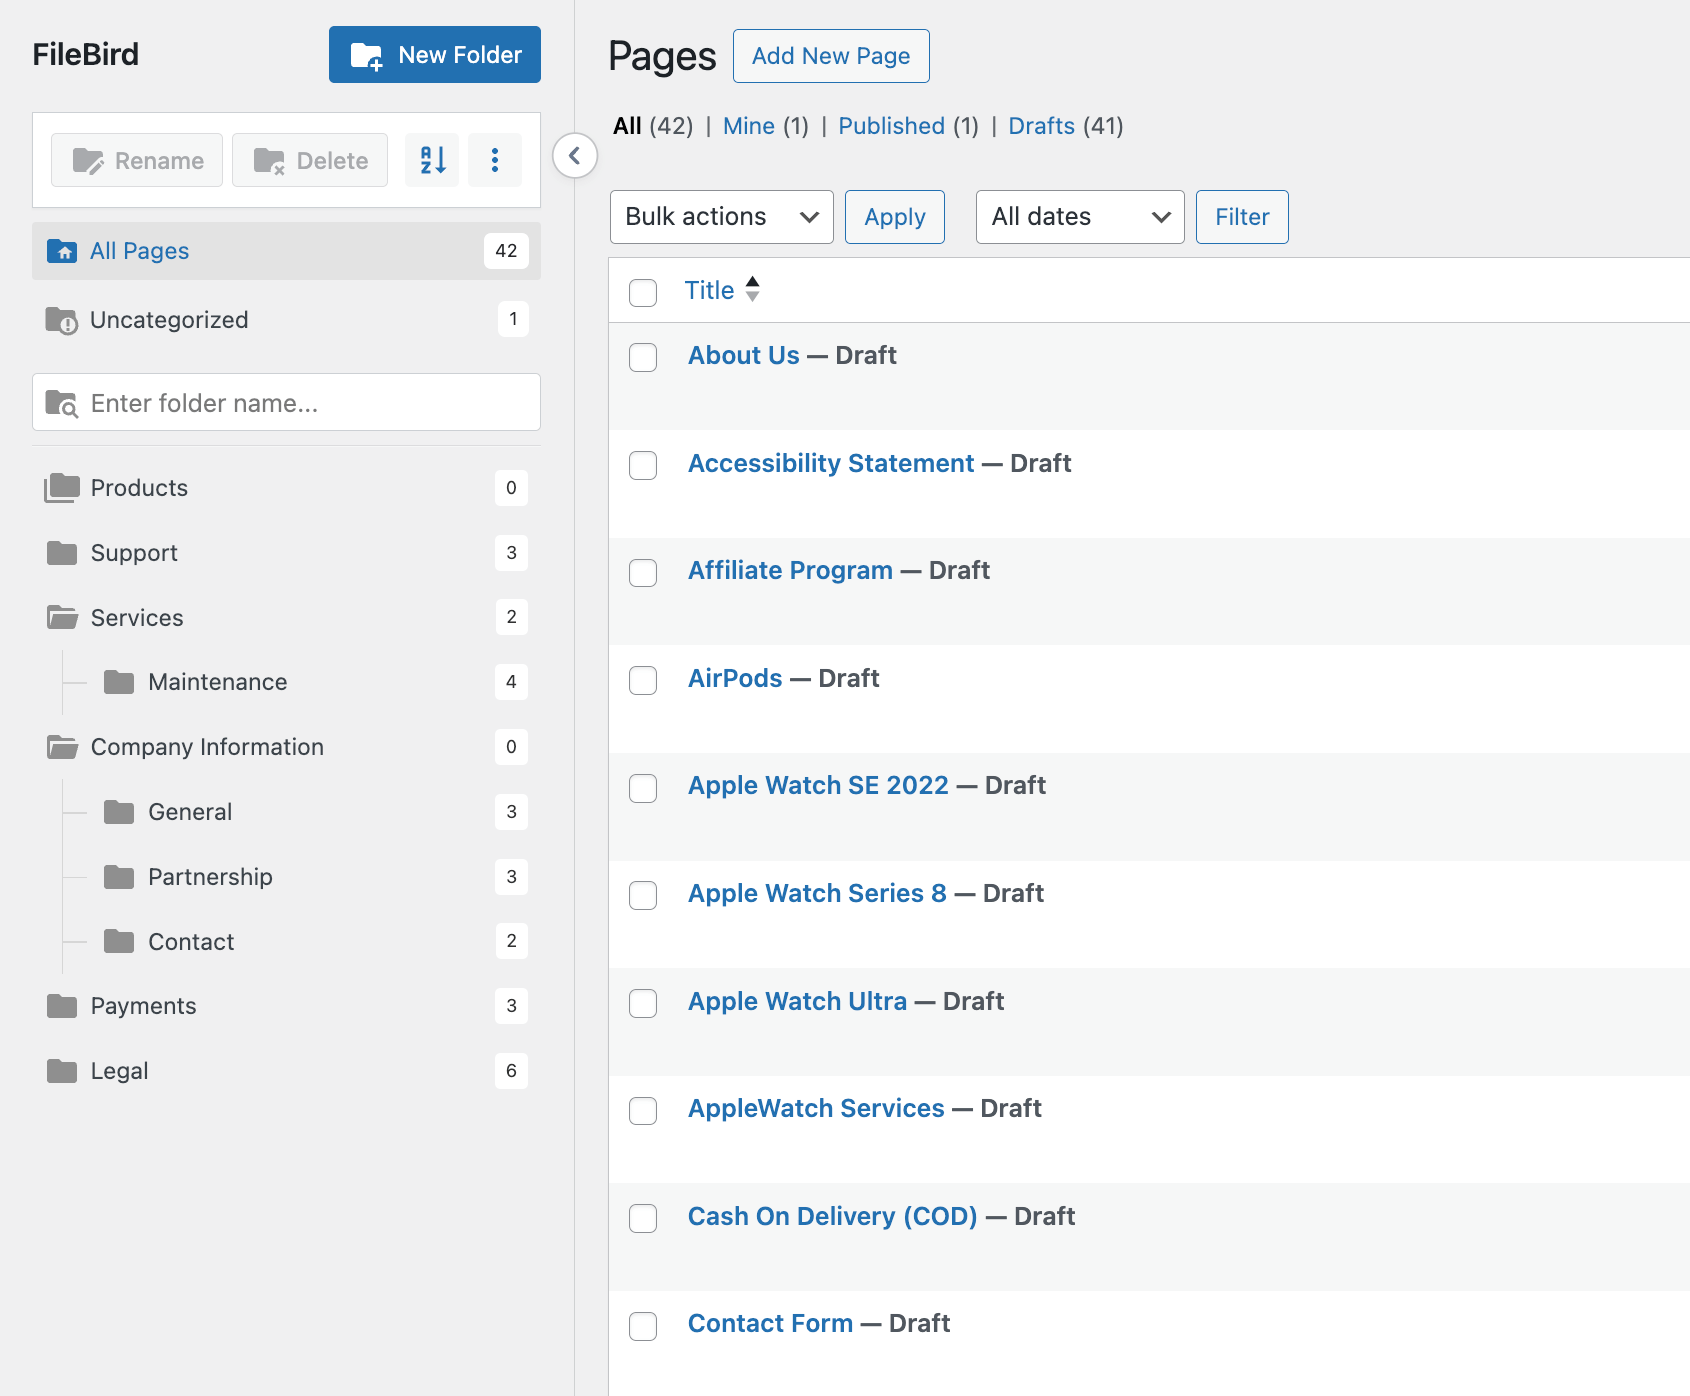
Organize Pages with Folders
Imagine having a “Core Pages” folder for your Home, About, Contact, and Privacy Policy. Then separate folders for “Landing Pages,” “Service Pages,” or “Campaign Pages.”
This becomes invaluable for web agencies and designers managing multiple client pages or for e-commerce owners with numerous static pages like FAQs, shipping info, or return policies.
Organize Posts with Folders
While the media library organization handles the visuals, a mirrored post folder system can help bloggers categorize their articles by topic, series, or even editorial calendar stages (e.g., “Outlined,” “Design Needed,” “Scheduled,” “Published,” “Needs Revamp”).
This provides a bird’s-eye view of your content pipeline directly within the WordPress admin.
Categorize Custom Post Types (CPTs)
This is where e-commerce sites (for products), photographers (for portfolios), and developers/agencies (for custom solutions) truly benefit.
If you use CPTs for “Products,” “Testimonials,” “Team Members,” or “Case Studies,” you can create dedicated folders for these.
Over to You
In this detailed article, we’ve shared our best tips and practices on organizing your WordPress media library. Now it’s time to take action!
Remember, organizing is what you do before you do something, so that when you do it, it is not all mixed up.
FREE DOWNLOADReady to streamline your media management even further? Explore the power of FileBird Cloud! It will help you to keep your external media files structured and easily accessible.
Have we left out any worth-mentioning tips in this article? If so, let us know in the chatbox below.